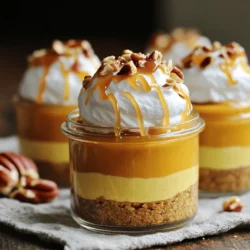
Craving a sweet fall treat that’s quick and simple? Look no further! My No-Bake Pumpkin Cream Pie Cups are just what you need. These delightful, creamy cups bring the cozy flavors of pumpkin spice without the fuss of baking. Perfect for parties or a holiday treat, these cups are sure to impress. Let’s gather our ingredients and whip up some deliciousness together!
Ingredients
To make No-Bake Pumpkin Cream Pie Cups, you need to gather some simple ingredients. Here’s the list you’ll need:
- 1 cup graham cracker crumbs
- 1/4 cup melted butter
- 3 tablespoons brown sugar
- 1 cup canned pumpkin puree
- 1 cup cream cheese, softened
- 1 cup whipped cream or whipped topping
- 1/2 cup powdered sugar
- 1 teaspoon vanilla extract
- 1 teaspoon pumpkin pie spice
- 4 tablespoons caramel sauce (for drizzling)
- Optional: crushed pecans or walnuts for garnish
These ingredients come together to create a delicious dessert. The graham cracker crumbs form a tasty crust that gives a nice crunch. The melted butter and brown sugar help bind the crumbs together.
Canned pumpkin puree adds a warm flavor, while cream cheese makes the filling creamy. Whipped cream or whipped topping lightens the texture. You can sweeten it with powdered sugar and add vanilla extract for depth.
Pumpkin pie spice gives that classic fall taste. The caramel sauce adds sweetness and a beautiful drizzle on top. If you want, you can use crushed pecans or walnuts for a nice crunch.
Gathering these ingredients is the first step to creating your delightful treats!
Step-by-Step Instructions
Preparation of the Crust
- In a mixing bowl, combine:
- 1 cup graham cracker crumbs
- 1/4 cup melted butter
- 3 tablespoons brown sugar
Mix until the crumbs are moist and crumbly. Use a spoon or your fingers to press this mixture into the bottom of your serving cups. This forms the base of your cups. Set them aside while you prepare the filling.
Preparing the Pumpkin Cream Mixture
- In another large bowl, beat:
- 1 cup cream cheese, softened
Do this until it is smooth. Next, mix in:
- 1 cup canned pumpkin puree
- 1/2 cup powdered sugar
- 1 teaspoon vanilla extract
- 1 teaspoon pumpkin pie spice
Blend these ingredients until they are well combined. Then, gently fold in:
- 1 cup whipped cream or whipped topping
This will make the mixture light and fluffy, giving your cups a nice texture.
Assembling and Chilling
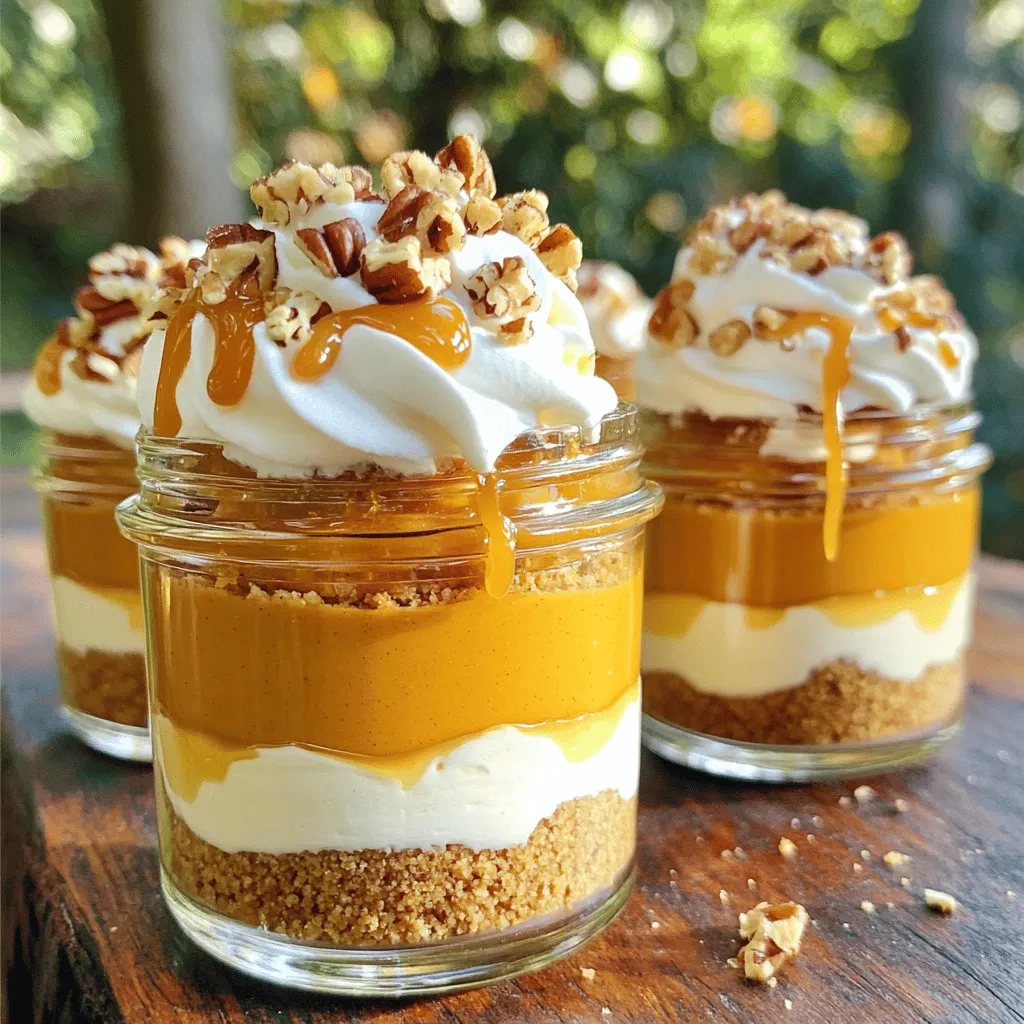
Now, spoon or pipe the pumpkin cream mixture into your cups over the crust. Fill them about three-quarters full. After that, chill the cups in the refrigerator for at least 2 hours. This helps the flavors mix and the cups to set. Before serving, you can drizzle caramel sauce on top. Adding crushed pecans or walnuts gives a nice crunch and flavor.
Tips & Tricks
Achieving the Perfect Texture
To get the best texture for your pumpkin cream pie cups, start with the cream cheese. Make sure it is softened. This step helps it blend smoothly with the other ingredients. If the cream cheese is cold, it will clump and make a lumpy filling.
Next, when you fold in the whipped cream, do it gently. Use a spatula and scoop from the bottom of the bowl. This method helps keep the mixture light and airy. If you stir too hard, you may lose that fluffy texture.
Serving Suggestions
When it comes to toppings, let your creativity shine. You can add more whipped cream on top. A sprinkle of pumpkin pie spice adds a nice touch. For some crunch, consider adding crushed pecans or walnuts. You can also try chocolate shavings for a sweet twist.
Serve the cups chilled. They taste best when they have set in the fridge for at least two hours. Use clear cups or jars to show off the layers. This way, everyone can see the beautiful pumpkin cream filling.
Enhancements for Flavor
You can easily switch up the spices in this recipe. Instead of just pumpkin pie spice, try adding cinnamon or nutmeg. These spices can boost the flavor and give it a unique twist.
If you want to change the caramel sauce, consider using chocolate sauce instead. A drizzle of maple syrup can also add a sweet touch. Experiment with different flavors to find your favorite!
Variations
Alternative Crust Options
You can switch up the crust for your No-Bake Pumpkin Cream Pie Cups. Here are some fun ideas:
- Using chocolate cookies: For a rich twist, use crushed chocolate cookies. They add a deep flavor that pairs well with pumpkin. Just mix the crumbs with melted butter, like you do with graham crackers.
- Gluten-free graham cracker alternative: If you need a gluten-free option, try almond flour or gluten-free cookies. These options give a nice texture while being safe for those with gluten sensitivities.
Flavor Variants
Feel free to get creative with flavors. Here are two tasty options:
- Adding chocolate or caramel layer: You can add a layer of chocolate pudding or caramel sauce between the crust and pumpkin cream. This adds richness and a surprise element to every bite.
- Incorporating different spices: While pumpkin pie spice is great, you can use nutmeg or allspice for a different taste. A pinch of cinnamon or ginger can also give it a warm kick.
Dietary Adjustments
You can easily adapt this recipe for different diets. Here’s how:
- Vegan versions of the recipe: To make it vegan, swap cream cheese with a vegan cream cheese. Use coconut whipped cream instead of regular whipped cream. This keeps it creamy and delicious.
- Low-sugar adaptations: For a low-sugar option, use a sugar substitute like stevia or monk fruit. You can also reduce the powdered sugar in the cream mixture. This way, you can enjoy your dessert without too much sugar.
Storage Info
Short-term Storage
To keep your no-bake pumpkin cream pie cups fresh, place them in the refrigerator. Use airtight containers to prevent odors from mixing. Glass jars or plastic containers work well. Make sure to cover the cups tightly with a lid or plastic wrap.
Long-term Storage Tips
If you want to save some for later, you can freeze the pumpkin cream cups. First, chill them in the fridge for at least two hours. Then, wrap each cup in plastic wrap and place them in a freezer-safe bag. When you’re ready to eat, let them thaw in the fridge overnight. Do not refreeze after thawing.
Shelf Life
In the fridge, these cups stay fresh for about 3-4 days. If frozen, they can last for about 1-2 months. However, for the best taste and texture, enjoy them within a month. Always check for any change in smell or texture before eating.
FAQs
Can I make these cups in advance?
Yes, you can make these cups ahead of time. I suggest making them a day before you plan to serve. This gives the flavors time to blend and the cups can chill properly. Just cover them tightly with plastic wrap. They will stay fresh in the fridge for about three days.
How do I know if the whipped cream is folded correctly?
You will know it’s folded correctly when the mixture looks light and fluffy. Gently mix the whipped cream in with the pumpkin cream. Use a spatula and fold the whipped cream in, making sure not to stir too hard. If you see streaks of whipped cream, keep folding until it looks smooth.
What can I use instead of cream cheese?
If you want to skip cream cheese, try using Greek yogurt. It gives a nice creamy texture and adds a little tang. You could also use mascarpone cheese for a rich taste. Just make sure you keep the same amount.
Can I substitute fresh pumpkin for canned?
Yes, you can use fresh pumpkin instead of canned. Just cook and puree the pumpkin until smooth. Use the same amount as the canned version, which is one cup. Make sure to drain any excess water from the fresh pumpkin to keep your cups from getting too wet.
In this article, we explored how to make delicious pumpkin cream cups. We covered the key ingredients, step-by-step instructions, and tips for great texture. I shared variations for crusts and flavors, plus storage tips to keep them fresh. Remember, you can customize this recipe to your taste. Enjoy these treats at gatherings or as a sweet snack. With this guide, you now have all you need to impress friends and family with your pumpkin dessert skills. Dig in, and have fun making these delightful cups!