Looking for a quick and easy treat that combines the flavors of fall? You’re in the right place! These Chocolate Pumpkin Cheesecake Truffles are a no-bake delight, perfect for any occasion. With just a few simple ingredients like pumpkin puree, cream cheese, and chocolate chips, you can whip up a batch in no time. Read on to discover how to make these delicious bites that everyone will love!
Ingredients
To make Chocolate Pumpkin Cheesecake Truffles, you need fresh and simple ingredients. Here’s what you will need:
- 1 cup pumpkin puree
- 8 oz cream cheese, softened
- 1/2 cup powdered sugar
- 1 tsp vanilla extract
- 1/2 tsp cinnamon
- 1/4 tsp nutmeg
- 1/4 tsp ginger
- 1 cup chocolate chips (dark or semi-sweet)
- 1/2 cup graham cracker crumbs
- Pinch of salt
Each ingredient adds its own magic to the truffles. The pumpkin puree gives a smooth and creamy texture. Cream cheese adds richness, while powdered sugar sweetens the mix.
Spices like cinnamon, nutmeg, and ginger bring warmth and depth, making each bite special. You can choose dark or semi-sweet chocolate chips to coat the truffles, adding a rich chocolate flavor.
Lastly, graham cracker crumbs add a nice crunch. This mix creates a treat that is both tasty and fun to eat.
Step-by-Step Instructions
Preparation Steps
First, grab a large mixing bowl. In this bowl, mix 8 oz of softened cream cheese with 1 cup of pumpkin puree. Use an electric mixer to beat them together. You want a smooth and creamy texture. Next, add 1/2 cup of powdered sugar, 1 tsp of vanilla extract, 1/2 tsp of cinnamon, 1/4 tsp of nutmeg, and 1/4 tsp of ginger. Don’t forget a pinch of salt to enhance the flavors. Mix it all thoroughly until you have a smooth filling.
Now, cover the bowl with plastic wrap. Place it in the fridge for about 1 hour. This chilling helps the mixture firm up, making it easier to shape later on.
Forming Truffles
Once the mixture is chilled, it’s time to shape the truffles. Use a small cookie scoop or your hands to form balls. Aim for about 1 inch in diameter. Place each ball on a baking sheet lined with parchment paper. After shaping all the truffles, freeze them for about 30 minutes. This step ensures they become firm and hold their shape when dipped in chocolate.
Coating Truffles
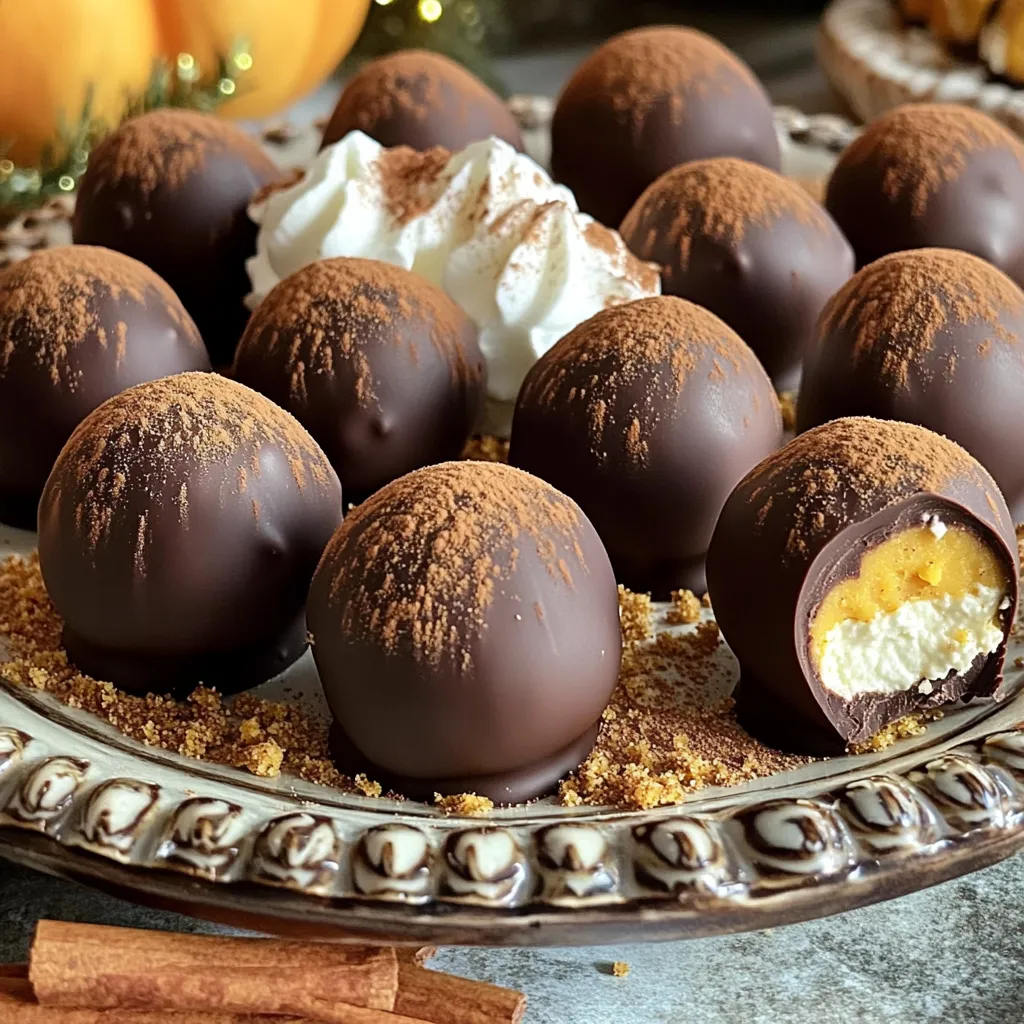
While the truffles freeze, melt 1 cup of chocolate chips in a microwave-safe bowl. Heat them in 30-second intervals, stirring after each interval until smooth. When the chocolate is ready, take the truffles out of the freezer. Quickly dip each truffle into the melted chocolate. Use a fork to help coat them evenly. Let any excess chocolate drip off before moving to the next step.
Finally, roll the dipped truffles in 1/2 cup of graham cracker crumbs. This adds a nice crunch and flavor. Place the coated truffles back on the parchment-lined baking sheet. Refrigerate them for about 15-20 minutes, or until the chocolate sets completely. Enjoy your delicious creations!
Tips & Tricks
Perfecting the Texture
To get the right firmness for your truffles, chill the mixture well. After mixing, cover the bowl and refrigerate for one hour. This step helps the truffles hold their shape. When combining ingredients, use an electric mixer. Beat the cream cheese and pumpkin until smooth. Then, slowly add the powdered sugar and spices. This method ensures a creamy and well-blended filling.
Efficient Chocolate Dipping
For a smooth chocolate coating, melt chocolate chips carefully. Use a microwave-safe bowl and heat in 30-second intervals. Stir between each heating to avoid burning. A fork works great for dipping the truffles. It helps to cover them evenly. Allow excess chocolate to drip back into the bowl. This keeps the coating neat and prevents clumps.
Presentation Ideas
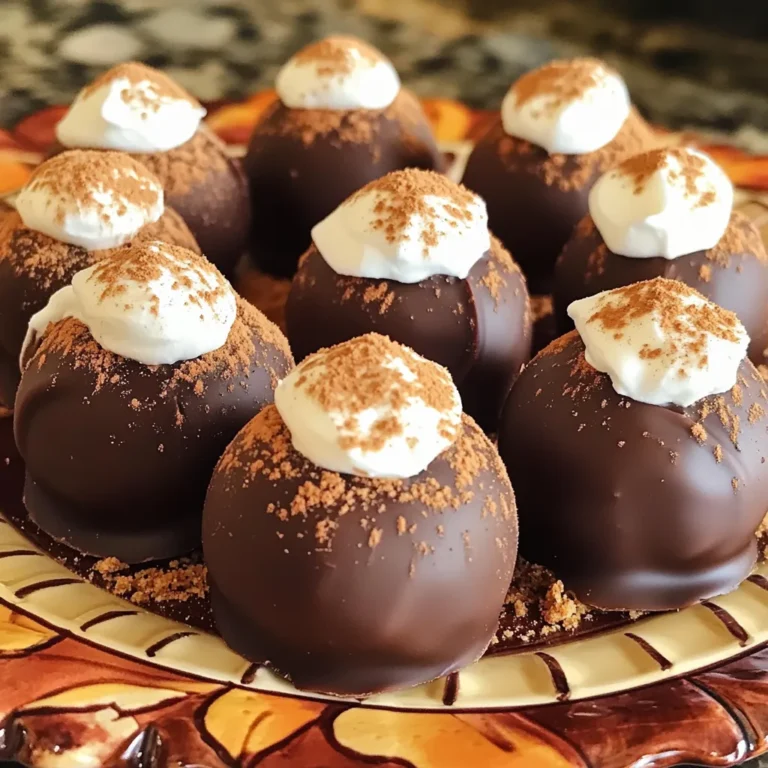
When serving the truffles, arrange them on a nice platter. Sprinkle extra graham cracker crumbs around them for a festive look. You can also top them with a small dollop of whipped cream. A sprinkle of cinnamon adds a nice touch and mimics cheesecake. This way, your truffles look as good as they taste!
Variations
Flavor Alternatives
You can change up the flavor of your truffles in fun ways. One great option is using a white chocolate coating instead of dark or semi-sweet chocolate. This gives a nice contrast to the pumpkin flavor. You can also add flavor extracts, like almond or orange, to the cream cheese mixture. Just a few drops can make a big difference! Using different spices can also help. Try adding a pinch of allspice or cloves for a warm twist.
Dietary Adjustments
If you want vegan truffles, swap cream cheese for a vegan cream cheese. Use maple syrup in place of powdered sugar for sweetness. For a gluten-free version, just use gluten-free graham cracker crumbs. It’s easy to make these treats fit your needs!
Seasonal Inspirations
These truffles can fit any season. For the holidays, try adding peppermint extract for a festive flavor. You can also customize them for special occasions by rolling them in colored sprinkles or even crushed nuts. The options are endless!
Storage Info
Best Practices for Storage
To keep your truffles fresh, store them in the refrigerator. Place them in an airtight container. This keeps moisture out and helps them stay tasty. You can also layer parchment paper between truffles to avoid sticking.
If you want to store them for a longer time, freezing is best. Place the truffles on a baking sheet lined with parchment paper. Freeze them until firm, then transfer them to a freezer-safe bag. This helps keep the flavor and texture.
Shelf Life
When stored properly, these truffles can last about one week in the fridge. They stay fresh and tasty, but you may notice changes over time. If you see any discoloration, smell an off odor, or find a change in texture, it’s best to throw them away.
Reheating and Serving
These truffles taste best when served chilled. Just take them out of the fridge right before serving. If you freeze them, let them thaw in the fridge for a few hours before serving. This keeps them smooth and creamy, just like when you first made them.
FAQs
How long do Chocolate Pumpkin Cheesecake Truffles last?
Chocolate Pumpkin Cheesecake Truffles can last up to one week in the fridge. Store them in an airtight container to keep them fresh. If you want to keep them longer, you can freeze them. They will stay good in the freezer for about three months. Just make sure to wrap them well to avoid freezer burn.
Can I use fresh pumpkin instead of canned?
Yes, you can use fresh pumpkin. Fresh pumpkin gives a more vibrant flavor and texture. However, it requires more prep time. You need to roast or steam the pumpkin first, then puree it. Canned pumpkin is convenient and saves time, but it may be less fresh in taste. Both options work well, depending on your preference.
What can I substitute for cream cheese?
If you need a substitute for cream cheese, you can use Greek yogurt or mascarpone cheese. Greek yogurt makes the truffles lighter and adds some tanginess. Mascarpone cheese gives a rich and creamy texture similar to cream cheese. You can also try vegan cream cheese for a dairy-free option.
Are these truffles suitable for a gluten-free diet?
Yes, these truffles can fit a gluten-free diet. Just make sure to use gluten-free graham cracker crumbs. Many brands offer gluten-free options that taste great. The other ingredients, like pumpkin and cream cheese, are naturally gluten-free. Always check labels to ensure your ingredients are safe.
In this post, we explored how to make delicious Chocolate Pumpkin Cheesecake Truffles. We covered key ingredients, detailed steps for preparation and forming, and tips for perfecting texture and coating. You learned about creative variations and essential storage tips. Now you have all the tools to create these tasty treats. Enjoy experimenting and sharing your truffles with friends and family. They will love the blend of pumpkin, cream cheese, and chocolate. Happy truffle making!

