Looking for the perfect snack that’s both easy and delicious? You’ve found it! Cheesy Taco Sticks combine crispy dough with flavorful meat and gooey cheese for a tasty treat. In just a few simple steps, you can whip up these fun bites that are great for parties or a quick weeknight dinner. Let’s dive into the ingredients and get started on making this satisfying snack!
Why I Love This Recipe
- Quick to Make: These cheesy taco sticks can be prepared in just 15 minutes, making them a perfect option for busy weeknights or last-minute gatherings.
- Versatile Filling: You can customize the filling with your favorite ingredients, whether it’s beef, turkey, or even a vegetarian option, making it adaptable to any dietary preference.
- Kid-Friendly: The fun shape and cheesy flavor make these taco sticks a hit among kids, ensuring that mealtime is enjoyable for the whole family.
- Perfect for Dipping: Served warm with sour cream and salsa, these cheesy taco sticks are an irresistible treat that adds an element of fun to any meal or snack time.
Ingredients
Main Ingredients Needed
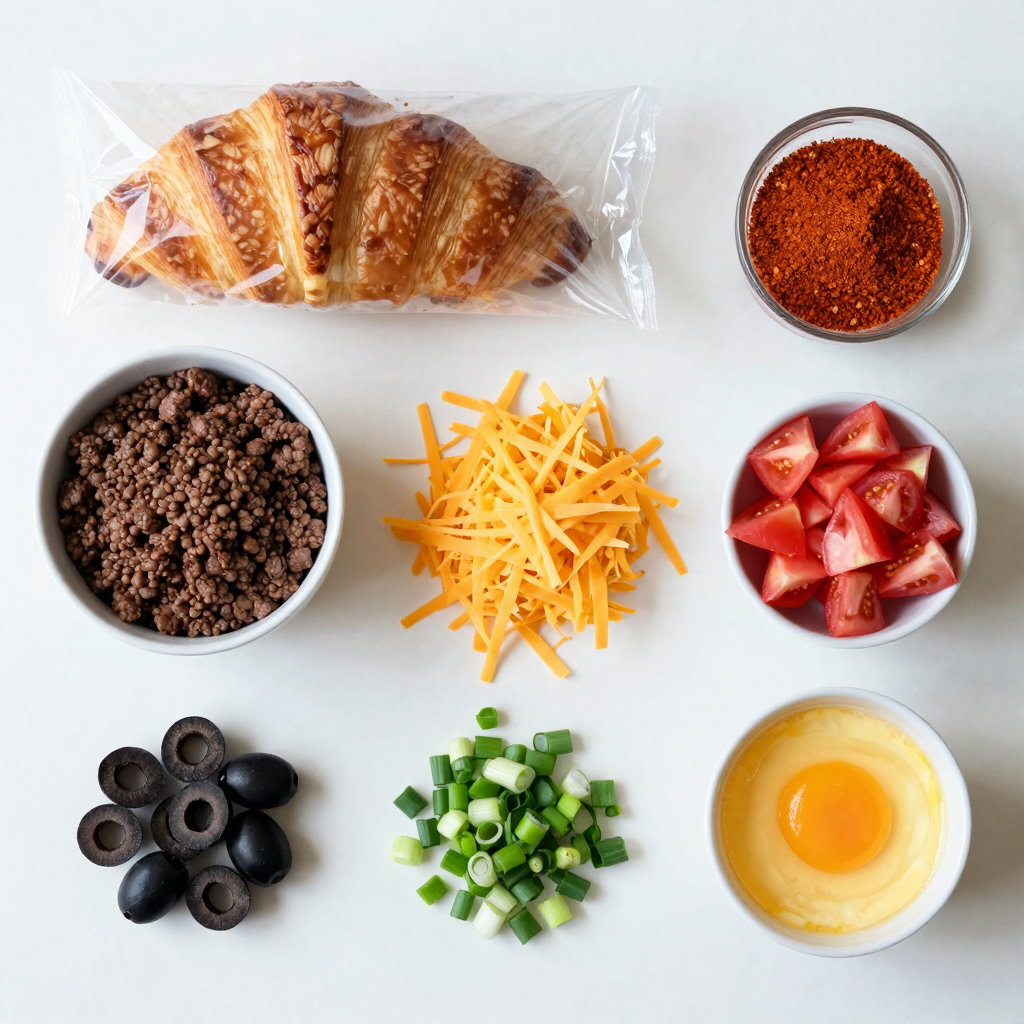
– Refrigerated crescent roll dough
– Cooked ground beef or turkey
– Shredded cheddar cheese
The base of your cheesy taco sticks is simple. Start with refrigerated crescent roll dough. This dough gives a flaky, buttery taste. Next, use cooked ground beef or turkey. I like ground turkey for a leaner option. Finally, add shredded cheddar cheese for that melty goodness. It binds all the flavors together.
Additional Flavor Enhancers
– Taco seasoning
– Diced tomatoes
– Optional toppings: black olives, green onions
To kick up the flavor, use taco seasoning. You can buy it or make your own. Diced tomatoes add a fresh touch. If you love extra flavor, consider black olives or chopped green onions on top. They add color and taste.
Cooking Essentials
– Egg for egg wash
– Serving accompaniments: sour cream and salsa
Do not forget the egg! It gives a nice golden color to your sticks. For serving, have sour cream and salsa on the side. They make great dips that enhance the cheesy taco sticks.
This simple ingredient list makes it easy to whip up this snack.
Step-by-Step Instructions
Prepping the Oven and Ingredients
First, you need to preheat your oven to 375°F (190°C). This helps the cheesy taco sticks cook evenly. While the oven heats, cook your ground beef or turkey in a skillet over medium heat. Make sure it’s fully browned. After that, drain any extra fat from the meat. Then, stir in your taco seasoning. You can use store-bought or make your own. Add in diced tomatoes and black olives if you like. Cook this mixture for another 2-3 minutes until it’s nice and warm. Set the meat aside to cool a bit.
Assembling the Cheesy Taco Sticks
Next, unroll your crescent roll dough. Separate it into four rectangles. If the seams split, just press them together to seal. Now, take a spoonful of your meat mixture and place it in the center of each rectangle. Sprinkle some shredded cheddar cheese on top. You can add a few chopped green onions too. Fold the dough over the filling to make a stick shape. Make sure to pinch the edges well so the filling stays inside.
Baking Instructions
Now, place your cheesy taco sticks on a baking sheet lined with parchment paper. In a small bowl, beat your egg. Brush the egg wash over the top of each stick. This gives them a golden-brown finish. Bake in your preheated oven for 12-15 minutes. Watch for a nice golden color. When they look perfect, take them out and let them cool a bit before serving.
Pro Tips
- Use Fresh Ingredients: Opt for fresh tomatoes and green onions for a brighter flavor and better texture in your cheesy taco sticks.
- Customize Your Filling: Feel free to add extra ingredients like bell peppers, corn, or jalapeños to your meat mixture for added flavor and crunch.
- Serve with Dipping Sauces: Enhance the experience by offering a variety of dipping sauces, such as guacamole or a spicy salsa.
- Experiment with Cheeses: Try different types of cheese, like pepper jack or mozzarella, for a unique twist on the classic cheesy taco sticks.
Tips & Tricks
Cooking Techniques for Perfection
To get a crispy texture, here are some key tips:
– Preheat your oven well before baking. This helps make the dough rise and crisp.
– Use parchment paper on your baking sheet. This prevents sticking and promotes even cooking.
Ensure even cooking by:
– Spacing the cheesy taco sticks apart on the sheet. This allows heat to circulate properly.
– Rotating the baking sheet halfway through baking. This helps with consistent browning.
Customization Suggestions
You can easily make these taco sticks your own. Here are some ideas:
– Try different types of cheese. Pepper jack adds a spicy kick, while mozzarella gives a gooey texture.
– Add vegetables for nutrition. Bell peppers, spinach, or corn can make them healthier and tastier.
Presentation Tips
How you serve your taco sticks matters. Here are some fun ideas:
– Arrange the cheesy taco sticks on a colorful platter. It makes them look more inviting.
– Serve with bowls of sour cream and salsa. This adds flavor and a fun dipping experience.
– Garnish with extra green onions for a pop of color. It makes your dish look fresh and appealing.
Variations
Alternative Protein Options
You can easily switch up the meat in cheesy taco sticks. Try using cooked chicken instead of beef. Shredded rotisserie chicken works great. For a plant-based option, use lentils or black beans. They add protein and flavor. You can also mix in some corn for extra texture. If you want a vegetarian filling, use diced bell peppers, mushrooms, and spices. This way, everyone can enjoy these tasty snacks.
Creative Flavor Combos
Getting creative with flavors can make cheesy taco sticks even better. Try different seasoning blends like cumin, paprika, or chili powder. These spices bring a unique taste to your dish. You can also mix in different cheeses. Pepper jack gives a spicy kick, while mozzarella adds a gooey texture. Experiment with your favorite cheese combinations to discover a new twist on this classic snack.
Different Dipping Sauces
Dipping sauces can elevate your cheesy taco sticks. You can make a simple homemade sauce by mixing sour cream with lime juice and cilantro. This adds freshness. Salsa is another great choice. It pairs well with the cheesy flavors. For those in a hurry, store-bought options like ranch or guacamole work too. These sauces enhance the taste and make your snack more fun.
Storage Info
Proper Storage Methods
To keep your cheesy taco sticks fresh, store leftovers in an airtight container. This helps seal in moisture and flavor. You can use glass or plastic containers. Make sure to let them cool to room temperature first. This prevents condensation, which can make them soggy.
Reheating Guidelines
When you reheat cheesy taco sticks, aim for a crispy texture. The best way is to use an oven. Preheat your oven to 350°F (175°C). Place the sticks on a baking sheet and heat for about 10 minutes. This method helps regain their crunch. You can also use a microwave, but it may not keep them crispy. If you use a microwave, heat them in short bursts and check often.
Freezing Instructions
To freeze cheesy taco sticks, wrap each stick in plastic wrap. Then place them in a freezer-safe bag. This keeps them fresh for up to three months. When you’re ready to eat, thaw them in the fridge overnight. For reheating, use the oven method mentioned earlier. This ensures they come out hot and crispy again. Enjoy your cheesy taco sticks anytime!
FAQs
How long do Cheesy Taco Sticks last in the fridge?
Cheesy taco sticks can last about 3-4 days in the fridge. To keep them fresh, store them in an airtight container. If you want to keep them longer, you can freeze them. Just remember that they taste best when eaten fresh!
Can I make Cheesy Taco Sticks in advance?
Yes, you can prepare cheesy taco sticks ahead of time. Assemble the sticks, but don’t bake them yet. Cover them well and place them in the fridge. When you are ready to eat, just bake them straight from the fridge. This makes for a quick snack or meal!
What are some popular variations of Cheesy Taco Sticks?
You can get creative with cheesy taco sticks! Some popular variations include:
– Using chicken or turkey instead of beef.
– Adding roasted peppers or corn for extra flavor.
– Trying different cheeses like pepper jack for a spicy kick.
– Making a vegetarian version with beans and veggies.
These twists keep things fun and tasty!
How can I make these Cheesy Taco Sticks spicier?
To spice up your cheesy taco sticks, try these tips:
– Add diced jalapeños to the meat mixture.
– Use spicy taco seasoning instead of mild.
– Mix in some hot sauce before filling the dough.
– Serve with a spicy salsa on the side.
These changes will bring the heat you crave!
Cheesy taco sticks are a fun and simple dish. We combined crescent roll dough, tasty meat, and cheddar cheese. Enhance your meal with taco seasoning and fresh toppings. Follow the steps to bake them perfectly golden. Don’t forget the tips for customizing flavors and serving. Store and reheat your leftovers for later enjoyment. With all these ideas, you can enjoy a tasty treat anytime. Now, get cooking and enjoy your masterpiece!