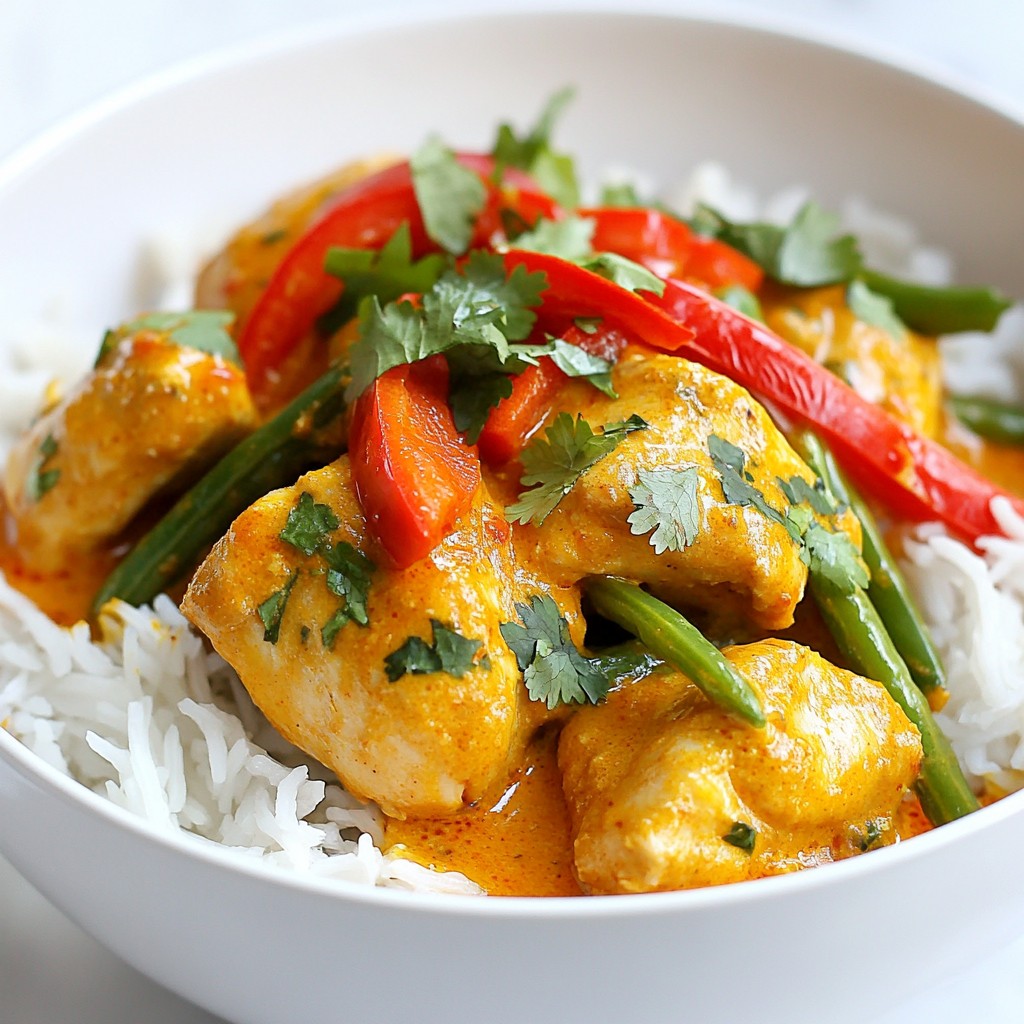
Get ready to spice up your dinner with my Spicy Instant Pot Coconut Curry Chicken! This easy recipe combines tender chicken, creamy coconut milk, and zesty flavors for a dish that packs a punch. Whether you're a busy parent or a gourmet enthusiast, this quick and tasty meal promises to delight your taste buds. Let’s dive into the luxurious flavors and simple steps to create your next favorite dish!
Why I Love This Recipe
- Bold Flavors: The combination of red curry paste and coconut milk creates a rich, aromatic sauce that tantalizes the taste buds.
- Quick Preparation: With the Instant Pot, this dish comes together in just 35 minutes, making it perfect for busy weeknights.
- Healthy Ingredients: Packed with protein from chicken and nutrients from vegetables, this curry is both satisfying and nutritious.
- Customizable: You can easily adjust the spice level or swap in your favorite vegetables to make it your own.
Ingredients
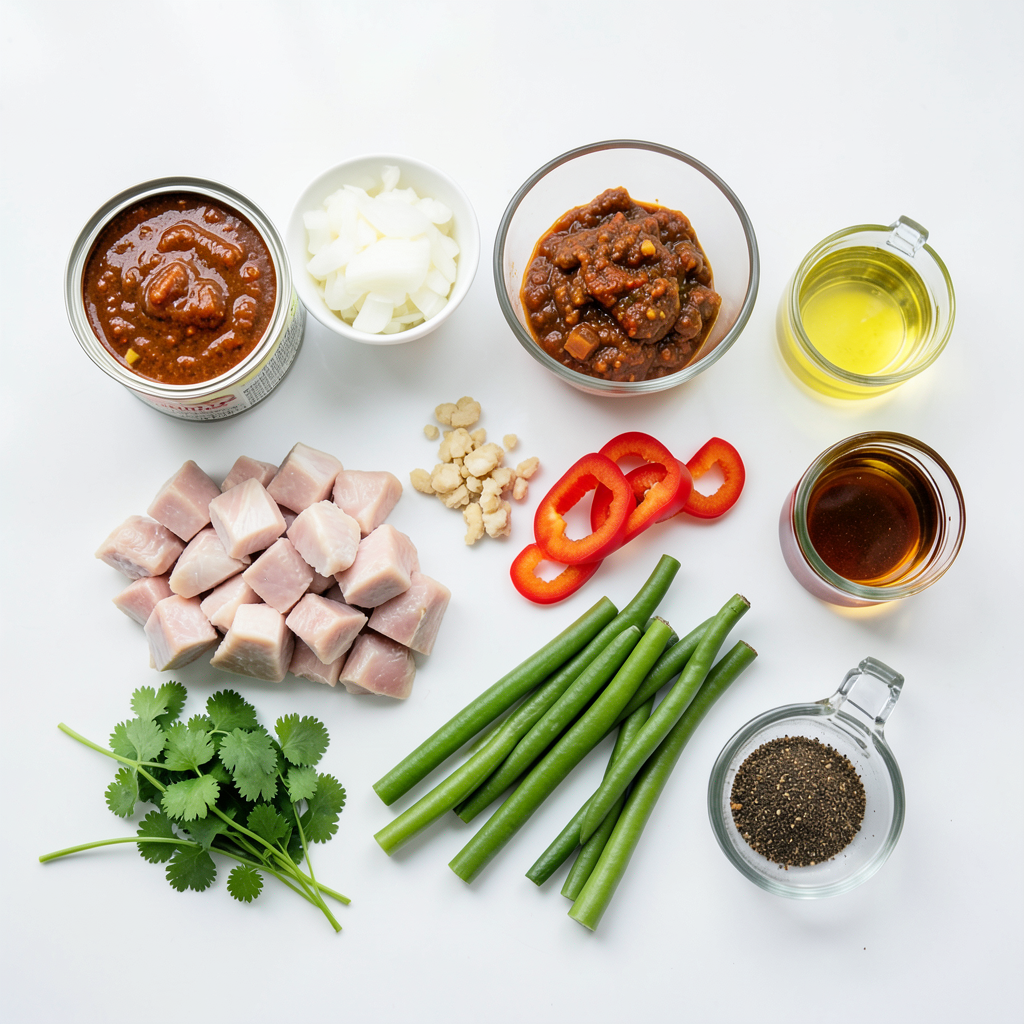
Main Ingredients
- 1.5 lbs boneless, skinless chicken thighs
- 1 can (14 oz) coconut milk
- 2 tablespoons red curry paste
Additional Ingredients
- 1 onion, diced
- 3 cloves garlic, minced
- 1 tablespoon ginger, minced
- 1 red bell pepper, sliced
- 1 cup green beans, trimmed
Seasonings and Garnishes
- 2 tablespoons fish sauce (or soy sauce)
- 1 tablespoon brown sugar
- Juice of 1 lime
- Fresh cilantro for garnish
- Vegetable oil, salt, and pepper
To make Spicy Instant Pot Coconut Curry Chicken, gather these key ingredients. The chicken thighs give a rich flavor. Coconut milk adds creaminess, making the dish smooth. Red curry paste brings the heat and spice.
Next, you’ll need an onion, garlic, ginger, and a red bell pepper. These add depth and freshness. Green beans add a nice crunch and color.
For seasoning, fish sauce or soy sauce gives umami. Brown sugar balances the spice. Lime juice adds brightness. Don't forget salt and pepper for extra taste. Fresh cilantro is the perfect garnish to finish your dish.
Step-by-Step Instructions
Preparation Steps
- Set your Instant Pot to 'Sauté' mode and heat the vegetable oil.
- Add diced onion and sauté until translucent. This should take about 3-4 minutes.
Cooking Process
- Stir in minced garlic and ginger, then add chicken chunks to the pot.
- Mix in red curry paste and pour in the coconut milk. Stir well to coat the chicken.
Finishing Touches
- Add sliced red bell pepper and green beans on top; do not stir.
- Set the Instant Pot to 'Manual' and cook for 7 minutes.
- Once done, let the pressure release naturally for 10 minutes. Then quick-release any remaining pressure.
- Carefully remove the lid and stir in lime juice. Adjust the seasoning if needed.
Tips & Tricks
Cooking Tips
- Best practices for sautéing chicken: Start by heating the vegetable oil in your Instant Pot. Use medium heat and let the oil shimmer. Add the chicken in a single layer to brown it well. This gives a nice flavor and texture. Don’t overcrowd the pot; cook in batches if needed.
- How to avoid burning garlic: Mince the garlic finely and add it to the pot after the onion has softened. Stir it quickly for just a minute. Garlic cooks fast, so keep an eye on it to avoid burning. If it starts to brown too much, lower the heat.
Flavor Enhancements
- Suggestions for adding more spices: If you want extra heat, add a pinch of cayenne pepper or some red pepper flakes. You can also add a teaspoon of ground cumin or coriander for a deeper flavor. Experiment with spices to find your perfect heat level.
- Alternative garnishes for added flavor: Fresh herbs can brighten this dish. Try using mint leaves or basil along with cilantro. A sprinkle of toasted coconut can also add a nice crunch. If you like, squeeze extra lime juice on top before serving for a zesty kick.
Instant Pot Specifics
- Importance of layering ingredients: When adding ingredients to your Instant Pot, layer them. Start with the chicken, then add the coconut milk, and finally, place the vegetables on top. This way, the chicken cooks evenly while the veggies steam perfectly.
- Tips for pressure cooking adjustments: If you prefer your chicken very tender, you can add an extra minute to the cooking time. However, be careful not to overcook it, as the chicken can become mushy. Always let the pressure release naturally for the best results.
Pro Tips
- Use Fresh Ingredients: Fresh garlic, ginger, and vegetables can significantly enhance the flavor of your curry, making it more vibrant and delicious.
- Adjust Spice Level: If you prefer a milder curry, reduce the amount of red curry paste or add a bit of coconut milk to balance the heat.
- Natural Pressure Release: Allowing the Instant Pot to release pressure naturally for a few minutes helps keep the chicken tender and juicy.
- Garnish for Flavor: Fresh cilantro not only adds a pop of color but also a burst of fresh flavor that complements the richness of the coconut curry.
Variations
Vegetarian and Vegan Options
You can easily make this dish vegetarian or vegan. Just swap the chicken for tofu or chickpeas. Both options soak up the flavors well. Tofu works best if you press it first to remove excess water. For the sauce, replace fish sauce with soy sauce for a similar umami taste. This change keeps it plant-based while still tasting great.
Different Flavor Profiles
There are many ways to change the flavor of this curry. Try using different curry pastes. Yellow or green curry pastes bring unique tastes to the dish. You can also add other veggies like spinach or carrots. These not only add color but also boost the nutrition. Just remember to cut them into bite-sized pieces for even cooking.
Serving Suggestions
Serve your curry over cooked rice or quinoa. Both options soak up the sauce well and make the meal filling. For toppings, fresh cilantro adds a nice touch. You can also squeeze extra lime juice on top for a zesty kick. Enjoy your meal with naan or crusty bread for a complete experience!
Storage Info
Refrigeration
To store leftovers in the fridge, let the curry cool. Pour it into an airtight container. Seal it well to keep air out. You can keep it in the fridge for up to four days. To reheat, pour the curry into a pot and heat on low. Stir often to warm it evenly. You can also use the microwave. Heat it in short bursts, stirring in between.
Freezing
Yes, you can freeze Spicy Coconut Curry Chicken. Freezing helps save extra portions for later. To freeze, let the curry cool completely. Then, place it in a freezer-safe container or a heavy-duty bag. Seal tightly to prevent freezer burn. When you're ready to eat, move it to the fridge overnight to thaw. For a quicker thaw, you can use the microwave on the defrost setting.
Shelf Life
In the fridge, the curry lasts about four days. If you freeze it, it can last up to three months. Check for signs that the dish has spoiled. If you see mold, or the smell is off, throw it away. It’s better to be safe than sorry. Enjoy your delicious curry while it’s fresh!
FAQs
How do I adjust the spice level?
To change the spice level, you can add or reduce red curry paste. For more heat, add an extra tablespoon of curry paste. You can also include fresh chili peppers for extra kick. If you prefer less heat, use only one tablespoon of red curry paste. Another option is to add more coconut milk to mellow the spice.
Can I make this dish ahead of time?
Yes, you can prepare this dish ahead of time. Cook the curry and let it cool. Store it in an airtight container in the fridge for up to three days. When you are ready to eat, reheat it on the stove or in the microwave. The flavors will still taste great after a day or two.
What can I substitute for coconut milk?
If you need a substitute for coconut milk, try almond milk or soy milk. These options will change the flavor a bit but will still be creamy. You can also use heavy cream for a richer taste. Just remember, if you use dairy, the dish will no longer be dairy-free.
This blog post explored how to create a delicious Spicy Coconut Curry Chicken. We covered key ingredients like chicken, coconut milk, and curry paste. I shared step-by-step cooking instructions and valuable tips to enhance flavor. You even learned how to adapt the recipe for vegetarian options.
In closing, this dish is easy to make and full of flavor. Whether you are cooking for yourself or others, it will impress everyone at the table. Try it today and enjoy the vibrant tastes in every bite!