Are you ready to whip up a tasty dinner in no time? My Succulent Instant Pot Paprika Lemon Chicken recipe is here to make your life easier and your meals delicious. Imagine tender chicken, rich flavors, and minimal mess—all in one pot! Whether you're a busy parent or just love quick meals, this dish has you covered. Let's dive into the ingredients and get cooking!
Why I Love This Recipe
- Flavor Explosion: This dish combines the smoky depth of paprika with the bright zing of lemon, creating a delightful taste that’s both comforting and refreshing.
- Quick and Easy: The Instant Pot allows for a speedy cooking process, making it perfect for busy weeknights without sacrificing flavor or tenderness.
- Versatile Serving Options: Pair it with rice, quinoa, or steamed veggies for a complete meal, and customize it to fit your dietary preferences.
- Healthy and Wholesome: Using chicken thighs provides a juicy texture, while the inclusion of fresh herbs and lemon juice adds nutritional benefits and freshness.
Ingredients
List of Essential Ingredients
For this recipe, gather the following key items:
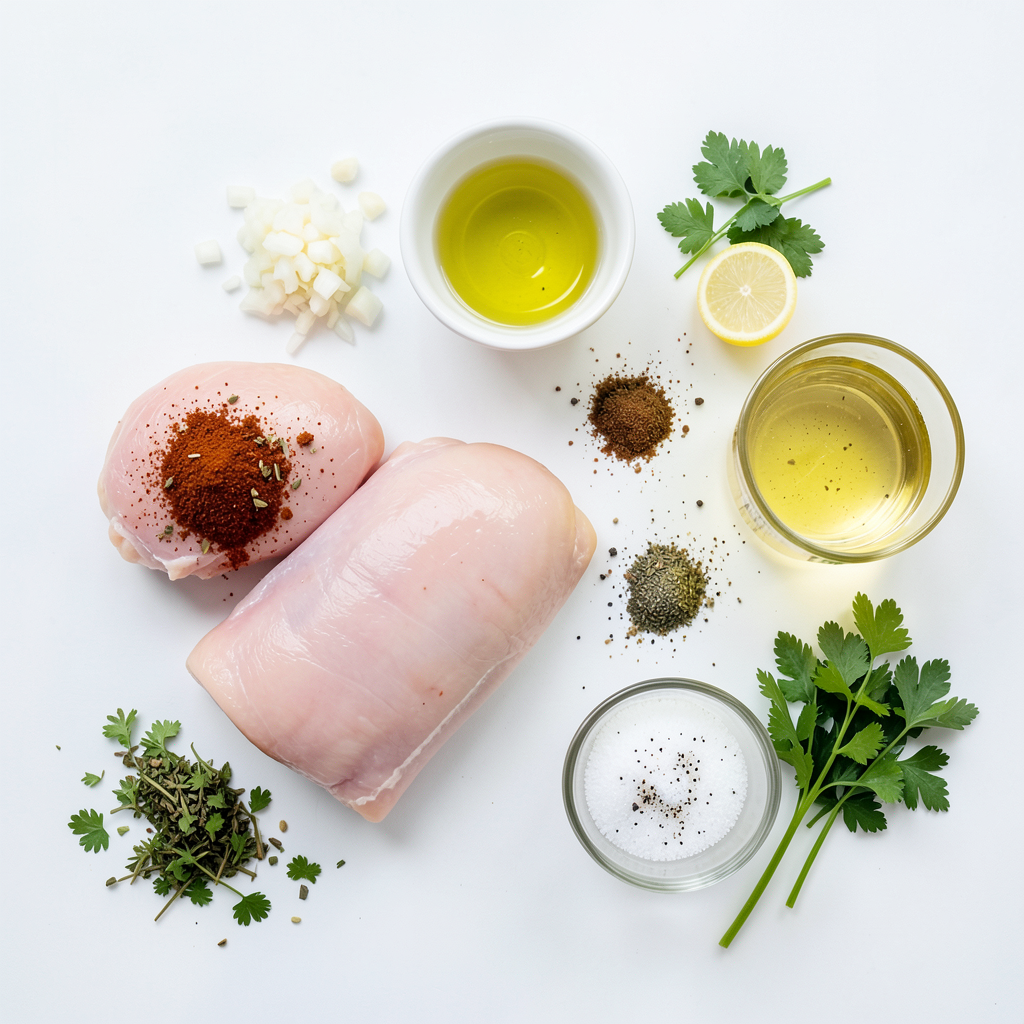
- 4 boneless, skinless chicken thighs
- 2 tablespoons olive oil
- 1 large onion, chopped
- 4 cloves garlic, minced
- 2 teaspoons smoked paprika
- 1 teaspoon sweet paprika
- 1 teaspoon dried oregano
- Zest of 1 lemon
- 1 cup chicken broth
- Juice of 1 lemon
- Salt and pepper to taste
- Fresh parsley, chopped (for garnish)
These ingredients help create a rich and flavorful dish.
Spice Breakdown
Spices make this chicken pop with flavor. Here’s how they work:
- Smoked paprika gives a deep, smoky taste.
- Sweet paprika adds a touch of sweetness.
- Dried oregano brings an earthy note that balances the dish.
- Lemon zest adds brightness and freshness.
Together, these spices create a warm and inviting flavor profile.
Recommended Garnishes
Garnishes elevate your dish. Here are some great ideas:
- Fresh parsley provides a nice pop of color.
- Lemon slices add a fresh touch and more flavor.
- A sprinkle of extra paprika can enhance the look.
Use these garnishes to make your meal look and taste awesome!
Step-by-Step Instructions
Preparing the Instant Pot
First, set your Instant Pot to the Sauté function. Add 2 tablespoons of olive oil. Let it heat up until it shimmers. This step is key for a good start.
Sautéing the Aromatics
Next, add the chopped onion and minced garlic. Sauté them for about 3-4 minutes. They should smell sweet and look translucent. This adds depth to your dish. Sprinkle in 2 teaspoons of smoked paprika, 1 teaspoon of sweet paprika, and 1 teaspoon of dried oregano. Don’t forget the zest of 1 lemon, salt, and pepper. Stir everything well.
Cooking and Pressure Release
Now, push the onion mixture to the sides of the pot. Place the chicken thighs in the center. Sear them for about 2 minutes on each side. Look for a golden brown crust; that’s where the flavor hides. Pour in 1 cup of chicken broth and the juice of 1 lemon. Scrape any bits from the bottom. These bits add flavor and help avoid the burn notice. Close the lid and set the valve to sealing. Select Manual and set the timer for 10 minutes on high pressure.
When the timer goes off, let the pressure release naturally for 5 minutes. Then, switch to a quick release for any remaining pressure. Carefully open the lid and serve the chicken warm, spooning the sauce over it. Garnish with chopped fresh parsley for a pop of color. Enjoy your meal!
Tips & Tricks
How to Perfectly Sear Chicken
Searing chicken adds flavor and texture. Start by heating olive oil in the pot. Make sure the oil is hot. This helps form a nice crust. Place the chicken thighs in the pot without crowding them. Sear each side for about 2 minutes. Look for a golden brown color. This step locks in those juicy flavors.
Adjusting Flavor Levels
Taste is key! You can tweak the spices to fit your taste. If you want more heat, add cayenne pepper or red pepper flakes. For a fresh twist, try adding fresh herbs like thyme or rosemary. Lemon juice brightens the dish, so feel free to add a bit more. Always taste as you go to get it just right.
Mistakes to Avoid
Avoid skipping the sauté step. It builds flavor, so don’t rush it. Ensure the pot is hot before adding oil. This keeps the chicken from sticking. Don’t forget to scrape the bottom of the pot after adding broth. It prevents the burn notice and gives you a tasty sauce. Lastly, be patient with the pressure release. Quick releases can make the chicken tough.
Pro Tips
- Marinate for Extra Flavor: If you have time, marinate the chicken thighs in the lemon juice, garlic, and spices for a few hours or overnight. This will enhance the flavors and make the chicken even more succulent.
- Adjust the Spice Level: Feel free to adjust the amount of smoked and sweet paprika to suit your taste, or add a pinch of cayenne pepper for a spicy kick.
- Use Homemade Broth: For the best flavor, use homemade chicken broth instead of store-bought. It adds depth and richness to the dish.
- Rest Before Serving: Let the chicken rest for a few minutes after cooking before slicing. This helps retain the juices and keeps the meat tender.
Variations
Chicken Thighs vs. Chicken Breasts
I love using chicken thighs in this recipe. They stay juicy and tender. If you prefer chicken breasts, you can use them. Just keep in mind they may dry out faster. Adjust the cooking time to about 8 minutes for breasts. Ensure they reach an internal temperature of 165°F for safety.
Adding Vegetables
You can boost nutrition by adding veggies. Try carrots, bell peppers, or peas. Chop them into small pieces. Add them to the pot after sautéing the onions and garlic. This way, they cook nicely with the chicken. It makes your dish colorful and healthy.
Spice Substitute Suggestions
Don’t have smoked paprika? No problem! You can use regular paprika instead. If you want heat, add a pinch of cayenne pepper. For a different flavor, try curry powder. Each spice will change the taste a bit but still keep it delicious.
Storage Info
How to Store Leftovers
To store leftovers, let the chicken cool first. Place it in an airtight container. You can keep it in the fridge for up to three days. Make sure to spoon some sauce over the chicken to keep it moist.
Reheating Instructions
When you're ready to eat, reheat the chicken gently. You can use the microwave or stovetop. If using the microwave, cover the chicken with a damp paper towel. Heat it for one to two minutes. Check to make sure it's hot all the way through. If using the stovetop, add a splash of chicken broth to keep it juicy.
Freezing for Future Meals
If you want to freeze the chicken, let it cool completely. Store it in a freezer-safe bag or container. Remove as much air as possible. You can freeze it for up to three months. When you’re ready to eat, thaw it overnight in the fridge. Reheat as mentioned above. This way, you always have a tasty meal ready!
FAQs
Can I use bone-in chicken for this recipe?
Yes, you can use bone-in chicken. It adds great flavor. Just adjust the cooking time. Bone-in chicken needs about 12-15 minutes at high pressure. Always check that it’s cooked through. The internal temperature should reach 165°F.
What can I serve with Paprika Lemon Chicken?
You can serve this chicken with many sides. Here are some ideas:
- Fluffy rice or quinoa
- Steamed vegetables like broccoli or carrots
- A fresh salad with lemon vinaigrette
- Mashed potatoes for a hearty meal
Each option pairs well with the sauce. It adds flavor and makes the meal complete.
How to modify for a low-sodium version?
To make a low-sodium version, follow these tips:
- Use low-sodium chicken broth
- Skip added salt during cooking
- Rely on spices and herbs for flavor
- Add fresh lemon juice for brightness
These steps help keep the dish tasty without too much sodium. Enjoy your healthy meal!
This guide covered essential ingredients and how to prepare Paprika Lemon Chicken. We explored the cooking steps, tips for perfecting the dish, and helpful variations. I shared storage and reheating tips for leftovers, plus answers to common questions.
With these insights, you can make a tasty meal with ease. Enjoy cooking, and remember, practice makes perfect!