![- 1 cup brownie mix - 2 tablespoons water - 1/4 cup vegetable oil - 1 package (8 oz) cream cheese, softened - 1/2 cup granulated sugar - 1 teaspoon vanilla extract - 1 large egg - 1/2 cup sour cream - 1/4 cup miniature chocolate chips (optional) - Whipped cream - Fresh berries I love starting with these simple ingredients for Mini Brownie Bottom Cheesecakes. The brownie mix is easy to use, and it gives a rich flavor. You only need water and oil to make the brownie base. This is perfect for busy days! For the cheesecake filling, cream cheese is key. Make sure it is softened so it blends well. Then, mix in sugar for sweetness and vanilla for flavor. The egg adds a nice texture, and sour cream gives it a creamy taste. If you like chocolate, add miniature chocolate chips. They will melt and blend nicely. Finally, don’t forget the toppings! A swirl of whipped cream on top is a must. Fresh berries not only look great, but they also add a burst of flavor. For the complete recipe, check out the Full Recipe. Each ingredient plays a role in making these mini cheesecakes a delightful treat! - Preheat Oven to 325°F (160°C) - Line a muffin tin with cupcake liners First, set your oven to 325°F (160°C). This temperature is perfect for baking mini cheesecakes. Next, take a muffin tin and place cupcake liners inside each cup. This makes it easy to lift out the mini cheesecakes later. - Combine ingredients and create brownie batter - Fill cupcake liners and bake for 10 minutes In a mixing bowl, combine 1 cup of brownie mix, 2 tablespoons of water, and 1/4 cup of vegetable oil. Stir this mix until it is smooth. Now, scoop about 1 tablespoon of the brownie batter into each cupcake liner. Press it down a bit to form a solid base. Bake these in the oven for 10 minutes. The brownies should be soft but not fully cooked. - Beat cream cheese until smooth - Incorporate sugar, vanilla extract, and egg - Fold in sour cream and chocolate chips (if using) While the brownie base cools, prepare the cheesecake filling. In a bowl, beat 1 package of softened cream cheese until it is smooth. Add in 1/2 cup of granulated sugar and mix well. Then, add 1 teaspoon of vanilla extract and 1 large egg. Beat this mixture until it is just combined. Finally, fold in 1/2 cup of sour cream and 1/4 cup of miniature chocolate chips if you want some extra flavor. - Spoon filling over brownie base - Bake for 15-20 minutes until set - Cool and chill for better texture Now, scoop the cheesecake filling and spoon it over the brownie base in each liner. Fill them all the way to the top. Return the muffin tin to the oven and bake for 15-20 minutes. The cheesecakes are done when they are set but still slightly jiggle in the center. After baking, let them cool in the tin for about 10 minutes. Then, transfer them to a wire rack to cool completely. For the best texture, refrigerate them for at least 2 hours or overnight. For the full recipe, check out the detailed steps above! - Use an oven thermometer for accuracy. This tool helps you know the real temperature. - Check for doneness with a toothpick. Insert it in the center; it should come out clean. - Experiment with different extracts, like almond or lemon. Each adds a unique twist. - Add a pinch of salt to heighten sweetness. It makes the flavors pop even more. - Use decorative serving platters to elevate the look. A nice plate makes any dessert shine. - Dust with powdered sugar or add mint leaves for color. This little touch can impress guests. These tips help you create a delicious and beautiful dessert. Follow these hints for the best results, and don't forget to check the Full Recipe for complete guidance. {{image_2}} You can make these mini cheesecakes even more fun! Start by adding fruit purees to the cheesecake mix. For example, raspberry or strawberry puree adds a fresh taste. You can also try flavored extracts. Orange or coconut extracts can give a nice twist to the flavor. Just be careful not to add too much. A little goes a long way! If you need a gluten-free option, use a gluten-free brownie mix. Many brands offer tasty mixes that work great in this recipe. For a vegan version, you can replace the cream cheese with a plant-based cream cheese. Use a flax egg instead of a regular egg. These swaps keep the flavor while meeting dietary needs. You can change these mini cheesecakes with the seasons. In fall, add pumpkin puree to the cheesecake mix. It gives a cozy flavor that everyone loves. For winter, try peppermint extract. This will add a festive touch to your treats. Each season brings a new way to enjoy these delights! Store your mini brownie bottom cheesecakes in an airtight container. This keeps them fresh and moist. They taste best if eaten within 3-4 days. After that, the texture may change. You can freeze the mini cheesecakes for longer storage. First, let them cool completely. Then, wrap each cheesecake tightly in plastic wrap. Place them in a freezer-safe bag. They can last up to three months in the freezer. To enjoy, move them to the fridge overnight to thaw. This helps keep the flavor intact. If you have leftover mini cheesecakes, you can reheat them. Preheat your oven to 300°F (150°C). Place the cheesecakes on a baking sheet and heat for about 10 minutes. This warms them without drying them out. You can serve them warm with a dollop of whipped cream and fresh berries for a treat. You can tell they are done when you see a slight jiggle in the center. This means they are set but still creamy. If they look too firm, they might be overbaked. To be sure, check them around the 15-minute mark. Yes, you can make these mini cheesecakes ahead of time. Just store them in the fridge for up to three days. They taste great after chilling, and the flavors will blend nicely. This makes them perfect for parties or special events. To remove the cheesecakes, let them cool completely in the tin. Once cool, gently peel off the liners. If they stick a bit, use a small knife to help free them. This way, you keep the lovely shape and presentation. You can easily make these gluten-free. Just use a gluten-free brownie mix in place of the regular mix. This way, everyone can enjoy these sweet treats without worry. Remember to check the labels on ingredients to ensure they are gluten-free. For the complete recipe, check out the [Full Recipe]. You now have a clear guide to make mini brownie cheesecakes. Start with a simple brownie base and layer on a creamy cheesecake filling. Remember to bake the layers together for perfect flavor and texture. Personalize your cheesecakes with fun toppings and flavor twists. This dessert impresses while being easy to prepare. Store leftovers properly to enjoy later. With these steps, you can create a delicious treat any time. I hope you enjoy baking and tasting these mini cheesecakes!](https://pagosarecipes.com/wp-content/uploads/2025/05/5c3a8288-708b-4977-8277-4183ce1dc5b2-768x768.webp)
Are you ready to treat yourself to something truly special? Mini Brownie Bottom Cheesecakes are the perfect blend of rich chocolate brownie and creamy cheesecake. In this post, I’ll share simple steps and essential tips to create these delightful bites. Whether you’re hosting a party or enjoying a quiet night at home, these desserts will surely impress. Let’s dive in and get baking!
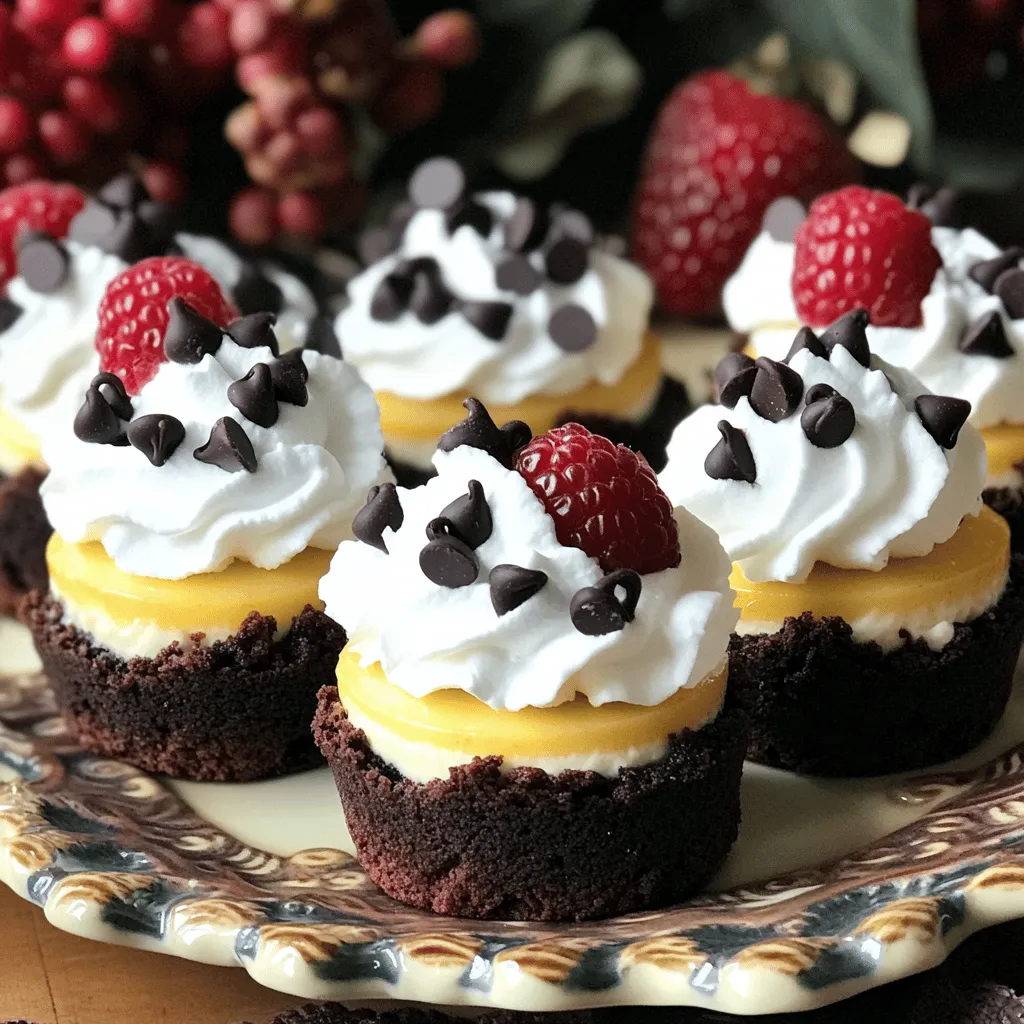
Ingredients
Brownie Base Ingredients
- 1 cup brownie mix
- 2 tablespoons water
- 1/4 cup vegetable oil
Cheesecake Filling Ingredients
- 1 package (8 oz) cream cheese, softened
- 1/2 cup granulated sugar
- 1 teaspoon vanilla extract
- 1 large egg
- 1/2 cup sour cream
- 1/4 cup miniature chocolate chips (optional)
Toppings and Garnish
- Whipped cream
- Fresh berries
I love starting with these simple ingredients for Mini Brownie Bottom Cheesecakes. The brownie mix is easy to use, and it gives a rich flavor. You only need water and oil to make the brownie base. This is perfect for busy days!
For the cheesecake filling, cream cheese is key. Make sure it is softened so it blends well. Then, mix in sugar for sweetness and vanilla for flavor. The egg adds a nice texture, and sour cream gives it a creamy taste. If you like chocolate, add miniature chocolate chips. They will melt and blend nicely.
Finally, don’t forget the toppings! A swirl of whipped cream on top is a must. Fresh berries not only look great, but they also add a burst of flavor.Each ingredient plays a role in making these mini cheesecakes a delightful treat!
Step-by-Step Instructions
Preparing the Oven and Muffin Tin
- Preheat Oven to 325°F (160°C)
- Line a muffin tin with cupcake liners
First, set your oven to 325°F (160°C). This temperature is perfect for baking mini cheesecakes. Next, take a muffin tin and place cupcake liners inside each cup. This makes it easy to lift out the mini cheesecakes later.
Making the Brownie Base
- Combine ingredients and create brownie batter
- Fill cupcake liners and bake for 10 minutes
In a mixing bowl, combine 1 cup of brownie mix, 2 tablespoons of water, and 1/4 cup of vegetable oil. Stir this mix until it is smooth. Now, scoop about 1 tablespoon of the brownie batter into each cupcake liner. Press it down a bit to form a solid base. Bake these in the oven for 10 minutes. The brownies should be soft but not fully cooked.
Preparing the Cheesecake Filling
- Beat cream cheese until smooth
- Incorporate sugar, vanilla extract, and egg
- Fold in sour cream and chocolate chips (if using)
While the brownie base cools, prepare the cheesecake filling. In a bowl, beat 1 package of softened cream cheese until it is smooth. Add in 1/2 cup of granulated sugar and mix well. Then, add 1 teaspoon of vanilla extract and 1 large egg. Beat this mixture until it is just combined. Finally, fold in 1/2 cup of sour cream and 1/4 cup of miniature chocolate chips if you want some extra flavor.
Baking the Cheesecakes
- Spoon filling over brownie base
- Bake for 15-20 minutes until set
- Cool and chill for better texture
Now, scoop the cheesecake filling and spoon it over the brownie base in each liner. Fill them all the way to the top. Return the muffin tin to the oven and bake for 15-20 minutes. The cheesecakes are done when they are set but still slightly jiggle in the center. After baking, let them cool in the tin for about 10 minutes. Then, transfer them to a wire rack to cool completely. For the best texture, refrigerate them for at least 2 hours or overnight.
Tips & Tricks
Baking Precision
- Use an oven thermometer for accuracy. This tool helps you know the real temperature.
- Check for doneness with a toothpick. Insert it in the center; it should come out clean.
Enhancing Flavor
- Experiment with different extracts, like almond or lemon. Each adds a unique twist.
- Add a pinch of salt to heighten sweetness. It makes the flavors pop even more.
Presentation Ideas
- Use decorative serving platters to elevate the look. A nice plate makes any dessert shine.
- Dust with powdered sugar or add mint leaves for color. This little touch can impress guests.
These tips help you create a delicious and beautiful dessert.
Variations
Flavor Variations
You can make these mini cheesecakes even more fun! Start by adding fruit purees to the cheesecake mix. For example, raspberry or strawberry puree adds a fresh taste. You can also try flavored extracts. Orange or coconut extracts can give a nice twist to the flavor. Just be careful not to add too much. A little goes a long way!
Dietary Adjustments
If you need a gluten-free option, use a gluten-free brownie mix. Many brands offer tasty mixes that work great in this recipe. For a vegan version, you can replace the cream cheese with a plant-based cream cheese. Use a flax egg instead of a regular egg. These swaps keep the flavor while meeting dietary needs.
Seasonal Twists
You can change these mini cheesecakes with the seasons. In fall, add pumpkin puree to the cheesecake mix. It gives a cozy flavor that everyone loves. For winter, try peppermint extract. This will add a festive touch to your treats. Each season brings a new way to enjoy these delights!
Storage Info
Refrigeration Recommendations
Store your mini brownie bottom cheesecakes in an airtight container. This keeps them fresh and moist. They taste best if eaten within 3-4 days. After that, the texture may change.
Freezing Instructions
You can freeze the mini cheesecakes for longer storage. First, let them cool completely. Then, wrap each cheesecake tightly in plastic wrap. Place them in a freezer-safe bag. They can last up to three months in the freezer. To enjoy, move them to the fridge overnight to thaw. This helps keep the flavor intact.
Reheating
If you have leftover mini cheesecakes, you can reheat them. Preheat your oven to 300°F (150°C). Place the cheesecakes on a baking sheet and heat for about 10 minutes. This warms them without drying them out. You can serve them warm with a dollop of whipped cream and fresh berries for a treat.
FAQs
How do I know when the cheesecakes are done baking?
You can tell they are done when you see a slight jiggle in the center. This means they are set but still creamy. If they look too firm, they might be overbaked. To be sure, check them around the 15-minute mark.
Can I make these ahead of time?
Yes, you can make these mini cheesecakes ahead of time. Just store them in the fridge for up to three days. They taste great after chilling, and the flavors will blend nicely. This makes them perfect for parties or special events.
What’s the best way to remove them from the liners?
To remove the cheesecakes, let them cool completely in the tin. Once cool, gently peel off the liners. If they stick a bit, use a small knife to help free them. This way, you keep the lovely shape and presentation.
How can I make these mini cheesecakes gluten-free?
You can easily make these gluten-free. Just use a gluten-free brownie mix in place of the regular mix. This way, everyone can enjoy these sweet treats without worry. Remember to check the labels on ingredients to ensure they are gluten-free.
You now have a clear guide to make mini brownie cheesecakes. Start with a simple brownie base and layer on a creamy cheesecake filling. Remember to bake the layers together for perfect flavor and texture. Personalize your cheesecakes with fun toppings and flavor twists. This dessert impresses while being easy to prepare. Store leftovers properly to enjoy later. With these steps, you can create a delicious treat any time. I hope you enjoy baking and tasting these mini cheesecakes!
![- 1 cup brownie mix - 2 tablespoons water - 1/4 cup vegetable oil - 1 package (8 oz) cream cheese, softened - 1/2 cup granulated sugar - 1 teaspoon vanilla extract - 1 large egg - 1/2 cup sour cream - 1/4 cup miniature chocolate chips (optional) - Whipped cream - Fresh berries I love starting with these simple ingredients for Mini Brownie Bottom Cheesecakes. The brownie mix is easy to use, and it gives a rich flavor. You only need water and oil to make the brownie base. This is perfect for busy days! For the cheesecake filling, cream cheese is key. Make sure it is softened so it blends well. Then, mix in sugar for sweetness and vanilla for flavor. The egg adds a nice texture, and sour cream gives it a creamy taste. If you like chocolate, add miniature chocolate chips. They will melt and blend nicely. Finally, don’t forget the toppings! A swirl of whipped cream on top is a must. Fresh berries not only look great, but they also add a burst of flavor. For the complete recipe, check out the Full Recipe. Each ingredient plays a role in making these mini cheesecakes a delightful treat! - Preheat Oven to 325°F (160°C) - Line a muffin tin with cupcake liners First, set your oven to 325°F (160°C). This temperature is perfect for baking mini cheesecakes. Next, take a muffin tin and place cupcake liners inside each cup. This makes it easy to lift out the mini cheesecakes later. - Combine ingredients and create brownie batter - Fill cupcake liners and bake for 10 minutes In a mixing bowl, combine 1 cup of brownie mix, 2 tablespoons of water, and 1/4 cup of vegetable oil. Stir this mix until it is smooth. Now, scoop about 1 tablespoon of the brownie batter into each cupcake liner. Press it down a bit to form a solid base. Bake these in the oven for 10 minutes. The brownies should be soft but not fully cooked. - Beat cream cheese until smooth - Incorporate sugar, vanilla extract, and egg - Fold in sour cream and chocolate chips (if using) While the brownie base cools, prepare the cheesecake filling. In a bowl, beat 1 package of softened cream cheese until it is smooth. Add in 1/2 cup of granulated sugar and mix well. Then, add 1 teaspoon of vanilla extract and 1 large egg. Beat this mixture until it is just combined. Finally, fold in 1/2 cup of sour cream and 1/4 cup of miniature chocolate chips if you want some extra flavor. - Spoon filling over brownie base - Bake for 15-20 minutes until set - Cool and chill for better texture Now, scoop the cheesecake filling and spoon it over the brownie base in each liner. Fill them all the way to the top. Return the muffin tin to the oven and bake for 15-20 minutes. The cheesecakes are done when they are set but still slightly jiggle in the center. After baking, let them cool in the tin for about 10 minutes. Then, transfer them to a wire rack to cool completely. For the best texture, refrigerate them for at least 2 hours or overnight. For the full recipe, check out the detailed steps above! - Use an oven thermometer for accuracy. This tool helps you know the real temperature. - Check for doneness with a toothpick. Insert it in the center; it should come out clean. - Experiment with different extracts, like almond or lemon. Each adds a unique twist. - Add a pinch of salt to heighten sweetness. It makes the flavors pop even more. - Use decorative serving platters to elevate the look. A nice plate makes any dessert shine. - Dust with powdered sugar or add mint leaves for color. This little touch can impress guests. These tips help you create a delicious and beautiful dessert. Follow these hints for the best results, and don't forget to check the Full Recipe for complete guidance. {{image_2}} You can make these mini cheesecakes even more fun! Start by adding fruit purees to the cheesecake mix. For example, raspberry or strawberry puree adds a fresh taste. You can also try flavored extracts. Orange or coconut extracts can give a nice twist to the flavor. Just be careful not to add too much. A little goes a long way! If you need a gluten-free option, use a gluten-free brownie mix. Many brands offer tasty mixes that work great in this recipe. For a vegan version, you can replace the cream cheese with a plant-based cream cheese. Use a flax egg instead of a regular egg. These swaps keep the flavor while meeting dietary needs. You can change these mini cheesecakes with the seasons. In fall, add pumpkin puree to the cheesecake mix. It gives a cozy flavor that everyone loves. For winter, try peppermint extract. This will add a festive touch to your treats. Each season brings a new way to enjoy these delights! Store your mini brownie bottom cheesecakes in an airtight container. This keeps them fresh and moist. They taste best if eaten within 3-4 days. After that, the texture may change. You can freeze the mini cheesecakes for longer storage. First, let them cool completely. Then, wrap each cheesecake tightly in plastic wrap. Place them in a freezer-safe bag. They can last up to three months in the freezer. To enjoy, move them to the fridge overnight to thaw. This helps keep the flavor intact. If you have leftover mini cheesecakes, you can reheat them. Preheat your oven to 300°F (150°C). Place the cheesecakes on a baking sheet and heat for about 10 minutes. This warms them without drying them out. You can serve them warm with a dollop of whipped cream and fresh berries for a treat. You can tell they are done when you see a slight jiggle in the center. This means they are set but still creamy. If they look too firm, they might be overbaked. To be sure, check them around the 15-minute mark. Yes, you can make these mini cheesecakes ahead of time. Just store them in the fridge for up to three days. They taste great after chilling, and the flavors will blend nicely. This makes them perfect for parties or special events. To remove the cheesecakes, let them cool completely in the tin. Once cool, gently peel off the liners. If they stick a bit, use a small knife to help free them. This way, you keep the lovely shape and presentation. You can easily make these gluten-free. Just use a gluten-free brownie mix in place of the regular mix. This way, everyone can enjoy these sweet treats without worry. Remember to check the labels on ingredients to ensure they are gluten-free. For the complete recipe, check out the [Full Recipe]. You now have a clear guide to make mini brownie cheesecakes. Start with a simple brownie base and layer on a creamy cheesecake filling. Remember to bake the layers together for perfect flavor and texture. Personalize your cheesecakes with fun toppings and flavor twists. This dessert impresses while being easy to prepare. Store leftovers properly to enjoy later. With these steps, you can create a delicious treat any time. I hope you enjoy baking and tasting these mini cheesecakes!](https://pagosarecipes.com/wp-content/uploads/2025/05/5c3a8288-708b-4977-8277-4183ce1dc5b2-250x250.webp)
