

Introduction
Onion rings are one of those universally loved snacks that can elevate any meal or serve as a delightful appetizer on their own. Their crispy, golden exterior paired with the tender, flavorful onion within makes for a satisfying bite that appeals to both young and old. Whether you’re enjoying them at a local diner, at a backyard barbecue, or as a side with your favorite burger, onion rings have a special place in culinary traditions around the world. However, achieving that perfect crispy texture is key to making onion rings that stand out.
In this article, we’ll guide you through a detailed recipe for making crispy onion rings that are sure to impress. We will explore the essential ingredients that contribute to their delightful crunch and flavor, as well as provide step-by-step instructions that will transform your kitchen into a hub of deliciousness. By the end of this guide, you will have all the knowledge necessary to prepare the perfect onion rings that can rival any restaurant dish.
Understanding Onion Rings
Onion rings have a rich history that dates back to ancient times, with variations found in numerous culinary traditions worldwide. The concept of frying vegetables has been embraced across cultures, making onion rings a beloved comfort food in many places. Some attribute the modern version of onion rings to the United States, where they became popular in the 1930s. It wasn’t long before they became a staple in diners and fast-food establishments, celebrated for their crispy texture and savory taste.
Around the globe, you can find different takes on onion rings. In the UK, for example, you might encounter a variant featuring beer batter, while in the Middle East, fried onions are often used as a garnish in various dishes. This culinary versatility is a testament to the onion’s ability to adapt and shine in different flavor profiles.
The appeal of onion rings lies in their simplicity and the delightful contrast of textures. The crispy coating provides a satisfying crunch that complements the tender sweetness of the onion. When seasoned well, onion rings can take on a variety of flavors, making them a popular choice for pairing with various dipping sauces, from classic ketchup to more adventurous options like spicy aioli or tangy ranch.
Essential Ingredients for Perfect Onion Rings
To create truly remarkable onion rings, selecting high-quality ingredients is paramount. Each ingredient plays a vital role in contributing to the overall flavor and texture of the final product. Let’s break down the essential ingredients for this recipe:
Onions
Choosing the right type of onion is crucial for optimal flavor and texture. While yellow onions are the most common choice due to their balance of sweetness and sharpness, you can also experiment with sweet onions like Vidalia or even red onions for a unique twist. The key is to select firm onions without any soft spots to ensure that they hold up during the frying process.
Flour
All-purpose flour is the backbone of the batter, providing the necessary structure and crispiness. It forms a light coating around the onions, which helps achieve that coveted crunch. You may also consider adding cornstarch to the flour mixture for an even crispier texture, as cornstarch helps absorb moisture and creates a lighter batter.
Spices
Seasoning is essential for elevating the flavor of your onion rings. In this recipe, we’ll incorporate smoked paprika, garlic powder, and cayenne pepper. Smoked paprika adds a subtle smokiness that enhances the overall flavor, while garlic powder brings a savory depth. A pinch of cayenne adds just the right amount of heat, ensuring that each bite is packed with flavor.
Buttermilk
Using buttermilk in the batter not only adds richness but also helps the coating adhere to the onions better. The acidity in buttermilk tenderizes the onions slightly, creating a perfect balance between crispy and tender. If you don’t have buttermilk on hand, you can easily make a substitute by mixing milk with a teaspoon of vinegar or lemon juice and letting it sit for a few minutes.
Breadcrumbs
Breadcrumbs are another key component of the batter. You can choose between traditional breadcrumbs or panko breadcrumbs for added crunch. Panko, which is coarser and lighter, creates an extra crispy texture that many people prefer. Whichever you choose, ensure that the breadcrumbs are fresh for the best results.
Importance of Quality Ingredients
The quality of your ingredients can significantly affect the outcome of your onion rings. Fresh, high-quality onions, flour, and spices will yield a more flavorful and satisfying dish. Opting for organic or locally sourced ingredients when available can also enhance the taste of your onion rings, making them even more enjoyable.
Preparation Steps for Crispy Onion Rings
Now that we’ve covered the essential ingredients, it’s time to dive into the preparation steps that will lead to perfectly crispy onion rings. Each step is crucial for ensuring that your onion rings turn out just right.
Step 1: Prepping the Onions
Begin by peeling the onions and cutting off the ends. To create evenly sized rings, slice the onion into approximately 1/2-inch thick slices. The thickness is key; too thin, and they may burn quickly, while too thick can lead to a soggy texture. Once sliced, gently separate the rings, being careful not to break them.
Step 2: Making the Batter
In a mixing bowl, combine the all-purpose flour, cornstarch (if using), smoked paprika, garlic powder, cayenne pepper, and a pinch of salt. Mix these dry ingredients well to ensure an even distribution of spices.
In another bowl, pour in the buttermilk. Dip each onion ring into the buttermilk, allowing any excess to drip off before transferring it to the flour mixture. This step is essential for ensuring that the batter adheres to the onions properly.
Step 3: Coating the Onion Rings
Once the onion rings are coated in the buttermilk, proceed to the flour mixture. Toss the rings in the flour mixture until they are fully coated. For an extra crispy coating, you can double-dip the onion rings by repeating the buttermilk and flour steps, which will create a thicker batter.
Step 4: Frying the Onion Rings
Heat a pot or deep fryer filled with oil to 350°F (175°C). It’s essential to test the oil’s temperature before adding the onion rings, as the right temperature ensures that they cook quickly and evenly. Carefully drop a few onion rings into the hot oil, being cautious not to overcrowd the pot. Fry them for about 2-4 minutes or until they turn golden brown, flipping them halfway through for even cooking.
Step 5: Draining and Seasoning
Once the onion rings are fried to perfection, use a slotted spoon to remove them and place them on a paper towel-lined plate to drain excess oil. While they are still hot, sprinkle a little salt over them to enhance the flavor.
By following these preparation steps, you will be on your way to creating deliciously crispy onion rings that are sure to impress family and friends alike. Stay tuned for the next part of this guide, where we will explore additional tips for achieving the best results, along with answers to common questions about onion rings.
Preparing the Buttermilk Dip: Options and Variations
Creating the perfect buttermilk dip is a crucial step in achieving the ultimate crispy onion rings. This flavorful mixture not only helps to tenderize the onions but also serves as a glue for the coating to stick. While a traditional buttermilk dip is made with only buttermilk and a few spices, you can easily customize it to suit your taste.
Start with the base: for every cup of buttermilk, mix in a teaspoon of salt, a dash of pepper, and a pinch of garlic powder. Here are some variations to consider:
- Spicy Buttermilk Dip: Add a teaspoon of hot sauce or cayenne pepper for a kick.
- Herbed Buttermilk Dip: Include fresh or dried herbs such as dill, thyme, or parsley for a garden-fresh flavor.
- Smoky Buttermilk Dip: Mix in some smoked paprika or chipotle powder for a hint of smokiness.
Feel free to experiment with different spices and seasonings until you find your perfect blend. Once your buttermilk dip is ready, it’s time to move on to the coating process.
Coating Process: Achieving the Perfect Crunch
Step-by-Step Guide on Coating the Onion Rings
Now that you have your buttermilk dip prepared, it’s time to coat the onion rings for that coveted crunch. Follow these steps for a flawless coating process:
1. Prepare Your Stations: Set up three bowls – one with the buttermilk dip, another with a seasoned flour mix (all-purpose flour combined with salt, pepper, and any additional spices), and the last one with breadcrumbs (panko breadcrumbs work best for extra crunch).
2. Dip and Dredge: Take each onion ring, dip it into the buttermilk mixture, allowing any excess to drip off. Next, dredge it in the seasoned flour, ensuring it is completely coated. Repeat this process by dipping the floured onion ring back into the buttermilk and finally coating it in breadcrumbs.
3. Shake Off Excess: After coating, gently shake the onion ring to remove any excess flour and breadcrumbs. This step is crucial as it prevents clumping and ensures that the rings fry evenly.
Importance of Shaking Off Excess Flour and Breadcrumbs
Shaking off excess coating is essential for achieving that crispy texture. Too much flour or breadcrumbs can lead to a soggy coating, which is the opposite of what you want. A well-adhered, evenly distributed coating will enhance the crunchiness of the fried onion rings and provide a delightful contrast to the tender onion inside.
Tips for Ensuring the Coating Adheres Properly
To ensure the coating sticks perfectly, consider these tips:
- Use Cold Buttermilk: Cold buttermilk helps the coating to adhere better to the onion rings.
- Pat the Onions Dry: Before dipping, make sure the onion rings are patted dry with a paper towel. This removes excess moisture, allowing the coating to stick more effectively.
- Let Coated Rings Rest: After coating, let the onion rings rest on a wire rack for about 10-15 minutes. This allows the coating to set, which helps it stay in place during frying.
Frying Techniques for Golden Brown Onion Rings
Once your onion rings are perfectly coated, it’s time to fry them. The method you choose will significantly impact the final texture and flavor of your onion rings.
Overview of Frying Methods: Deep Frying vs. Shallow Frying
- Deep Frying: This method involves fully immersing the onion rings in hot oil, resulting in a uniformly crispy texture. It’s the preferred method for achieving that iconic restaurant-style crunch.
- Shallow Frying: This method uses less oil, allowing you to fry the onion rings in a frying pan while flipping them occasionally. While it’s a healthier option, it may not provide the same level of crispiness as deep frying.
Ideal Oil Temperature and Why It Matters
The oil temperature is crucial for frying onion rings. Ideally, you want to maintain a temperature between 350°F to 375°F (175°C to 190°C). This range ensures that the onion rings cook quickly without absorbing too much oil, which can lead to greasiness.
To test the oil’s readiness, drop a small piece of bread into the oil. If it sizzles and turns golden brown in about 60 seconds, your oil is hot enough for frying.
Tips for Frying Without Overcrowding the Pan
Overcrowding the frying pan can lower the oil temperature and result in soggy onion rings. To avoid this, fry in small batches, giving each onion ring enough space to fry evenly. Depending on the size of your frying vessel, aim for 4-5 rings per batch.
Signs of Doneness: How to Identify When the Onion Rings Are Perfectly Cooked
Perfectly cooked onion rings will turn a beautiful golden brown color and will have a satisfying crunch when bitten into. The total frying time is typically about 3-4 minutes, but keep an eye on them as cooking times may vary based on the thickness of the rings and the exact oil temperature.
Once cooked, use a slotted spoon to remove the onion rings from the oil and transfer them to a paper towel-lined plate to drain any excess oil.
Serving Suggestions and Presentation Ideas
Now that your crispy onion rings are ready, it’s time to plate them up! Presentation can elevate your dish from simple snack to a visually appealing appetizer.
Creative Ways to Plate Onion Rings for Visual Appeal
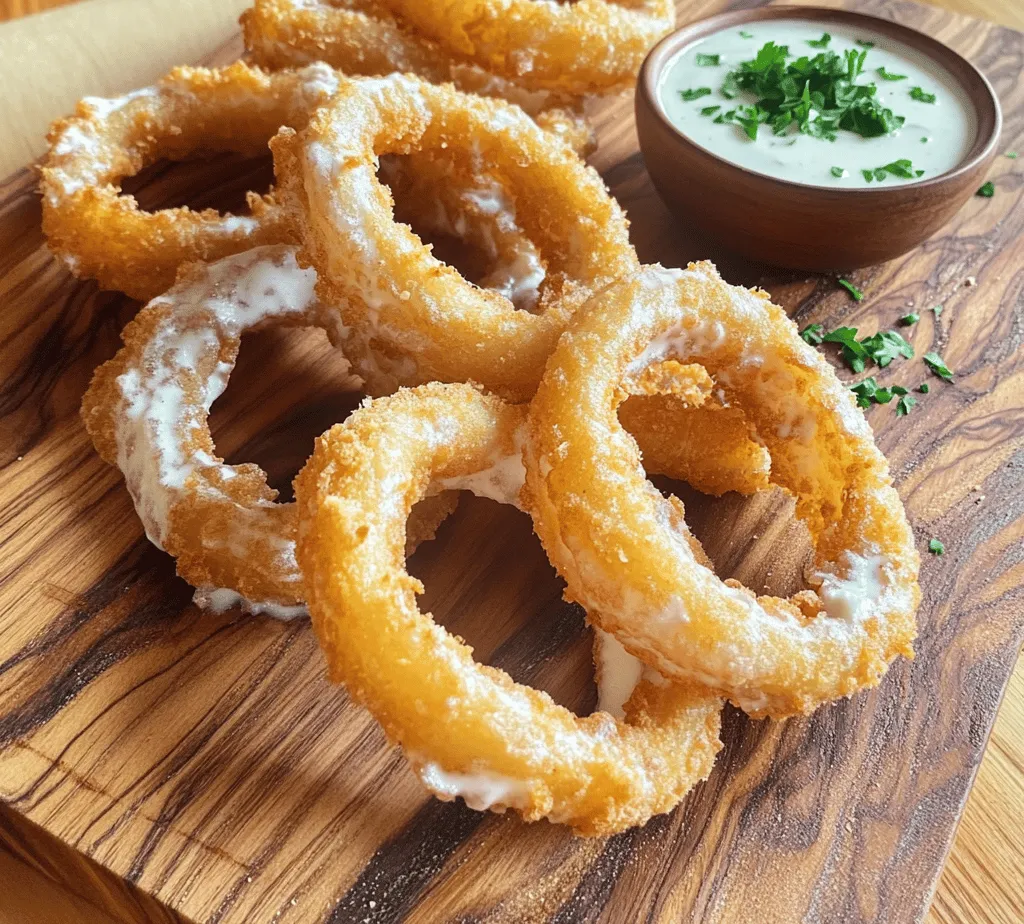
- Rustic Wooden Boards: Serve your onion rings on a rustic wooden board for a casual, inviting look. This presentation works particularly well for parties or casual gatherings.
- Large Plates with Dipping Sauces: Arrange the onion rings in a circular pattern on a large plate, leaving space for a variety of dipping sauces in the center. This not only looks great but allows guests to sample different flavors.
Incorporating Dipping Sauces: Recipes for Ranch and Spicy Ketchup
- Ranch Dressing: Combine 1 cup of mayonnaise, 1/2 cup of sour cream, a tablespoon of fresh dill, a teaspoon of garlic powder, and a splash of lemon juice for a creamy and tangy dipping sauce.
- Spicy Ketchup: Mix 1 cup of ketchup with a tablespoon of hot sauce and a teaspoon of smoked paprika for a zesty kick.
These sauces perfectly complement the crispy onion rings, enhancing the overall flavor experience.
Garnishing Tips: Using Herbs for an Added Touch
For a final touch, consider garnishing your onion rings with fresh herbs such as chopped parsley or cilantro. This adds a pop of color and freshness to your dish, making it even more appetizing.
Nutritional Considerations
While crispy onion rings are undoubtedly a delicious indulgence, it’s important to consider their nutritional profile.
Caloric Breakdown of the Dish
Depending on the size and coating, a serving of onion rings can range from 250 to 400 calories. This caloric content primarily comes from the frying oil and the flour used in the coating.
Discussing the Balance of Indulgence and Enjoyment
Enjoying crispy onion rings is all about balance. They make for a fantastic treat or appetizer, especially when shared with friends and family. Moderation is key, and pairing onion rings with healthier dishes can help maintain a balanced diet.
Suggestions for Healthier Alternatives (e.g., Baking Instead of Frying)
If you’re looking for a healthier alternative, consider baking your onion rings instead of frying. Simply coat the rings as described, place them on a baking sheet lined with parchment paper, and bake at 425°F (220°C) for about 20-25 minutes or until golden brown, flipping halfway through. This method greatly reduces the amount of oil used and still yields satisfying results.
Conclusion
Making crispy onion rings at home is a delightful culinary adventure that not only brings joy to your taste buds but also fills your kitchen with mouthwatering aromas. The process, from preparing the buttermilk dip to achieving that perfect crunchy coating, is both rewarding and satisfying.
Don’t shy away from experimenting with different flavors and ingredients, whether it’s through unique seasoning blends or various dipping sauces. The joy of creating a delicious snack from scratch is unmatched, and your homemade onion rings are sure to impress family and friends alike. So roll up your sleeves, gather your ingredients, and start frying up a batch of these delightful crispy onion rings today!

