If you’re craving an easy yet delicious snack, you’ve come to the right place! This best recipe for Pillsbury Biscuit Garlic Butter Cheese Bombs offers the perfect mix of cheesy goodness and buttery flavor. Whether you’re hosting a party or just want a tasty treat at home, these bombs will impress. Join me as I guide you through the steps to create these crowd-pleasers that are sure to delight everyone!
How Can You Make the Best Garlic Butter Cheese Bombs?
To create the best recipe for cheese bombs, you need simple ingredients. Here are the items you will use:
What Ingredients Do You Need?
Gather these ingredients:
– 1 can (16.3 oz) Pillsbury refrigerated biscuits
– 1/2 cup shredded mozzarella cheese
– 1/4 cup grated Parmesan cheese
– 1/4 cup butter, melted
– 4 cloves garlic, minced
– 1 teaspoon dried Italian herbs
– 1 teaspoon garlic powder
– Salt and pepper to taste
– Fresh parsley, chopped (for garnish)
These ingredients blend well to make delicious garlic butter biscuits.
How Do You Prepare the Dough?
First, preheat your oven to 375°F (190°C). Line a baking sheet with parchment paper. This helps with easy cleanup. Next, open the can of Pillsbury biscuits. Carefully pull apart each biscuit and flatten them a bit with your hands. This is where the magic begins!
What Steps Should You Follow for Assembly?
Now, it’s time for assembly. Place about a tablespoon of mozzarella and a teaspoon of Parmesan cheese in the center of each biscuit. Don’t skimp on the cheese; it makes these bombs extra tasty! Gather the edges of the biscuit and pinch them to seal the cheese inside. Make sure they are well sealed to keep the cheese from leaking out.
Next, dip each cheese-filled biscuit ball into the seasoned garlic butter mixture. Coat them well, so every bite bursts with flavor. Place the butter-coated biscuit balls on the baking sheet, seam side down. Brush any leftover garlic butter over the tops for extra tastiness.
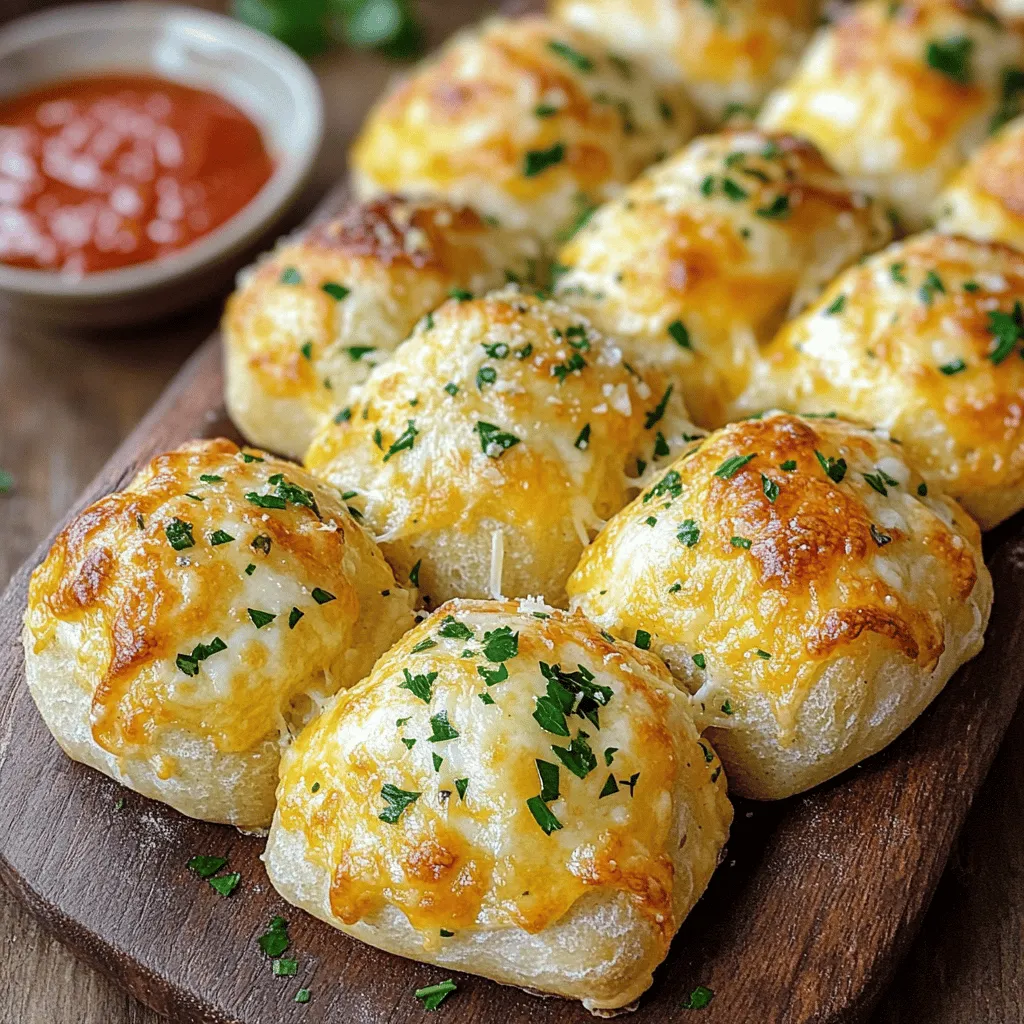
Bake in the oven for 12-15 minutes. Watch for that golden brown color and puffiness. Once done, let them cool for a minute. Drizzle any remaining garlic butter on top and sprinkle with parsley for color. You now have a delightful dish ready to share.Enjoy your cheesy garlic bombs!
What Cooking Methods Are Recommended for Garlic Butter Cheese Bombs?
To make the best oven-baked cheese bombs, start with the right cooking method. I recommend baking these cheesy delights for the best results. Baking gives them a crispy outside and a soft, gooey inside.
How Do You Preheat the Oven Efficiently?
First, set your oven to 375°F (190°C). This temperature helps the cheese melt perfectly. Preheating takes about 10-15 minutes. While waiting, line your baking sheet with parchment paper. This step keeps the bombs from sticking.
What Temperature Should You Cook at for Optimal Results?
Always bake your garlic butter cheese bombs at 375°F. This is the ideal temperature. It ensures even cooking and a golden-brown finish. If the oven is too hot, the outside may burn before the inside cooks.
How Long Do You Need to Bake for Perfectly Golden Bombs?
Bake the cheese bombs for 12-15 minutes. Keep an eye on them in the last few minutes. You want them to puff up and turn golden brown. If they don’t look done, give them a couple more minutes. Check them often to avoid overbaking. When they are done, let them cool for about a minute. Then, drizzle with extra garlic butter for added flavor.

What Variations Can You Try with Garlic Butter Cheese Bombs?
You can create many cheese bomb variations to delight your taste buds. First, let’s talk about customizing the cheese filling. You can use cheddar, pepper jack, or even cream cheese. Mixing different cheeses will add a fun twist. You can also add cooked bacon or spinach for extra flavor and texture.
Next, consider herbs and spices. Besides Italian herbs, you can try chili flakes, smoked paprika, or fresh herbs like rosemary or chives. These will give your cheese bombs a unique taste. Just remember to use herbs that pair well with the cheese you choose.
If you want to make them spicy or sweet, it’s easy! For a spicy kick, add jalapeños or hot sauce. For a sweet treat, you can mix in some cinnamon and sugar. Drizzle honey on top after baking for a sweet finish. The possibilities are endless!Enjoy trying out these variations!
How Can You Serve Garlic Butter Cheese Bombs?
Garlic butter cheese bombs make great snacks at any event. You can serve them warm, right from the oven. Place them on a large platter for everyone to enjoy. A sprinkle of fresh parsley adds a nice touch.
What Dipping Sauces Pair Well?
Dipping sauces can enhance the flavor of these cheese bombs. Marinara sauce is a classic choice. It adds a nice tang that pairs well with the garlic. Ranch dressing is another favorite. The coolness of ranch balances the warm, cheesy bites. You could also try garlic aioli for extra garlic flavor.
How Do You Present Them at a Gathering?
When presenting garlic butter cheese bombs, keep it simple and fun. Arrange them in a circle or a stack on a platter. Use a small bowl for dipping sauces in the center. This makes it easy for guests to grab and dip. You can also add some colorful veggies around the platter. This adds a nice contrast and gives a fresh feel.
What Drinks Complement This Dish?
Pairing drinks with garlic butter cheese bombs can be easy. A light white wine, like Sauvignon Blanc, works well. It doesn’t overpower the flavors. For a non-alcoholic option, try sparkling water with lemon. This keeps it refreshing and light. If you want something fun, offer a light beer, like a lager. It can balance the richness of the cheese.
Are There Any Tips for Storing and Reheating Garlic Butter Cheese Bombs?
Storing garlic butter cheese bombs properly keeps them fresh and tasty. First, let the bombs cool completely. This step helps prevent moisture build-up. Once cooled, place them in an airtight container. You can keep them in the fridge for up to three days.
How can you store leftovers properly? Use a container that seals well. If you have many, layer parchment paper between them. This method stops them from sticking together. You could also wrap them tightly in plastic wrap. This keeps them safe from air and moisture.
What is the best way to reheat for freshness? The oven is the best choice. Preheat your oven to 350°F (175°C). Place the bombs on a baking sheet. Heat them for about 8-10 minutes. This way, they get warm and stay crisp. You can use a microwave, but they may lose their crunch.
Can you freeze garlic bombs for future enjoyment? Yes, you can freeze them! After baking, let them cool. Then, place them in a freezer-safe bag or container. Be sure to remove as much air as possible. Frozen garlic bombs can last for up to two months. When ready to eat, thaw them in the fridge overnight. Then, reheat as mentioned before.
Following these tips makes your garlic butter cheese bombs a quick and easy snack any time!
What Are the Nutritional Benefits of Garlic Butter Cheese Bombs?
Garlic butter cheese bombs are tasty and fun to eat. They use simple ingredients that offer some nutritional benefits. Let’s break it down.
What Nutritional Components Are Present in the Ingredients?
The main ingredients in these bombs are biscuits, cheese, garlic, and butter. Biscuits provide carbohydrates for energy. Cheese adds protein and calcium, which are good for bones. Garlic has health benefits, too. It may boost your immune system and lower blood pressure. Butter gives flavor but also adds fat. It’s best to use it in moderation.
Can They Fit Into Various Dietary Plans?
These cheese bombs can fit into many diets. If you want a treat, they work well. If you follow a low-carb diet, you could use almond flour biscuits instead. For a vegan option, try dairy-free cheese and a plant-based butter. This recipe can adapt to meet your needs.
How Can You Make Them a Balanced Snack?
To make these garlic butter cheese bombs a more balanced snack, pair them with fresh veggies. Carrot sticks or cucumber slices can add crunch and nutrients. You can also serve a side of marinara sauce for dipping. This adds flavor and vitamins, making it a more complete snack. Enjoy these cheesy delights without guilt!
To sum up, garlic butter cheese bombs are easy and fun to make. We covered the best ingredients, dough prep, and assembly steps. Cooking tips like oven temperature and timing help ensure perfect results. You can also create delicious variations and pair them with tasty dips. Storing and reheating properly keeps leftovers fresh. While indulging, these bombs offer nutritional benefits too. Try making them for your next gathering and enjoy a treat everyone will love!