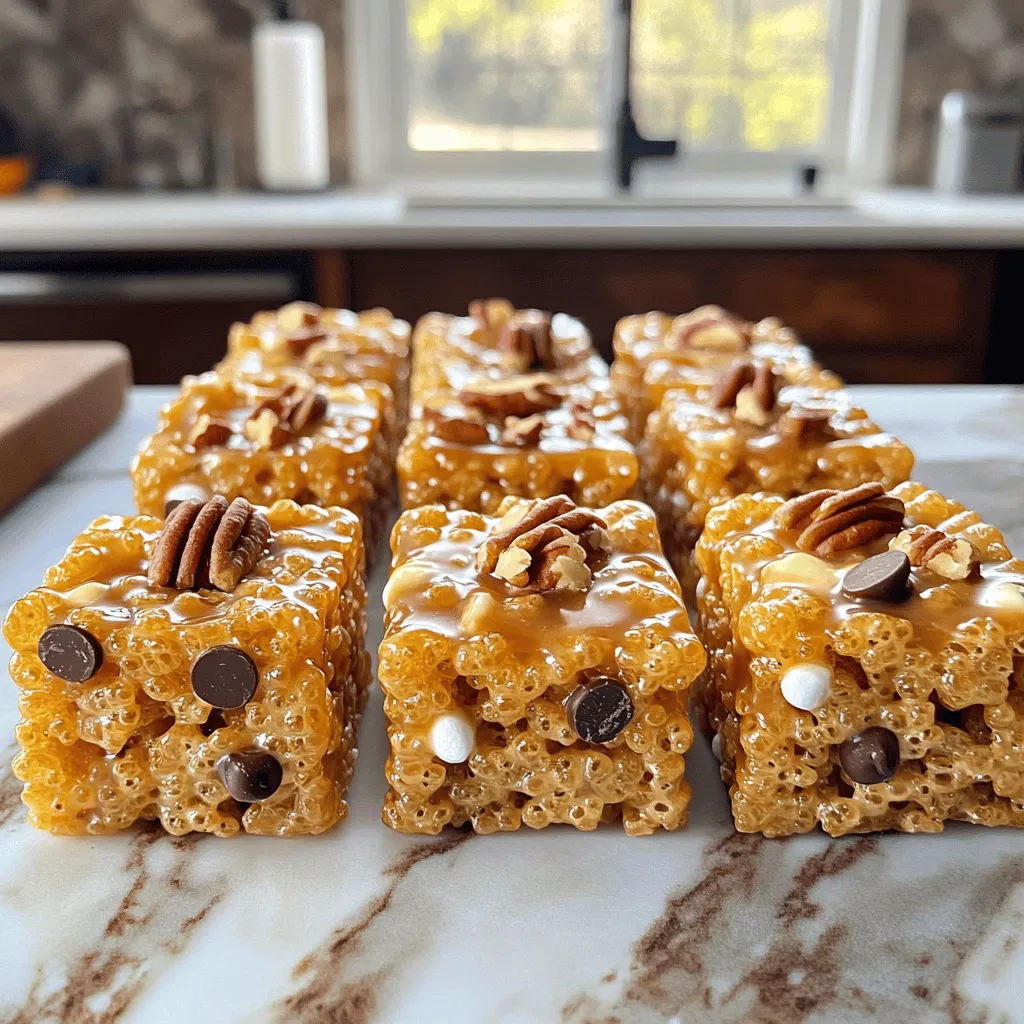
If you love sweet snacks, you’ll adore these Brown Butter Rice Krispie Treats. They’re a simple twist on a classic, bringing rich, nutty flavors to a beloved favorite. I’ll guide you step-by-step, from browning the butter to mixing in optional treats like chocolate chips. Get ready for an easy recipe that creates an irresistible treat you’ll want to share (or keep all to yourself)! Let’s dive in and make some magic happen!
Why I Love This Recipe
- Rich Flavor: The brown butter adds a nutty depth that elevates the classic Rice Krispie treat to new heights.
- Easy to Make: This recipe is straightforward and requires minimal ingredients, making it perfect for a quick treat.
- Customizable: You can easily add your favorite mix-ins like chocolate chips or nuts to make it your own.
- Perfect for Sharing: These treats are great for parties, gatherings, or simply to enjoy with family and friends.
Ingredients
To make Brown Butter Rice Krispie Treats, you need some simple and tasty ingredients. Here’s what you’ll need:
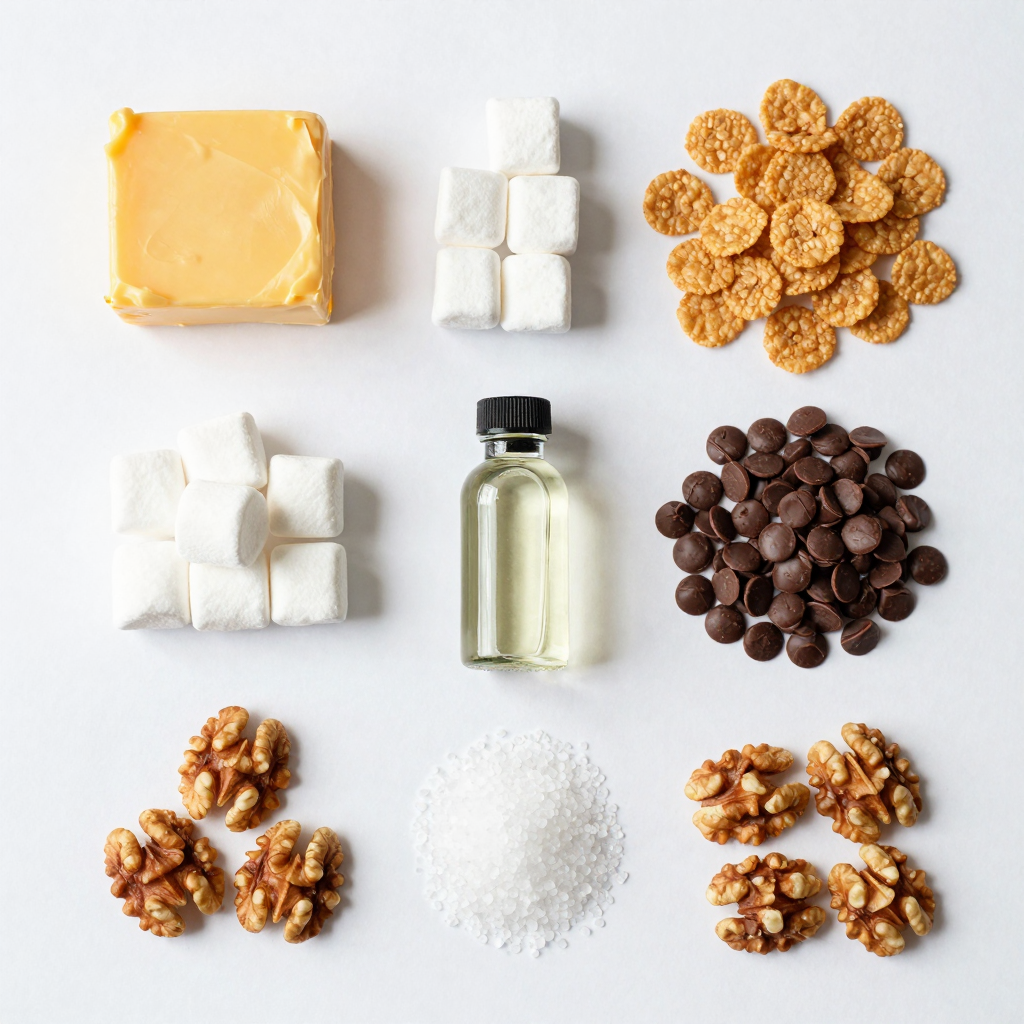
– 4 tablespoons unsalted butter
– 1 package (10 oz) mini marshmallows
– 6 cups Rice Krispie cereal
– 1/2 teaspoon vanilla extract
– 1/4 teaspoon sea salt
– Optional: 1/2 cup chocolate chips
– Optional: 1/4 cup chopped nuts (like pecans or walnuts)
These ingredients blend together to create a sweet and crunchy treat. The unsalted butter gives a rich flavor, while the mini marshmallows add that classic gooeyness. Rice Krispie cereal brings the crispiness that makes these treats so fun to eat.
You can also add chocolate chips or nuts to make them even tastier. The chocolate adds a nice sweetness, and the nuts give a lovely crunch.
Step-by-Step Instructions
Brown the Butter
First, melt the butter in a large saucepan over medium heat. You need to stir it often to keep it from burning. Watch closely as the butter foams. After about 4 to 5 minutes, it will turn golden brown. This step adds a nutty flavor that makes these treats special.
Add and Melt Marshmallows
Once the butter is browned, lower the heat to low. Add the mini marshmallows to the pan. Stir constantly until the marshmallows melt and blend with the brown butter. You want a smooth mixture without lumps. This is the base of your Rice Krispie treats.
Mix in Flavorings
After the marshmallows melt, take the pan off the heat. Now, stir in the vanilla extract and sea salt. This step adds depth to the flavor. Mix well to make sure everything combines nicely.
Combine with Rice Krispies
Next, gradually add the Rice Krispie cereal to the mixture. Use a spatula to fold it in gently. You want to coat every piece of cereal evenly. This ensures each bite is full of flavor and texture.
Add Optional Mix-Ins
If you like, now is the time to fold in chocolate chips and chopped nuts. These extras add more flavor and crunch. Mix until they are evenly spread throughout the mixture.
Press and Cool
Lightly grease a 9×13 inch baking pan with cooking spray. You can also line it with parchment paper for easier removal. Pour the Rice Krispie mixture into the pan. Press it down firmly with your hands or a spatula to create an even layer. Let the treats cool for about 30 minutes.
Pro Tips
- Browning the Butter: Make sure to stir constantly while browning the butter to achieve a rich, nutty flavor without burning it.
- Even Coating: When adding the Rice Krispies, fold gently to ensure that each piece is evenly coated without crushing the cereal.
- Cooling Time: Allow the treats to cool completely before cutting to ensure they hold their shape and do not crumble.
- Customization: Feel free to mix in your favorite add-ins like dried fruits or different types of chocolate for a personalized touch.
Tips & Tricks
Perfecting Browning Butter
To avoid burning your butter, keep the heat at medium. Stir it often. Watch closely for the color change. The butter should turn a lovely golden brown. You’ll know it’s perfect when it has a nutty aroma. This process takes about 4-5 minutes.
Achieving the Right Texture
To prevent hard treats, do not over-press the mixture. Use buttered hands or a spatula. Lightly press down to create a flat layer. For sticky treats, ensure the butter and marshmallows blend well. This helps keep the treats soft and chewy.
Flavor Enhancements
Want more flavor? Try adding a pinch of cinnamon or a splash of almond extract. For fun mix-ins, consider adding crushed cookies or dried fruit. Chocolate chips or nuts are great for extra texture. Be creative and make your treats unique!
Variations
Different Cereal Options
You can switch up Rice Krispies for other cereals. Try using Fruity Pebbles for a fun twist. Cornflakes also work well. They give a different crunch and taste. For themed treats, use cereal colors to match events. For Halloween, use orange and black cereals. For birthdays, pick bright, colorful options. These changes can make treats more exciting.
Flavor Combinations
Get creative with flavors! Add peanut butter for a nutty taste. You could also mix in cinnamon or coconut. For seasonal fun, try pumpkin spice in fall. In winter, consider peppermint extract for a fresh touch. Sprinkles can add color and a festive feel. These ideas can make your treats stand out.
Dietary Adjustments
If you need gluten-free options, use gluten-free Rice Krispies. There are many brands that offer these now. For a vegan version, swap butter for coconut oil. Use vegan marshmallows instead of regular ones. These adjustments let everyone enjoy this treat, no matter their diet.
Storage Information
Best Storage Practices
To keep your Brown Butter Rice Krispie Treats fresh, store them in an airtight container. This helps prevent the treats from becoming hard or stale. You can also layer them with parchment paper to avoid sticking. Always let them cool completely before storing.
Shelf Life
For best taste and texture, enjoy your treats within three days. After that, they may become dry or tough. Look for signs of spoilage, like a hard texture or changes in smell. If they smell off, it’s best to toss them.
Freezing Options
You can freeze these treats for longer storage. To freeze, wrap them tightly in plastic wrap, then place them in a freezer-safe bag. When you’re ready to eat, thaw them in the fridge overnight. They may lose some texture, so try to enjoy them fresh when possible.
FAQs
What is the difference between regular and brown butter?
Brown butter has a nutty flavor. You create it by heating butter until it turns golden brown. Regular butter tastes creamy but lacks that deep flavor. This extra step makes a big difference in your treats.
Can I use margarine instead of butter?
You can use margarine, but the flavor will change. Margarine lacks the rich taste of brown butter. If you want the best flavor, stick with real butter. It gives your treats the best taste and texture.
How long do Rice Krispie Treats last?
Rice Krispie Treats stay fresh for about a week. Store them in an airtight container at room temperature. If you want them to last longer, you can freeze them. Just wrap them well to avoid freezer burn.
Can I make Brown Butter Rice Krispie Treats without marshmallows?
Yes, you can use alternatives like peanut butter or vegan marshmallows. However, the texture and taste will change. Marshmallows provide sweetness and chewiness that is hard to replace. If you want a different flavor, consider adding some honey or agave.
What’s the best way to cut the treats after cooling?
To cut the treats easily, use a sharp knife. Lightly grease the knife to prevent sticking. Let the treats cool completely before cutting. This helps them hold their shape better and makes serving easier. For fun shapes, use cookie cutters!
Brown Butter Rice Krispie Treats are simple and fun to make. We covered the essential ingredients and detailed steps, from browning the butter to mixing in extras. I shared tips to help you achieve the perfect texture and delicious flavors. You can even explore different variations to suit your taste. Remember to store your treats properly for the best taste. Enjoy making these treats, and feel free to experiment with new ideas! Your kitchen adventure is just beginning.


