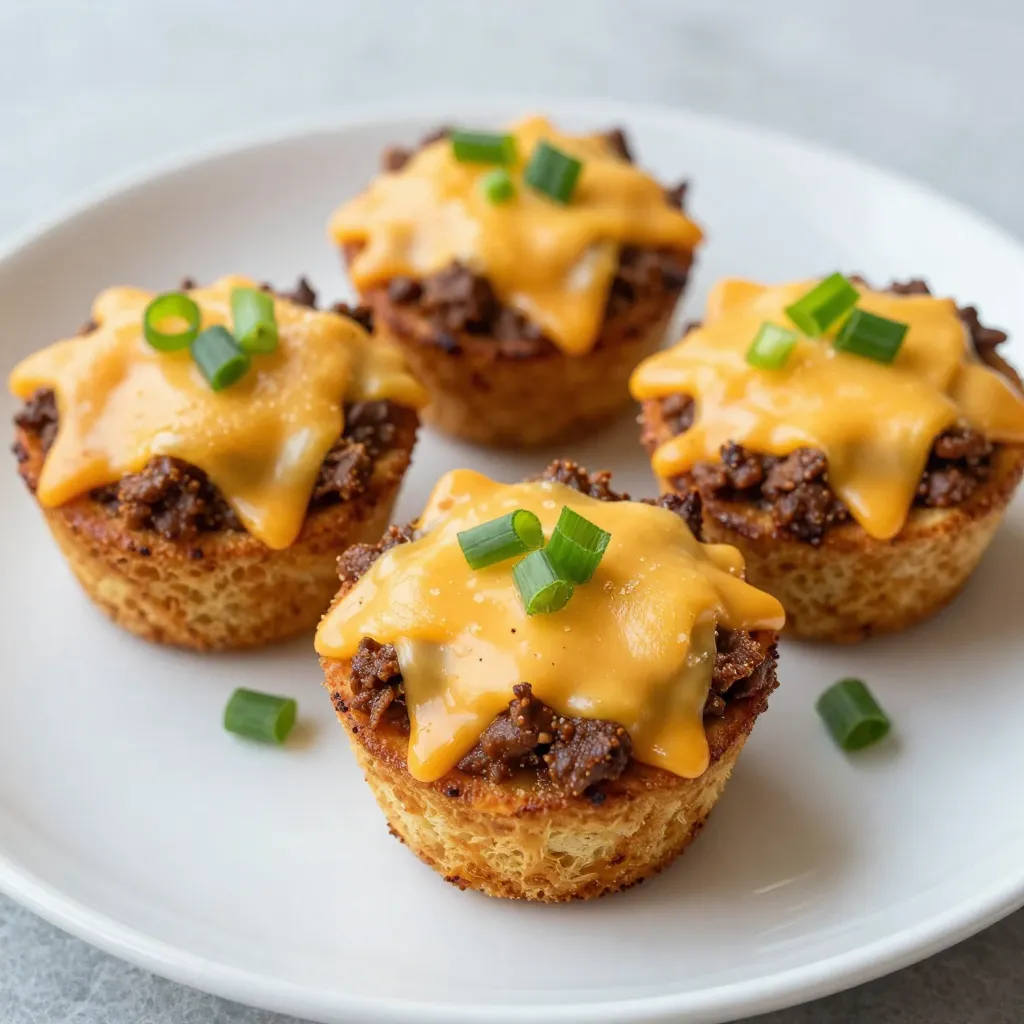
Are you craving a tasty treat that’s both easy to make and full of flavor? Cheesy Chili Cornbread Cups are the perfect answer! These little bites combine the warmth of chili with the comfort of cornbread, making them a hit for any occasion. Whether you’re hosting a party or just looking for a quick snack, these cups are savory and simple. Join me as we explore how to whip up this delicious recipe in no time!
Why I Love This Recipe
- Delicious Flavor Combination: The mix of cheesy cornbread and hearty chili creates a comforting and satisfying bite.
- Easy to Make: This recipe comes together quickly, making it perfect for busy weeknights or last-minute gatherings.
- Customizable: Add your favorite toppings or spices to make these cornbread cups truly your own!
- Great for Sharing: These individual servings are perfect for parties, picnics, or family dinners.
Ingredients
List of Ingredients Required
To make Cheesy Chili Cornbread Cups, gather these ingredients:
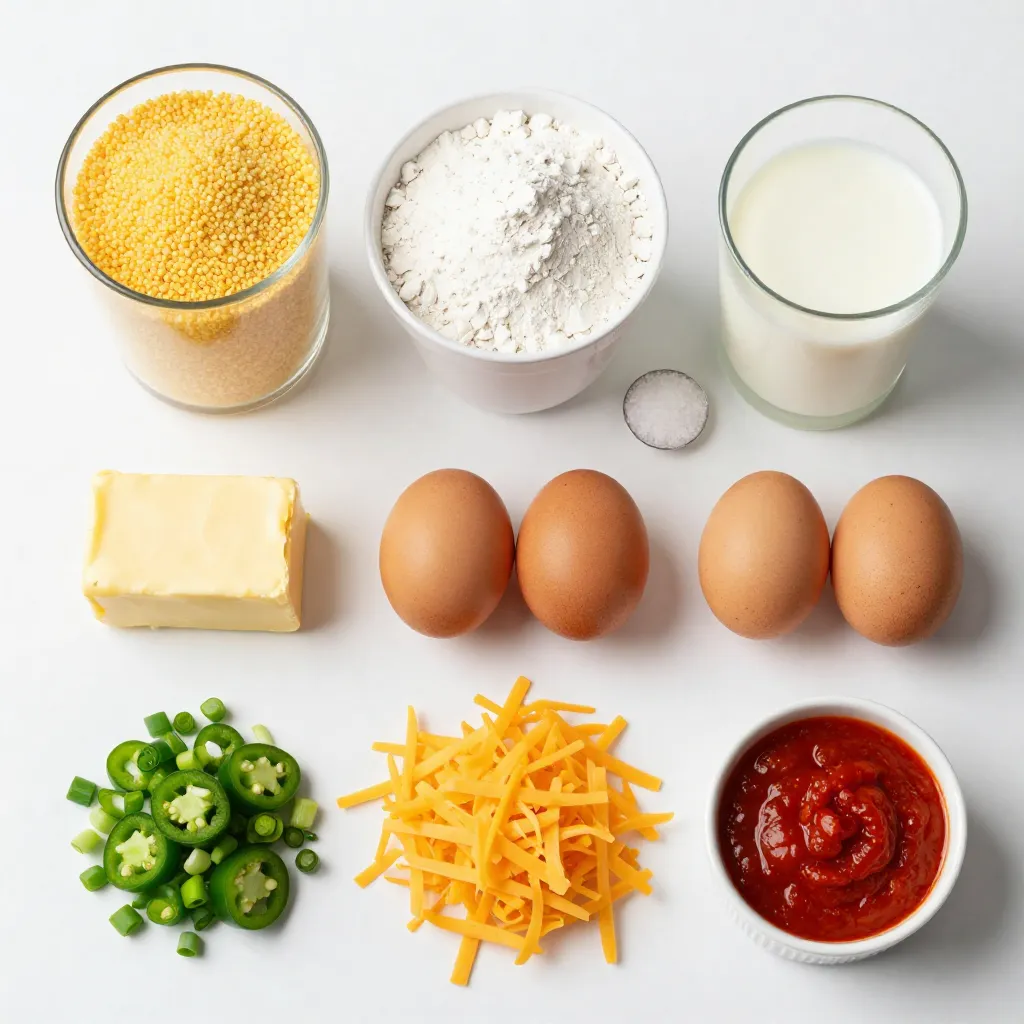
– 1 cup cornmeal
– 1 cup all-purpose flour
– 1 tablespoon baking powder
– 1 teaspoon salt
– 1 cup milk
– 2 large eggs
– 1/4 cup unsalted butter, melted
– 1 cup shredded cheddar cheese
– 1 cup chili (canned or homemade)
– 1/4 cup diced jalapeños (optional)
– 1/4 cup chopped green onions
Measuring Tips
Measuring ingredients correctly helps your recipe turn out well. Use dry measuring cups for flour and cornmeal. Level them off with a straight edge. For liquids like milk, use a liquid measuring cup. Pour until it reaches the right line. When measuring butter, melt it first and then pour it into a measuring cup. For accuracy, let the butter cool slightly before using it.
Optional Ingredients for Customization
You can make these cornbread cups your own! Try adding:
– Chopped bell peppers for sweetness
– Diced onions for flavor
– Different cheeses like pepper jack or mozzarella
– Cooked ground meat for extra protein
– Fresh herbs like cilantro for a fresh touch
These options can change the taste and make your cups unique!
Step-by-Step Instructions
Prepping the Oven and Muffin Tin
First, set your oven to 400°F (200°C). This helps cook the cornbread evenly. While the oven heats, grease your muffin tin well. Use cooking spray or butter to ensure they pop out easily later.
Mixing the Dry Ingredients
In a large bowl, mix the dry ingredients. Combine 1 cup of cornmeal, 1 cup of flour, 1 tablespoon of baking powder, and 1 teaspoon of salt. Stir these together until they blend completely. This step is key for even flavor in your cornbread.
Combining Wet Ingredients and Mixing
In another bowl, whisk together the wet ingredients. Add 1 cup of milk, 2 large eggs, and 1/4 cup of melted butter. Mix these well until smooth. Pour this wet mixture into the dry ingredients. Stir gently until just combined. Be careful not to overmix; a few lumps are okay!
Assembling the Cornbread Cups
Spoon about 1 heaping tablespoon of batter into each muffin cup. Then, add a dollop of chili on top, about 1 tablespoon. Cover the chili with another tablespoon of batter. Fill each cup about 2/3 full. This layering creates a tasty surprise inside each cup.
Baking and Cooling Instructions
Place the muffin tin in the preheated oven. Bake for 18-20 minutes. Look for a golden brown top. A toothpick inserted should come out clean. Once done, let the cups cool in the pan for a few minutes. Then, transfer them to a wire rack to cool completely. Don’t forget to garnish with chopped green onions before serving!
Tips & Tricks
How to Achieve Perfect Cornbread Texture
To get the best cornbread texture, mix ingredients gently. Overmixing can make your cornbread tough. Use a whisk for the wet mix. Combine it with dry ingredients until they just come together. The batter should be slightly lumpy. This helps keep the cornbread light and fluffy.
Best Practices for Storing Leftover Cups
Store leftover cornbread cups in an airtight container. They stay fresh in the fridge for up to three days. If you freeze them, wrap each cup in plastic wrap. Place them in a freezer bag to keep out air. They can last up to three months frozen.
Serving Suggestions for Enhancing Flavor
Top your cornbread cups with sour cream or avocado. A dollop of salsa adds a fresh kick! You can also sprinkle more cheese on top before serving. Fresh herbs like cilantro or parsley can brighten the dish. These simple toppings make each bite more exciting.
Pro Tips
- Use Fresh Ingredients: Freshly grated cheese and homemade chili enhance the flavor and texture of the cornbread cups.
- Don’t Overmix: Mix the batter just until combined to ensure a light and fluffy texture. Overmixing can lead to dense cornbread.
- Experiment with Toppings: Feel free to add toppings like sour cream, avocado, or salsa for an extra layer of flavor.
- Adjust Spice Level: If you enjoy heat, increase the amount of jalapeños or add some cayenne pepper to the batter.
Variations
Vegetarian-Friendly Alternatives
You can easily make these cornbread cups vegetarian. Simply swap the chili for a mix of beans, corn, and diced tomatoes. This keeps the flavor rich and hearty. You can add spices like cumin or paprika for extra zest. Mixing in vegetables like bell peppers or zucchini adds nutrition and taste.
Spicy Twist with Additional Ingredients
If you love heat, add diced jalapeños or crushed red pepper flakes to the batter. This gives your cornbread cups a kick that spice lovers will enjoy. You can also top the chili with pepper jack cheese instead of cheddar for a creamy, spicy finish.
Gluten-Free Option
For a gluten-free version, replace all-purpose flour with a gluten-free blend. Make sure your chili is also gluten-free. Double-check the labels of all ingredients. This way, you can enjoy delicious cornbread cups without the gluten. Don’t worry; they will still taste amazing!
Storage Info
How to Store Unbaked Batter
You can store unbaked batter easily. First, cover your bowl with plastic wrap. Make sure it fits tightly to keep air out. You can store it in the fridge for up to 24 hours. This lets the flavors mix well. Just remember to stir it again before you bake.
Refrigeration vs. Freezing
Refrigeration is best for short-term storage. If you want to keep it longer, freezing is a good choice. To freeze, pour the batter into a freezer-safe container. Leave some space at the top for expansion. You can freeze it for up to three months. When you are ready, thaw it in the fridge overnight.
Reheating Instructions
To reheat your cornbread cups, use the oven. Preheat it to 350°F (175°C). Place the cups on a baking sheet. Cover them with foil to keep them moist. Heat for about 10-15 minutes. You can also use a microwave if you’re in a hurry. Heat them for about 30-45 seconds. Enjoy them warm for the best taste!
FAQs
What are Cheesy Chili Cornbread Cups?
Cheesy Chili Cornbread Cups are tasty mini muffins. They blend cornbread with chili, cheese, and optional jalapeños. Each cup has a soft cornbread base topped with warm chili. This dish is great for snacks, parties, or a cozy dinner. You get a burst of flavor in every bite.
How long can I keep leftovers?
You can keep leftovers for about three days. Store them in an airtight container. When stored correctly, they stay fresh and tasty. Just remember to check for any signs of spoilage before eating.
Can I make these ahead of time?
Yes, you can make them ahead of time. Prepare the batter and fill the muffin tin. Cover it and put it in the fridge for up to 24 hours. Bake them when you are ready. This makes meal prep easy and fun.
What can I serve with Cheesy Chili Cornbread Cups?
These cups pair well with many sides. Try serving them with a fresh salad. You can also enjoy them with salsa or sour cream. They are great with a bowl of soup too. The options are endless!
Can I use different types of cheese?
Absolutely! You can use any cheese you love. Try pepper jack for a spicy kick. Alternatively, use mozzarella for a milder taste. Mixing cheeses can add depth and flavor to your cornbread cups.
We explored the ingredients needed for the Cheesy Chili Cornbread Cups. You learned tips on measuring and customizing your mix. Next, we covered steps for baking these tasty treats, from prepping your oven to cooling the cups. We shared tips for perfect texture and storage and looked at fun variations like vegetarian and spicy options.
In summary, these cups are easy to make, and you’ll enjoy the many ways to serve them. Get cooking and savor each bit