
If you crave a sweet treat that’s both easy and tasty, you’ll love these Cherry Almond Scones! In this guide, I’ll walk you through a simple recipe that makes scones soft and fluffy. Whether you want to impress guests or enjoy a cozy breakfast at home, cherry almond scones are a perfect choice. Let’s dive in and discover how to create this delightful dish together!
Why I Love This Recipe
- Delicious Flavor Combination: The sweet cherries combined with the nutty almonds create a delightful contrast in every bite.
- Easy to Make: This scone recipe is simple and quick, making it perfect for any skill level in the kitchen.
- Perfect for Any Occasion: These scones are ideal for breakfast, brunch, or as a delightful afternoon snack with tea.
- Versatile Recipe: Feel free to substitute other fruits or nuts based on what you have on hand, giving you endless variations!
Ingredients
List of Ingredients
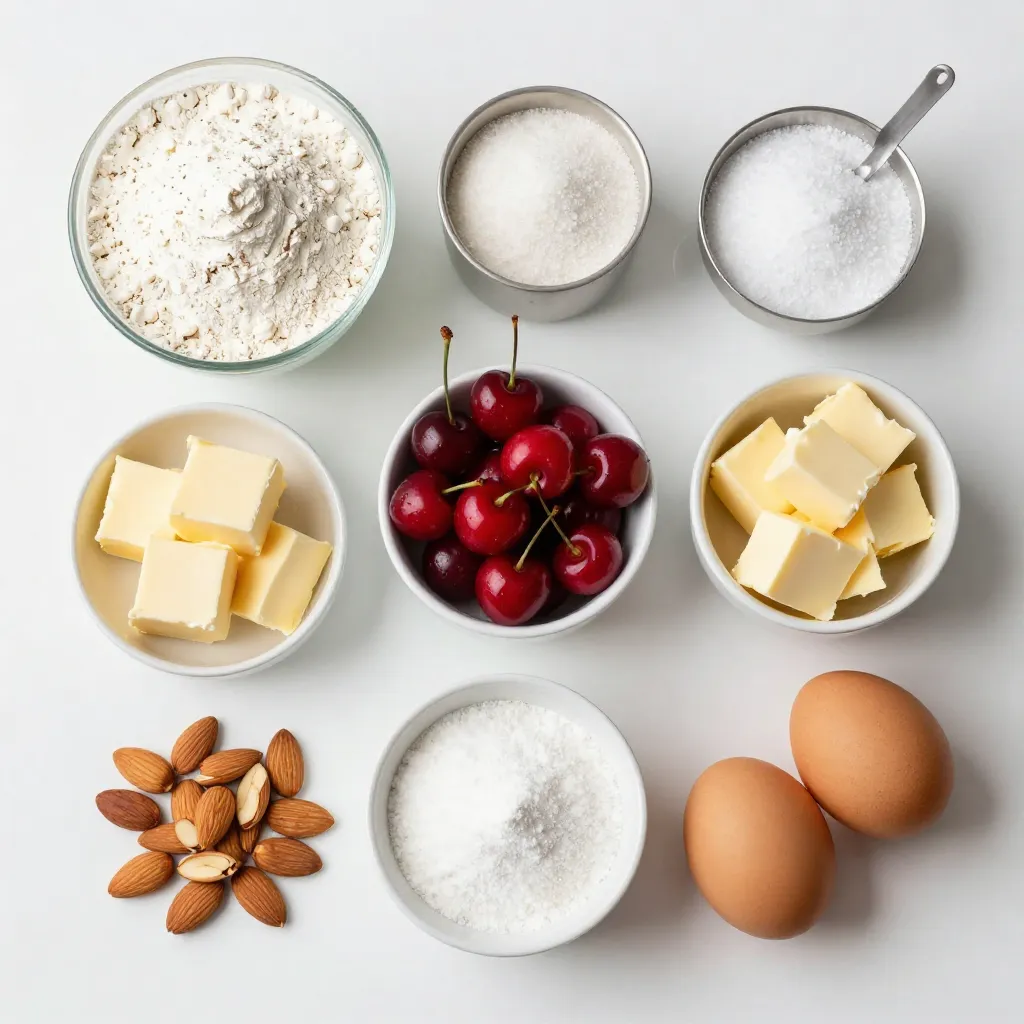
To make Cherry Almond Scones, gather these simple items:
– 2 cups all-purpose flour
– 1/2 cup sugar
– 1 tablespoon baking powder
– 1/2 teaspoon salt
– 1/2 cup unsalted butter, cold and cubed
– 1/2 cup chopped fresh cherries (pitted)
– 1/4 cup sliced almonds
– 1/2 teaspoon almond extract
– 1/2 cup heavy cream
– 1 large egg
– Additional sugar for sprinkling on top (optional)
Ingredient Substitutions
You can swap some ingredients if you need to. Here are some ideas:
– Use whole wheat flour instead of all-purpose flour for a heartier scone.
– Replace sugar with honey or maple syrup for natural sweetness.
– If you don’t have fresh cherries, frozen cherries work well too; just thaw and drain them.
– Use coconut cream instead of heavy cream for a dairy-free option.
– Almonds can be swapped with walnuts or pecans for a different nutty flavor.
Equipment Needed
To bake these scones, you’ll need a few tools:
– Mixing bowls for combining ingredients
– A whisk for blending dry and wet ingredients
– A pastry cutter or your fingers for cutting butter
– A baking sheet lined with parchment paper
– A knife or pizza cutter to slice the scones
– An oven preheated to 400°F (200°C) for baking
Using the right equipment helps ensure your scones turn out great.
Step-by-Step Instructions
Preparation Overview
To start, gather your ingredients. You need flour, sugar, baking powder, salt, butter, cherries, almonds, almond extract, cream, and an egg. Preheat your oven to 400°F (200°C). This makes your scones rise nicely. Line a baking sheet with parchment paper for easy cleanup.
Detailed Baking Steps
1. In a big bowl, mix together the flour, sugar, baking powder, and salt. Use a whisk for even blending.
2. Cut in the cold butter until it looks like coarse crumbs. I like using my fingers or a pastry cutter for this.
3. Gently fold in the cherries and almonds. Mix just enough so they are spread out.
4. In another bowl, whisk the cream, egg, and almond extract together.
5. Pour this mixture into the flour bowl. Stir until just combined. Don’t overmix or your scones will be tough!
6. Turn the dough onto a floured surface and knead it lightly a few times. Shape it into a circle about 1 inch thick.
7. Cut the circle into 8 wedges. Place them on the baking sheet, leaving space between each one.
8. If you like, sprinkle sugar on top for added sweetness.
9. Bake for 15-20 minutes. Look for a golden brown color on the edges.
10. Let them cool on the baking sheet for a few minutes. Then, transfer them to a wire rack to cool completely.
Tips for Mixing and Kneading
Mix gently to keep the scones light. Knead the dough only a few times. This helps keep them tender. If the dough feels sticky, dust a little flour on your hands. Use cold butter to help the scones rise well. Enjoy the process and have fun!
Tips & Tricks
How to Ensure Fluffy Scones
To make fluffy scones, keep your butter cold. Cold butter creates pockets of air. This helps the scones rise. Cut the butter into small cubes and mix it quickly. Don’t overwork the dough. Mixing too much can make the scones tough. When you see some flour still dry, stop mixing. This will keep the texture light.
Baking Time Adjustments
Baking time can change based on your oven. Start checking your scones at 15 minutes. If they look golden brown, they are likely done. If not, give them a few more minutes. Every oven has its quirks, so keep an eye on them. Scones should be firm to the touch when ready.
Common Mistakes to Avoid
Avoid using warm butter. Warm butter can lead to flat scones. Also, don’t skip the baking powder. It helps the scones rise. Be careful not to over-knead the dough. Over-kneading can make them dense. Lastly, remember to space out the scones on the baking sheet. They need room to rise as they bake.
Pro Tips
- Use Cold Ingredients: Ensure your butter and cream are cold; this helps create flaky layers in your scones.
- Don’t Overmix: Mix just until combined; overmixing can lead to tough scones.
- Experiment with Add-ins: Feel free to substitute or add other fruits and nuts, like blueberries or walnuts, for a twist on the classic flavor.
- Store Properly: Keep any leftover scones in an airtight container at room temperature for up to 2 days for optimal freshness.
Variations
Gluten-Free Cherry Almond Scones
To make gluten-free cherry almond scones, swap all-purpose flour for gluten-free flour. Look for a blend that works well in baking. You may need to add a bit more liquid to the dough. Use a gluten-free flour mix that includes xanthan gum for the best texture. These scones will still be soft and flavorful, just like the original.
Vegan Cherry Almond Scones
For vegan cherry almond scones, replace the butter with coconut oil or vegan butter. Use almond milk in place of heavy cream. You can also substitute the egg with a flaxseed meal mixture. Mix one tablespoon of flaxseed meal with three tablespoons of water and let it sit for a few minutes. This creates a great binding agent, keeping your scones fluffy and moist.
Flavor Additions and Twists
You can add fun flavors to your cherry almond scones. Try mixing in some chocolate chips for a sweet touch. You can also use dried cherries if fresh ones aren’t available. For a citrusy twist, add some lemon or orange zest to the dough. If you want a nutty flavor, consider adding walnuts or pecans. Each twist can change the taste while keeping the delightful cherry almond base.
Storage Info
How to Store Scones
After baking, let the scones cool fully. Once cool, place them in an airtight container. They stay fresh at room temperature for up to two days. If you want to keep them longer, consider freezing.
Freezing Instructions
To freeze scones, wrap each one tightly in plastic wrap. Then, place them in a freezer bag or container. They can last up to three months in the freezer. When you’re ready to enjoy, just take out the number you need.
Best Ways to Reheat Scones
To reheat, preheat your oven to 350°F (175°C). Place the scones on a baking sheet. Heat them for about 10 minutes until warm. You can also use a microwave. Heat for 15-20 seconds, but they may not be as crispy. Enjoy them warm for the best taste!
FAQs
Can I use frozen cherries?
Yes, you can use frozen cherries. Just remember to thaw and drain them first. This way, you avoid adding extra moisture to the dough. Ensure you chop them into smaller pieces. This helps distribute the cherry flavor evenly in the scones.
How do I prevent my scones from being dry?
To keep your scones moist, do not overmix the dough. Mix until just combined. The butter should be cold and cubed. This creates small pockets of air, making them fluffy. Adding a little extra cream can also help. Finally, bake them until they are just golden, not too long.
What can I substitute for heavy cream?
You can use milk with a bit of melted butter. Mix ¾ cup of milk with ¼ cup of melted butter to mimic heavy cream. This keeps the richness while cutting down on fat. You can also try using a non-dairy milk option for a lighter version.
We covered the main ingredients and equipment needed for scones. I provided a step-by-step guide to ensure perfect results. You learned tips for light, fluffy scones and how to avoid common mistakes. We explored variations, including gluten-free and vegan options. Finally, I shared storage and reheating methods for fresh scones.
By following these guidelines, you can create delicious scones every time. Enjoy the process and share your tasty creation


