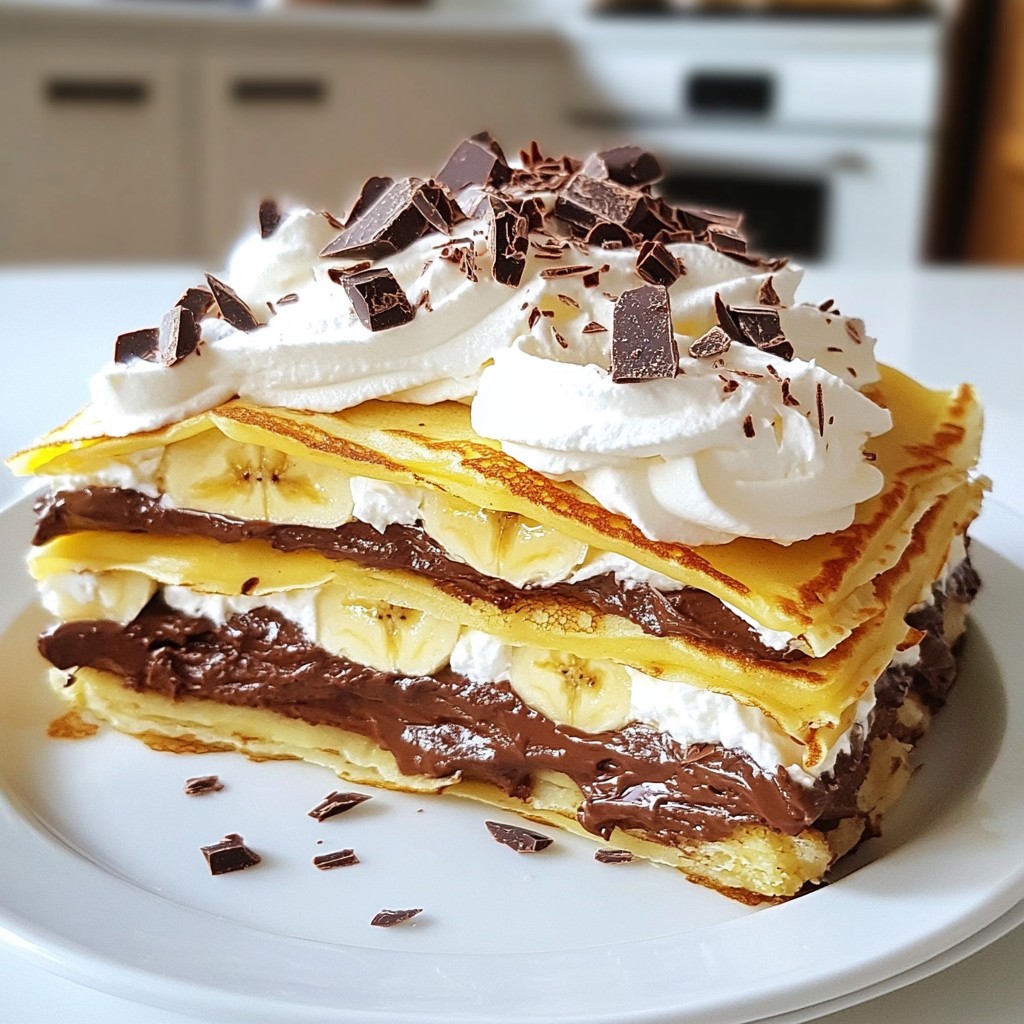
Are you ready to treat yourself to something sweet and fun? This Chocolate Banana Crepe Cake is both delightful and simple to make. With layers of soft crepes, rich chocolate, and fresh bananas, it’s a showstopper. In this guide, I'll walk you through easy steps, essential tips, and tasty variations. Get your ingredients ready, and let’s dive into making this delicious dessert that everyone will enjoy!
Why I Love This Recipe
- Delicious Flavor Combination: The rich chocolate hazelnut spread paired with sweet bananas creates an irresistible flavor that everyone loves.
- Stunning Presentation: This crepe cake is not only delicious but also a showstopper at any gathering, with its beautiful layers and garnishes.
- Customizable Layers: You can add different fruits, nuts, or flavored spreads to make it unique and tailored to your taste preferences.
- Make Ahead Option: This cake can be prepared in advance and chilled, making it a convenient dessert for hosting or meal prep.
Ingredients
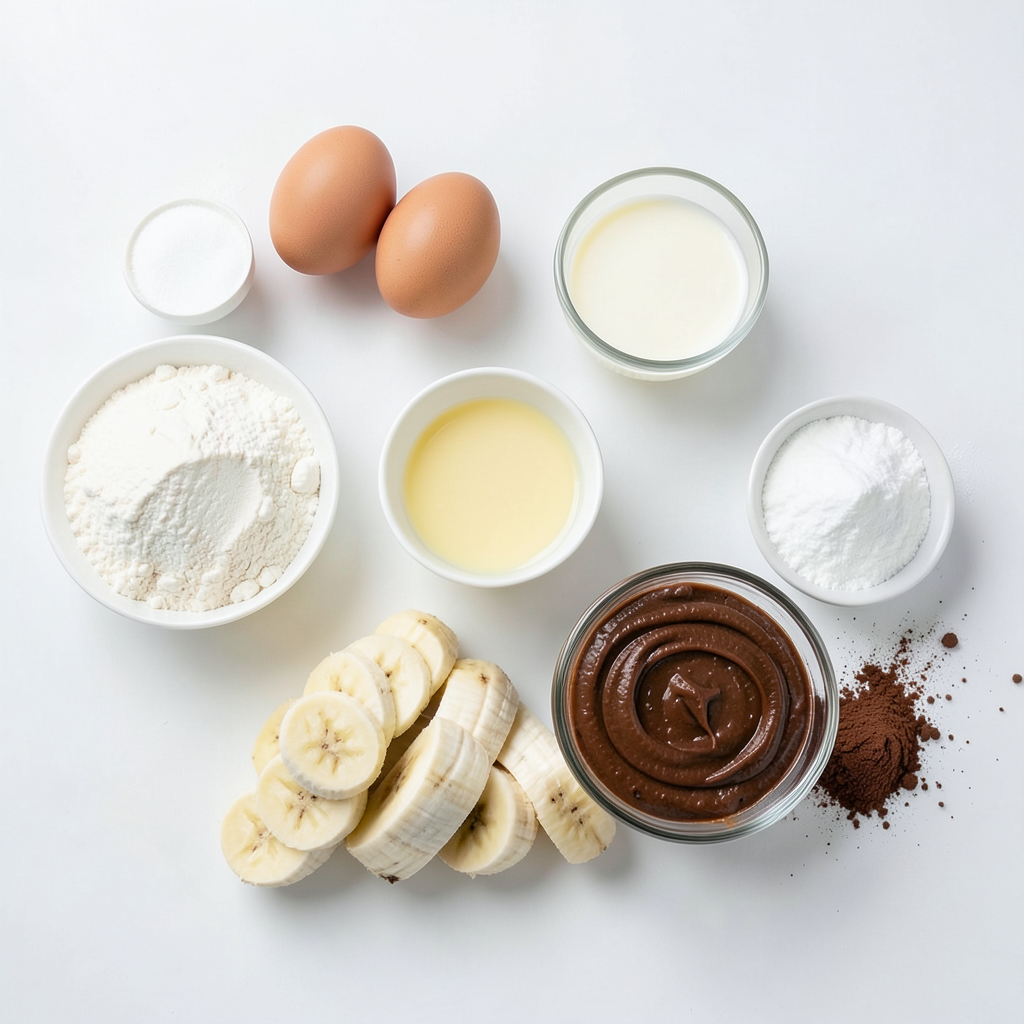
Main Ingredients for Chocolate Banana Crepe Cake
For this tasty cake, you will need:
- 1 cup all-purpose flour
- 2 large eggs
- 1 ½ cups milk
- 2 tablespoons melted butter
- 2 tablespoons granulated sugar
- 1 teaspoon vanilla extract
- 2 ripe bananas, sliced
- 1 cup chocolate hazelnut spread
- 1 cup heavy whipping cream
- 2 tablespoons powdered sugar
- Chocolate shavings or cocoa powder for garnish
These ingredients create layers of flavor and texture. The flour, eggs, and milk form a smooth crepe batter. The chocolate hazelnut spread adds rich sweetness, while ripe bananas bring freshness. The whipped cream makes everything light and fluffy.
Alternative Ingredients and Substitutions
If you want to swap some ingredients, here are good options:
- Use whole wheat flour for a healthier choice.
- Try almond milk or oat milk for a dairy-free version.
- Replace chocolate hazelnut spread with any nut butter or fruit spread.
- For a lower sugar option, use a sugar substitute in the whipped cream.
These swaps help everyone enjoy this cake, no matter their diet.
Essential Baking Tools Required
To make this cake, you will need:
- Mixing bowl
- Whisk or hand mixer
- Non-stick skillet or crepe pan
- Spatula
- Serving platter
Having the right tools makes the process easy. A non-stick skillet helps cook perfect crepes without sticking. A whisk or hand mixer ensures your batter is smooth. These simple tools will help you create a delightful dessert quickly.
Step-by-Step Instructions
How to Prepare the Crepe Batter
To make the crepe batter, start by gathering your ingredients. You need 1 cup of all-purpose flour, 2 large eggs, 1 ½ cups of milk, 2 tablespoons of melted butter, 2 tablespoons of granulated sugar, and 1 teaspoon of vanilla extract. In a mixing bowl, whisk together these ingredients until smooth. This is key for a great texture. After mixing, let the batter sit for 30 minutes. This resting time helps the flour absorb the liquid, leading to tender crepes.
Cooking the Crepes Perfectly
Now, it’s time to cook the crepes. Heat a non-stick skillet or crepe pan over medium heat. Lightly grease the pan with a little butter. Pour about ¼ cup of batter into the pan. Quickly swirl it around to coat the bottom evenly. Cook for 1-2 minutes, watching for the edges to lift. When the bottom turns light brown, flip the crepe and cook for another minute. Repeat this process until you use all the batter. Stack the crepes on a plate. This keeps them warm and ready for the cake.
Tips for Whipping Cream to Perfection
Next, let’s whip the cream. In a bowl, mix 1 cup of heavy whipping cream with 2 tablespoons of powdered sugar. Use a hand mixer to whip it until soft peaks form. Watch closely; over-whipping can turn your cream into butter, which is not what we want. The right texture will be fluffy and light. This cream will add a lovely richness to your cake.
Assembling the Chocolate Banana Crepe Cake
To assemble the cake, place one crepe on a serving platter. Spread a thin layer of chocolate hazelnut spread over it. Add a few slices of ripe banana on top. Then, add a layer of whipped cream. Repeat this layering until all ingredients are used. Finish with a crepe on top. Make sure your layers are even and neat. This creates a stunning look for the cake.
Proper Chilling Techniques for Best Flavor
Once you’ve assembled the cake, it’s time to chill it. Place the crepe cake in the refrigerator for at least 1 hour. Chilling helps the layers meld together and enhances the flavors. This step is crucial for a delicious bite. After chilling, slice the cake into wedges. You can sprinkle chocolate shavings or cocoa powder on top for a nice touch. Enjoy your delightful creation!
Tips & Tricks
Common Mistakes to Avoid When Making Crepes
Making crepes can be tricky. Here are some common mistakes to avoid:
- Not letting the batter rest: Always let your batter sit for at least 30 minutes. This helps the gluten relax, leading to tender crepes.
- Overheating the pan: If the pan is too hot, your crepes will burn. Keep the heat at medium.
- Using too much butter: A little grease is enough for the pan. Too much can make the crepes greasy.
How to Achieve the Perfect Layering
Layering is key to a great crepe cake. Here’s how to do it right:
- Start with a crepe: Place your first crepe flat on the plate.
- Spread evenly: Use about two tablespoons of chocolate hazelnut spread. Spread it thinly, and make sure it covers the whole crepe.
- Add bananas: Place a few banana slices evenly on top.
- Whipped cream layer: Add a thin layer of whipped cream next. Repeat this for every layer, finishing with a crepe on top.
Presentation and Garnishing Ideas
Presentation makes your cake shine. Here are some fun ideas:
- Chocolate shavings: Sprinkle chocolate shavings on top for a rich look.
- Cocoa powder: Lightly dust cocoa powder over the top for contrast.
- Slice fruit: Add extra banana slices or berries around the base for color.
- Mint leaves: A few mint leaves can add a fresh touch.
These tips will help you make a stunning Chocolate Banana Crepe Cake that is sure to impress!
Pro Tips
- Resting the Batter: Allow the crepe batter to rest for at least 30 minutes. This helps the flour fully absorb the liquid, resulting in more tender crepes.
- Even Cooking: Ensure your skillet is evenly heated before pouring the batter. An uneven temperature can lead to crepes that are cooked inconsistently.
- Layering Wisely: When assembling the cake, spread a thin layer of chocolate hazelnut spread to avoid overwhelming the crepes and maintain a balanced flavor.
- Chill for Best Results: Don't skip the chilling step! Allowing the cake to set in the refrigerator helps the flavors meld together beautifully and makes slicing easier.
Variations
Different Fillings for Custom Crepe Cakes
You can switch up the filling in your crepe cake. Try peanut butter or cream cheese. You can also use fruit spreads like strawberry or raspberry. For a tropical twist, add coconut cream or mango slices. Each filling gives a new taste and fun texture. Mix and match your favorites to create a unique dessert.
Dietary Modifications (Gluten-Free, Vegan Options)
Making this cake gluten-free is easy. Just use gluten-free flour instead of regular flour. You can also make it vegan. Replace eggs with flaxseed meal and use plant-based milk. For the whipped cream, use coconut cream instead of heavy cream. These changes keep the flavors while making it friendly for more diets.
Seasonal Flavor Additions (e.g., Berries, Citrus)
Seasonal fruits can add a fresh touch. In spring, use strawberries or blueberries for a burst of flavor. In summer, try peaches or cherries for sweetness. For fall, use apples or pears with a sprinkle of cinnamon. In winter, citrus fruits like oranges or lemons can brighten the layers. These add-ins make your crepe cake exciting all year round.
Storage Info
Best Practices for Storing the Crepe Cake
To keep your chocolate banana crepe cake fresh, store it in the fridge. Use an airtight container to prevent it from drying out. If you do not have a container, cover it tightly with plastic wrap. This helps keep the cream and bananas from getting brown. Avoid stacking other foods on top of the cake to keep it from getting squished.
How Long Can You Keep Crepe Cake in the Fridge?
You can keep your crepe cake in the fridge for up to three days. After that, the bananas may start to brown, and the cake may lose some of its freshness. It is best to eat it within this time frame for the best taste and texture.
Freezing Instructions for Leftovers
If you have leftover crepe cake, you can freeze it. First, slice it into wedges. Wrap each slice in plastic wrap, then place them in a freezer-safe bag. Be sure to remove as much air as possible. You can keep it frozen for up to two months. To enjoy later, thaw it in the fridge overnight.
FAQs
How do you fix a lumpy crepe batter?
If your crepe batter has lumps, don't worry. Just pour it through a fine mesh sieve. This will catch the lumps and give you a smooth mix. You can also whisk it more vigorously. If needed, add a little more milk to thin it out.
Can I make this cake ahead of time?
Yes, you can! This cake tastes even better the next day. Just make it, chill it, and store it in the fridge. You can serve it cold or let it sit out for a few minutes before cutting.
What can I use instead of chocolate hazelnut spread?
If you don’t have chocolate hazelnut spread, you can use chocolate ganache or peanut butter. You can also use almond butter for a nutty twist. Just make sure it’s something you enjoy with bananas.
Is it necessary to chill the cake before serving?
Chilling is key. It helps the layers set properly and melds the flavors together. If you skip this step, the cake may not hold its shape well when you slice it. A chill time of at least one hour is best.
In this post, we explored making a delicious chocolate banana crepe cake. We covered key ingredients, the right tools, and step-by-step instructions to guide you. We also discussed common mistakes and tips for perfect layers. You can try different fillings and even store your cake for later. Remember, practice makes perfect. Don’t be afraid to experiment. Enjoy the process and make it your own. Happy baking!