Are you ready for a fun and tasty treat? Chocolate covered banana pops are a delightful snack perfect for any time! With just a few simple ingredients, you can create a cool dessert that kids and adults will love. In this blog, I’ll walk you through the easy steps to make this frozen delight. Get your bananas and chocolate ready—let’s make something delicious!
Why I Love This Recipe
- Quick and Easy: This recipe comes together in just 15 minutes, making it a perfect last-minute treat.
- Healthier Option: With bananas and dark chocolate, these pops are a healthier dessert compared to traditional ice cream.
- Customizable Toppings: You can easily switch up the nuts and toppings based on your preferences or what you have on hand.
- Fun for All Ages: Making these banana pops is a fun activity for kids and adults alike, perfect for summer gatherings!
Ingredients
List of Ingredients
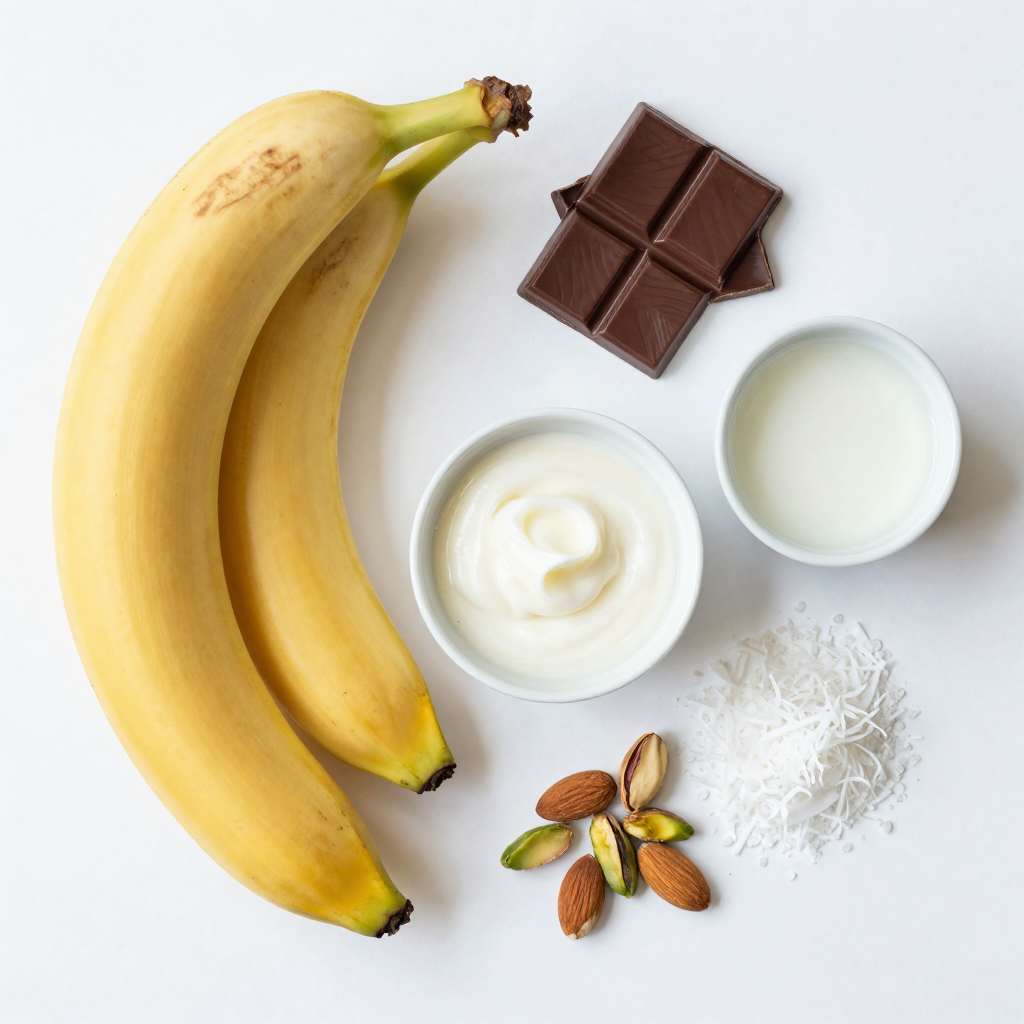
– 2 ripe bananas
– 100g dark chocolate (at least 70% cocoa)
– 2 tablespoons coconut oil
– 1 tablespoon chopped nuts (e.g., almonds or pistachios)
– 1 tablespoon shredded coconut (optional)
– 4 wooden popsicle sticks
– Sea salt for garnishing
Chocolate-covered banana pops are simple yet delightful. They need just a few ingredients. The ripe bananas provide natural sweetness. Dark chocolate gives a rich flavor. Coconut oil helps the chocolate melt smoothly.
Nutritional Information
– Calories: About 150 per pop
– Fats: 9g
– Carbohydrates: 19g
– Proteins: 2g
These pops make a great snack. They are low in calories and high in flavor. The dark chocolate adds healthy fats too. You can enjoy them without guilt, especially on hot days.
Equipment Needed
– Baking sheet
– Parchment paper
– Double boiler or heatproof bowl
To make these treats, you will need some basic tools. A baking sheet helps with freezing. Parchment paper keeps the pops from sticking. A double boiler is perfect for melting chocolate. You can also use a heatproof bowl over a saucepan.
Step-by-Step Instructions
Preparation of Bananas
– First, peel the bananas.
– Cut each banana in half.
– Insert a popsicle stick into the cut end of each half.
Freezing the Bananas
– Freeze the banana pops for about 30 minutes.
– A firm texture helps the chocolate stick better.
Melting the Chocolate
– Set up a double boiler. Fill a saucepan with water.
– Place a heatproof bowl on top, not touching the water.
– Bring the water to a simmer.
– Add dark chocolate and coconut oil to the bowl.
– Stir until the mix is smooth and melted.
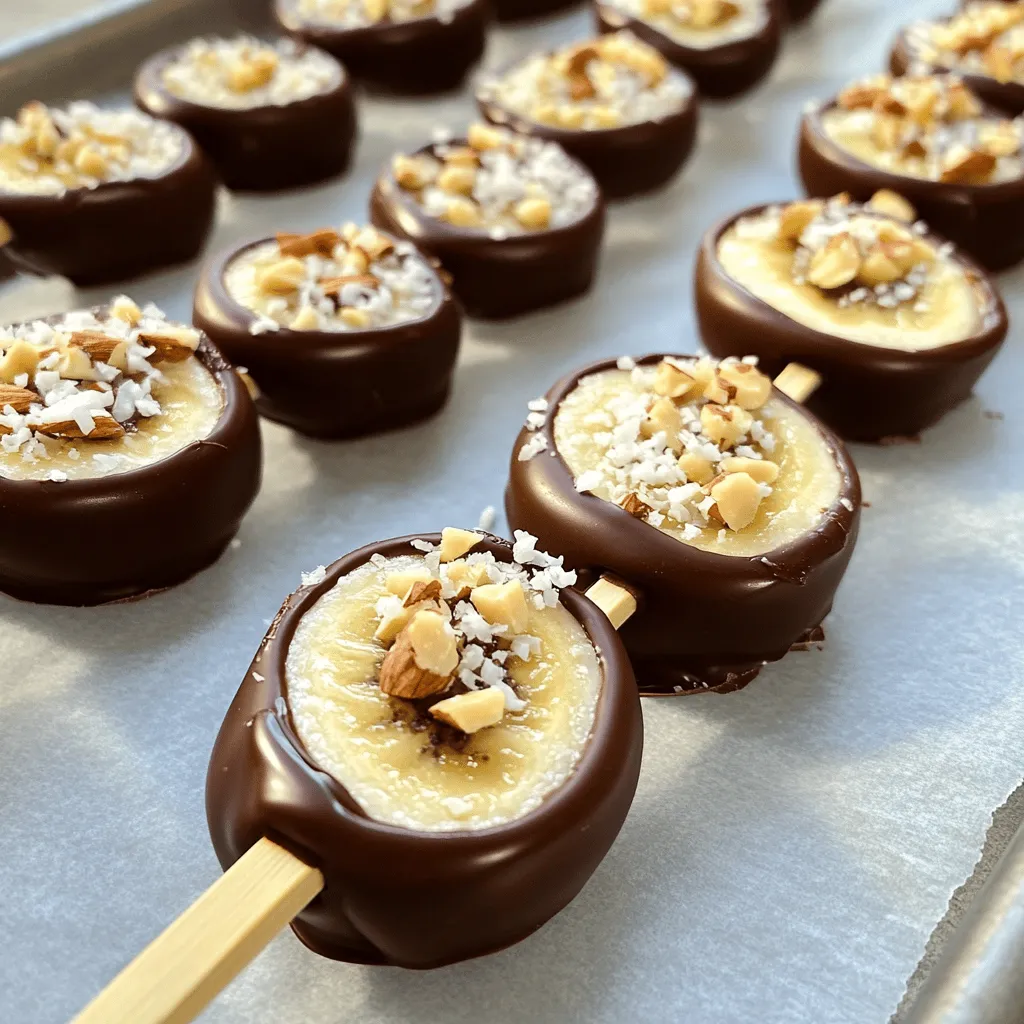
Coating the Bananas
– Remove the banana pops from the freezer.
– Dip each banana into the melted chocolate.
– Let any extra chocolate drip off.
– Sprinkle on chopped nuts or shredded coconut right away.
Final Freezing
– Return the coated banana pops to the baking sheet.
– Sprinkle a little sea salt on top for extra flavor.
– Freeze for 15-20 minutes until the chocolate sets.
– Check the chocolate’s consistency before serving.
Pro Tips
- Choose the Right Bananas: Make sure your bananas are ripe but not overripe. The sweetness of ripe bananas enhances the flavor of the chocolate.
- Melting Chocolate: For a smoother chocolate coating, make sure to stir continuously while melting to avoid any burning.
- Custom Toppings: Feel free to experiment with different toppings like crushed cookies or dried fruits to add variety to your banana pops.
- Serving Suggestions: These banana pops can be served as a fun dessert for parties or as a healthy snack option for kids!
Tips & Tricks
Perfecting the Chocolate Dip
To get smooth melted chocolate, use a double boiler. This method helps you heat the chocolate gently. Keep the heat low to prevent burning. Stir often for a nice texture. If the chocolate gets too thick, add a bit more coconut oil. This will help it stay smooth.
Be careful to avoid seizing the chocolate. Seizing happens when water touches the chocolate. Even a small drop can ruin it. So, make sure your bowl and utensils are dry before you start.
Enhancing Flavors
To make your banana pops even better, think about adding spices. A dash of cinnamon or cayenne can add warmth. You can also try a little vanilla extract for a sweet kick.
Balancing sweetness is key. A sprinkle of sea salt on top brightens the flavor. It helps cut through the sweetness and makes each bite pop.
Presentation Ideas
Serving these banana pops is fun! You can place them on a colorful plate. Add some fresh fruit around them for a nice touch.
For a creative look, try drizzling extra melted chocolate on top. Use a fork to make pretty patterns. You can also use a squeeze bottle for more control. This adds flair to your treat and makes it even more inviting.Enjoy making these tasty treats!
Variations
Healthier alternatives
You can make chocolate-covered banana pops even healthier. Try using low-sugar chocolate instead of regular chocolate. This swap cuts down on sweetness but keeps the rich taste. You can also add fruits or nut butters. For example, spread a layer of almond butter on the banana before dipping. This adds flavor and healthy fat.
Different Toppings
The toppings can change your banana pops. Consider using different nuts, like walnuts or pecans. These nuts add a nice crunch. Flavorful sprinkles or seeds are also fun choices. Try chia seeds or crushed freeze-dried fruit for color and taste. These toppings make your treat look pretty and unique.
Alternative Fruits
Banana pops are great, but you can use other fruits too. Strawberries are a fantastic alternative. They hold up well and taste great with chocolate. Apples also work nicely. Cut them into thick slices and dip them. You can even use alternative slip options like popsicle molds. This way, you can create fun shapes and flavors.
Storage Info
How to Store Chocolate Covered Banana Pops
To keep your chocolate-covered banana pops fresh, store them in an airtight container. This protects them from freezer burn. If you don’t have a container, wrap each pop in plastic wrap. The ideal temperature for storage is 0°F (-18°C) or colder. This keeps the pops firm and tasty.
Freezing Tips
To maintain texture and flavor, freeze the pops as soon as you coat them in chocolate. This helps the chocolate set and keeps the bananas from getting mushy. I recommend eating them within two weeks for the best taste. After that, they may lose some flavor and texture.
When to Consume
For the best freshness, enjoy your chocolate-covered banana pops within three days. Look for signs of spoilage, such as ice crystals or a dull appearance. If the chocolate starts to look gray or the bananas become mushy, it’s time to toss them out. Enjoy your treat while it’s still at its best!
FAQs
Can I use milk chocolate instead of dark chocolate?
Yes, you can use milk chocolate. It has a sweeter taste. Dark chocolate has a rich flavor. It also has more health benefits. Dark chocolate contains less sugar. It also has more antioxidants. If you want a healthier treat, stick with dark chocolate.
Are chocolate-covered banana pops suitable for kids?
Absolutely! Kids love these pops. Just ensure they are not too cold when serving. Always supervise young kids with popsicles. The banana provides potassium and fiber. The chocolate adds a sweet touch. It’s a fun treat that can be enjoyed by all.
Can I make these ahead of time?
Yes, you can prepare these pops ahead of time. Make them and store them in the freezer. They can last up to a month. Wrap each pop in plastic wrap. This keeps them fresh and prevents freezer burn. For best quality, consume them within two weeks. Just remember to let them sit out for a few minutes before eating. Enjoy your chocolate-covered banana pops!
This blog post covered how to make delicious chocolate-covered banana pops. You learned the ingredients needed, including ripe bananas and dark chocolate. I shared step-by-step instructions for preparation, freezing, and coating your treats. Tips helped you perfect the chocolate dip and enhance flavors. You also explored variations and proper storage methods.
Now, go ahead and enjoy making these tasty snacks. You’ll impress everyone with your yummy creations!


