Looking for a simple and fun treat that the whole family will love? Chocolate Covered Banana Pops are the perfect answer! With just a few ingredients and easy steps, you can make this delicious frozen snack that kids and adults alike will enjoy. Get ready to learn how to make these delightful pops, plus tips for toppings and storage. Let’s dive into this sweet adventure together!
Why I Love This Recipe
- Healthy Indulgence: These banana pops offer a delightful combination of fruit and chocolate, making them a guilt-free treat.
- Easy Preparation: With just a few simple steps, you can whip these up in no time, perfect for a quick dessert.
- Customizable Toppings: You can easily switch up the nuts or toppings based on your preference or pantry staples.
- Fun for All Ages: Kids and adults alike love these chocolate-covered banana pops, making them a hit for any gathering.
Ingredients
Main Ingredients
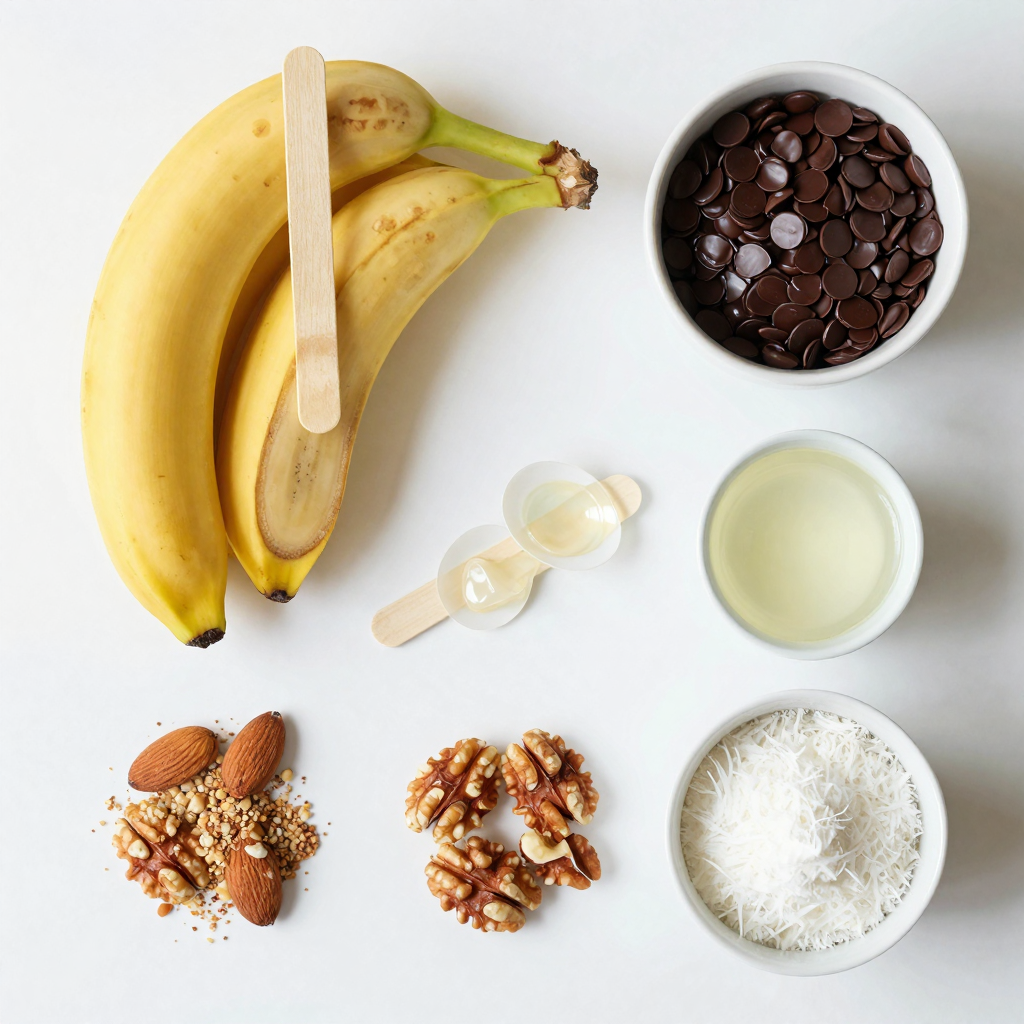
– 3 ripe bananas
– 1 cup dark chocolate chips
– 2 tablespoons coconut oil
Toppings
– 1/4 cup crushed nuts (e.g., almonds or walnuts)
– 1/4 cup shredded coconut
Equipment Needed
– Popsicle sticks
– Microwave-safe bowl
– Baking sheet
– Parchment paper
You will need three main ingredients for your Chocolate Covered Banana Pops. Ripe bananas are a must. They give a sweet taste and soft texture. Next, grab one cup of dark chocolate chips. They melt well and add a rich flavor. Coconut oil is your last main ingredient. It helps the chocolate melt smoothly.
For toppings, you can get creative! Use crushed nuts like almonds or walnuts for a nice crunch. Shredded coconut adds a tropical twist. Choose your favorites to make your pops special.
You will also need some simple equipment. Get popsicle sticks to hold the banana halves. A microwave-safe bowl is key for melting the chocolate. A baking sheet lined with parchment paper makes cleanup easy. With these ingredients and tools, you are ready to make a fun treat!
Step-by-Step Instructions
Preparing the Bananas
– Peel and cut 3 ripe bananas in half.
– Insert a popsicle stick into the flat end of each half.
Next, make sure the stick goes in well. This will help you hold the pops later.
Freezing
– Line a baking sheet with parchment paper.
– Arrange the banana pops on the sheet.
– Freeze for 30 minutes until firm.
Freezing makes the bananas cold and easy to dip in chocolate.
Melting the Chocolate
– Combine 1 cup of dark chocolate chips and 2 tablespoons of coconut oil in a microwave-safe bowl.
– Heat in the microwave in 30-second intervals, stirring in between.
Stir until the chocolate is smooth. This keeps the chocolate from burning.
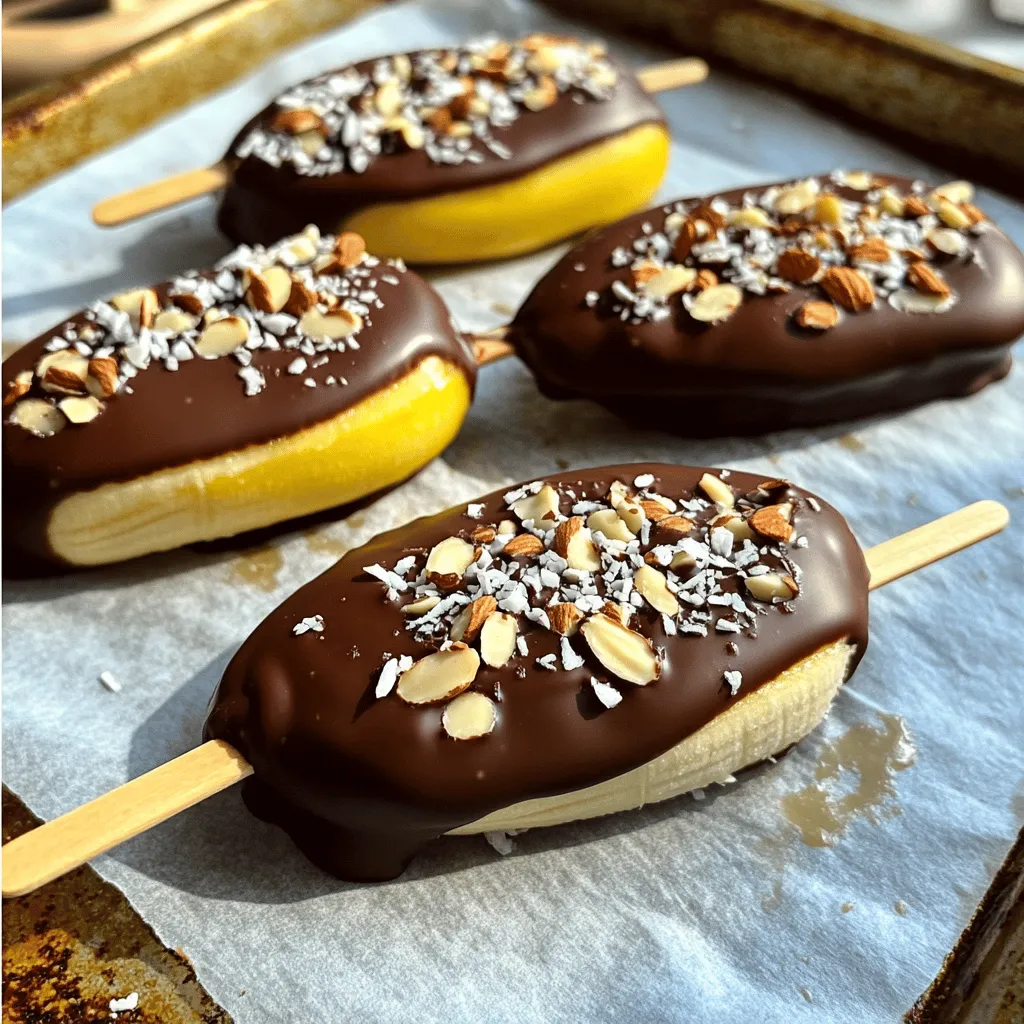
Coating the Pops
– Take the frozen banana pops out of the freezer.
– Dip each banana into the melted chocolate, covering it fully.
– Let excess chocolate drip off.
– Sprinkle toppings like crushed nuts or shredded coconut while the chocolate is still wet.
Using toppings adds crunch and flavor. Get creative with what you like!
Final Freezing
– Place the coated pops back on the baking sheet.
– Freeze until the chocolate hardens, about 30 minutes.
This step makes sure the chocolate stays solid and ready to eat. Enjoy your tasty treat!
Pro Tips
- Choose the Right Bananas: Select bananas that are ripe but not overly soft, as they will hold their shape better when frozen and dipped in chocolate.
- Use Quality Chocolate: Opt for high-quality dark chocolate for the best flavor. You can also experiment with milk or white chocolate for a different taste.
- Customize Your Toppings: Get creative with toppings! Try adding sprinkles, sea salt, or even a drizzle of caramel for a unique twist.
- Store Properly: Keep the banana pops stored in an airtight container in the freezer to maintain their freshness and prevent them from sticking together.
Tips & Tricks
Choosing Bananas
When making chocolate covered banana pops, the type of banana matters. Choose ripe bananas. They are sweeter and softer. Unripe bananas may be too firm and lack flavor. Aim for medium-sized bananas. They fit well on sticks and are easy to coat.
Perfecting the Chocolate Dip
Melt your chocolate carefully. Combine dark chocolate chips and coconut oil in a bowl. Heat in the microwave for 30 seconds. Stir between heats until smooth. This keeps the chocolate even and glossy. Dip each banana pop quickly to coat fully. Let the excess chocolate drip off before adding toppings.
Creative Presentation
Make your pops look fun! Serve them on a colorful plate. You can also stick them in a cup of rice or sand for a fun display. Try placing them in a tall glass. This way, they stand upright and look tasty. Add sprinkles or extra toppings for more color. Enjoy how they brighten up any party!
Variations
Flavor Combinations
You can make these banana pops even more fun! Try adding peanut butter or almond butter to your melted chocolate. This gives a rich and nutty taste. Just mix a spoonful of nut butter into the chocolate before dipping the bananas. You can also switch to white chocolate instead of dark chocolate. This will give the pops a sweet and creamy twist. Both options add unique flavors that make each bite special.
Toppings Variations
Toppings can change the look and taste of your pops. You can use different nuts like peanuts, pecans, or cashews. Each nut adds a crunch and flavor. You can also sprinkle on dried fruits like raisins or cranberries for a chewy texture. If you want something colorful, add sprinkles! They make the pops fun and festive. Mix and match your toppings to find your favorite combination.
Dietary Options
Want to make these banana pops fit your diet? You can easily make them vegan! Just choose a dairy-free chocolate. Check the label to be sure. You can also make them gluten-free. The main ingredients are naturally gluten-free, but always verify your toppings. These options let everyone enjoy these tasty treats without worry.
Storage Info
How to Store Leftover Pops
To keep your chocolate covered banana pops fresh, wrap them tightly in plastic wrap. You can also use an airtight container. Place them in the freezer. This method helps prevent freezer burn. For the best taste, eat them within two weeks. After that, the flavor may fade.
Re-freezing Guidelines
You can re-freeze chocolate covered banana pops, but it’s not ideal. When you re-freeze, the texture may change. They might become mushy or lose their crunch. The chocolate coating may also lose its shine. To keep them best, avoid re-freezing if you can.
Sharing and Gifting
Chocolate covered banana pops make great gifts! To wrap them, use colorful cellophane or treat bags. Tie with a ribbon for a nice touch. They are perfect for parties, birthdays, or holidays. Everyone loves a sweet treat, and these pops are a fun way to share joy!
FAQs
How long do Chocolate Covered Banana Pops last in the freezer?
Chocolate covered banana pops last about two months in the freezer. After that, they may lose taste and texture. To keep them fresh, store them in an airtight container or wrap them tightly. This helps prevent freezer burn and keeps them delicious.
Can I use different types of chocolate?
Yes, you can use different types of chocolate. Milk chocolate gives a sweeter taste, while dark chocolate offers a rich flavor. White chocolate adds a creamy touch. Each type changes the flavor and texture. Experiment to find your favorite!
Are Chocolate Covered Banana Pops a healthy snack?
Chocolate covered banana pops can be a healthy snack. Bananas provide potassium and fiber. Dark chocolate has antioxidants. However, watch the toppings you choose. Adding too many nuts or sugars can increase calories. Balance is key for a healthy treat!
What if my chocolate isn’t melting smoothly?
If your chocolate isn’t melting smoothly, it may be overheated. Try reducing the microwave time to 15 seconds. Stir between each interval. Adding a touch of coconut oil can help create a smoother dip. Patience is important when melting chocolate.
Can I make them ahead of time?
Yes, you can make chocolate covered banana pops ahead of time. Prepare them and freeze them for later. Just be sure to store them properly. This way, you always have a fun treat ready to enjoy!
This guide shows you how to make delicious chocolate-covered banana pops. You learned about the key ingredients, tools, and clear steps. We also explored fun toppings, tasty variations, and storage tips.
These banana pops are simple and fun to make for any occasion. Enjoy experimenting with flavors and presentations. Remember, these treats are not only tasty but can also be healthy. Try making them today for a sweet and satisfying snack!


