Craving a sweet treat that’s simple and fun to make? Chocolate Covered Oreo Pops are the perfect solution! With just a few ingredients and some easy steps, you can create these delicious pops that will delight both kids and adults. Whether you want to personalize them with fun toppings or add a festive twist, the possibilities are endless. Let’s dive into this easy recipe and get your sweet tooth satisfied!
Why I Love This Recipe
- Easy to Make: This recipe requires minimal ingredients and can be prepared in just 15 minutes, making it perfect for a quick treat.
- Customizable: You can use different types of melting chocolate and various toppings like sprinkles or nuts to suit your taste.
- Fun Activity: Making these Oreo pops is a fun activity for kids and adults alike, perfect for family gatherings or parties.
- Deliciously Decadent: With the rich chocolate coating and creamy Oreo filling, these pops are a truly indulgent treat that everyone loves.
Ingredients
Essential Ingredients for Chocolate Covered Oreo Pops
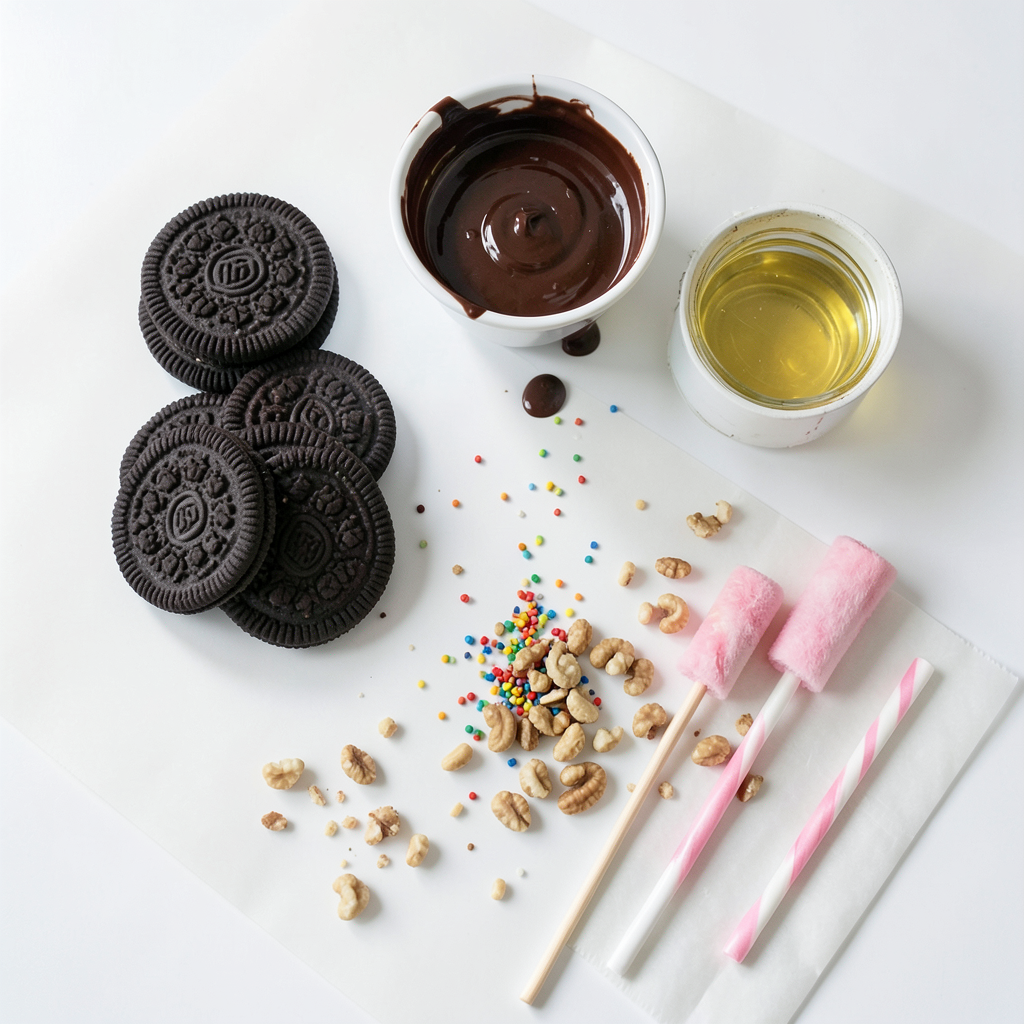
- Oreo cookies (family size)
- Melting chocolate (milk, dark, or white)
- Coconut oil (optional)
To make these Oreo pops, you need a few key items. First, grab a family-size package of Oreo cookies. These are the stars of your treat! Next, choose your melting chocolate. You can use milk, dark, or white chocolate, depending on what you like best. If you want a smoother finish, add a tablespoon of coconut oil. This step is optional but gives a nice touch.
Decorative Toppings
- Sprinkles and crushed nuts
- Creative options for personalization
Now let’s talk about toppings. You can use sprinkles or crushed nuts to make your pops look fun and tasty. Think about your favorite colors and flavors. You can even mix and match for a unique look. Let your creativity shine here!
Necessary Equipment
- Lollipop sticks
- Parchment paper
- Baking sheet, microwave-safe bowl, and Styrofoam block or muffin tin
You’ll also need some basic tools. Lollipop sticks are a must for holding your pops. Parchment paper is great for your baking sheet, as it makes cleanup easy. A microwave-safe bowl is needed for melting the chocolate. Last, you can use a Styrofoam block or a muffin tin to hold your pops upright while they set. Having the right equipment makes the whole process smoother!
Step-by-Step Instructions
Preparing the Workstation
Start by laying out parchment paper on a baking sheet. This will catch any drips and keep your area clean. It also helps the pops cool without sticking. Make sure to use a large enough sheet for all the pops you will make.
Assembling the Oreo Pops
Twist each Oreo cookie to separate the halves. Be gentle so the filling stays intact. Now, take a lollipop stick and insert it through the center of the filling. Press the cookie halves back together. Make sure the stick is centered for good support. This step is key to holding the pop together.
Melting and Coating the Oreos
In a microwave-safe bowl, mix the melting chocolate with coconut oil if you want a smoother finish. Heat in 30-second intervals. Stir between each interval. This helps avoid burning the chocolate. Once fully melted, dip each Oreo pop into the chocolate. Be sure to coat it entirely. Let any extra chocolate drip off before moving to the next step.
Finishing Touches
Before the chocolate sets, add your decorations. You can use sprinkles or crushed nuts for fun colors and textures. Be quick, as the chocolate needs to stay wet for the toppings to stick. Once decorated, place the pops upright in a block of Styrofoam or a muffin tin. This keeps them steady while they cool. Let the chocolate harden completely before peeling them off the parchment paper. Enjoy them cold or at room temperature!
Tips & Tricks
Melting Chocolate Like a Pro
To melt chocolate smoothly, start simple. Use a microwave-safe bowl. Combine the melting chocolate with coconut oil if you want a shiny finish. Heat in 30-second bursts. Stir after each round. This way, you avoid burning the chocolate. Keep stirring until it is fully melted. If it feels thick, add a bit more coconut oil. This helps achieve that perfect dip.
Decoration Techniques
To make your Oreo pops look great, get creative! After dipping each pop in chocolate, sprinkle toppings right away. Use colorful sprinkles or crushed nuts for texture. You can even drizzle extra chocolate over them for fun designs. Let your imagination guide you. Different colors and shapes make each pop unique and tasty.
Troubleshooting Common Issues
Sometimes, things do not go as planned. If the chocolate clumps, it may have overheated. Try stirring it more or adding a bit of coconut oil. If your decorations slide off, dip the pops again to re-coat them. Make sure to add toppings before the chocolate sets. If you wait too long, the sprinkles won’t stick. Keep these tips in mind for smooth sailing with your treats!
Pro Tips
- Use Quality Chocolate: The flavor and texture of your Oreo pops greatly depend on the quality of the melting chocolate. Opt for high-quality brands for the best results.
- Chill the Oreos: For easier assembly, consider chilling the Oreo cookies in the refrigerator for about 10 minutes before inserting the lollipop sticks. This helps them hold their shape better.
- Experiment with Flavors: Don’t hesitate to mix and match different types of melting chocolate or add flavor extracts (like peppermint or almond) to elevate your Oreo pops.
- Creative Toppings: Get creative with your toppings! Besides sprinkles and crushed nuts, consider using crushed cookies, coconut flakes, or even edible glitter for a festive touch.
Variations
Flavor Combos
You can use many types of chocolate for your pops. Here are some fun options:
- Milk Chocolate: This is a classic choice. It gives a sweet and creamy taste.
- Dark Chocolate: This adds a rich flavor. It balances the sweetness of the Oreo.
- White Chocolate: This option is very sweet and looks great. It’s perfect for decorating.
- Flavored Melting Chocolate: Try options like strawberry or mint for a twist.
Mix and match these chocolates to create your favorite flavors!
Seasonal Themes
You can deck out your Oreo pops for special occasions. Here are some ideas:
- Halloween: Use orange and black sprinkles. Add spooky designs with melted chocolate.
- Christmas: Use red and green decorations. Add candy canes or snowflake designs.
- Valentine's Day: Use pink and red sprinkles. Add heart-shaped candies for extra love.
- Birthdays: Use colorful sprinkles and fun designs. Top with mini candles for celebration.
Let your creativity shine by matching the theme of your event!
Alternative Treats
You don’t have to just use Oreos for these pops. Here are some tasty alternatives:
- Chocolate Chip Cookies: These make a chewy and sweet pop.
- Graham Crackers: These add a crunchy texture. Dip them in chocolate for a s'mores feel.
- Rice Crispy Treats: These can be shaped into pops. They are soft and fun to eat.
- Donuts: Mini donuts make a unique treat. Coat them in chocolate for a sweet twist.
Feel free to explore these options for a fun twist on the classic Oreo pop!
Storage Info
Best Practices for Storage
To keep your chocolate-covered Oreo pops fresh, store them in an airtight container. Place parchment paper between layers to avoid sticking. Keep the container in a cool, dry place. Avoid direct sunlight or heat. This will help maintain the chocolate's shine and flavor.
Shelf Life and Serving Tips
These treats are best enjoyed within a week. They stay fresh for about 5 to 7 days. If you want a fun treat for a party, serve them chilled. Place them on a nice platter for a great presentation. Kids and adults alike will love them!
Freezing Options
You can freeze chocolate-covered Oreo pops for later. Wrap each pop in plastic wrap to prevent freezer burn. Place them in a freezer-safe bag or container. They can stay in the freezer for up to a month. When you are ready to enjoy, let them thaw in the fridge before serving. Enjoy the taste of chocolatey goodness whenever you like!
FAQs
How long do Chocolate Covered Oreo Pops last?
Chocolate covered Oreo pops can last about 5 to 7 days. Store them in an airtight container. Keep them in a cool, dry place. Avoid heat and humidity. This helps keep the chocolate firm and fresh.
Can I use chocolate chips instead of melting chocolate?
Yes, you can use chocolate chips. They melt well and taste great. However, they may need a little help to get smooth. Add a bit of coconut oil to help. This makes the texture nice and creamy.
What can I use instead of coconut oil?
If you don't have coconut oil, use vegetable oil or shortening. Both work well for a smooth finish. You can also skip it, but your chocolate may not melt as smoothly.
How to make these pops gluten-free?
To make gluten-free Oreo pops, choose gluten-free Oreo cookies. Many brands offer gluten-free options. This way, you can enjoy the same great taste without gluten. Always check the labels to be sure.
In this post, I shared how to make chocolate-covered Oreo pops. We covered essential ingredients, necessary tools, and step-by-step instructions. You learned tips for decorating and troubleshooting common issues. I also provided variations for flavor and storage tips.
These pops are fun and simple to make at home. They are great for any occasion. Enjoy creating and personalizing your treats, and share them with family and friends!