Chocolate Hazelnut Crepes Irresistible Delight Recipe

WANT TO SAVE THIS RECIPE?

Indulge in the sweet world of Chocolate Hazelnut Crepes! This easy recipe combines soft crepes with rich, creamy chocolate hazelnut spread, perfect for breakfast or dessert. You’ll only need a few simple ingredients and my step-by-step instructions to create this delicious treat in no time. Join me as we whip up these irresistible delights and impress everyone at your table! Let’s get started!

Why I Love This Recipe

  1. Deliciously Indulgent: These chocolate hazelnut crepes are a perfect blend of rich chocolate and nutty flavors, making them a delightful treat for any time of day.
  2. Quick and Easy: With a simple batter that comes together in minutes, you can whip up these crepes quickly for breakfast or dessert.
  3. Customizable: Feel free to get creative with your fillings! You can add fruits, whipped cream, or even a drizzle of caramel for extra flavor.
  4. Perfect for Sharing: These crepes are great for gatherings, allowing everyone to enjoy their own personalized dessert, topped with their favorite garnishes.

Ingredients

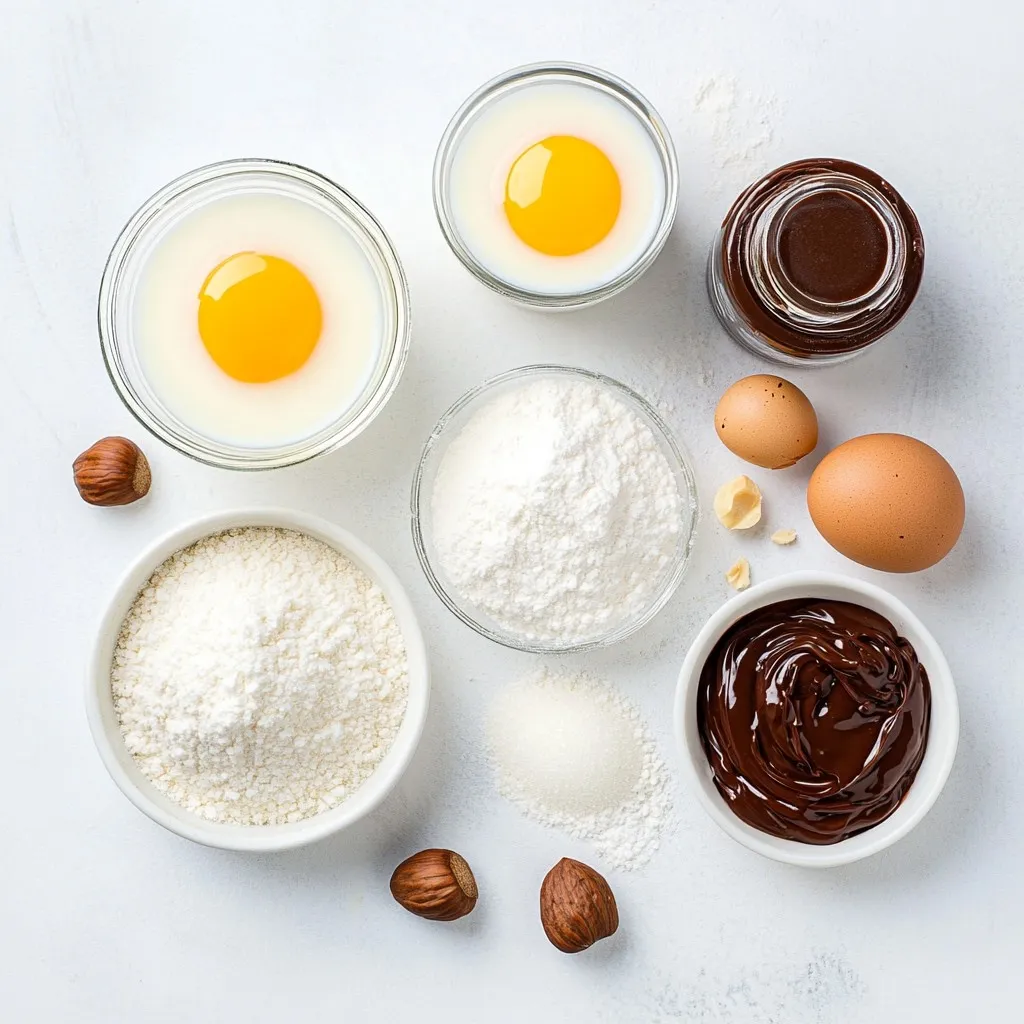
To make delightful chocolate hazelnut crepes, you’ll need some simple ingredients. Here’s what you will gather before you start cooking:

  • 1 cup all-purpose flour
  • 2 large eggs
  • 1 1/4 cups milk
  • 2 tablespoons melted butter (plus extra for cooking)
  • 1 tablespoon sugar
  • 1/2 teaspoon vanilla extract
  • 1/4 teaspoon salt
  • 1/2 cup chocolate hazelnut spread (like Nutella)
  • 1/4 cup crushed hazelnuts (for garnish)
  • Powdered sugar (for dusting)

Each ingredient plays a key role in creating the perfect crepe. The all-purpose flour gives structure, while eggs add richness. Milk keeps the batter smooth and creamy. Butter adds flavor and helps in cooking. Sugar and vanilla extract bring sweetness and aroma. Salt balances the flavors.

The star of this recipe is the chocolate hazelnut spread. It melts beautifully inside the crepes, making them irresistible. Crushed hazelnuts add a nice crunch, and powdered sugar gives a lovely finish.

With these ingredients, you’re ready to create a sweet treat that everyone will love!

Step-by-Step Instructions

Preparing the Batter

First, gather your dry ingredients. In a mixing bowl, whisk together:

  • 1 cup all-purpose flour
  • 1 tablespoon sugar
  • 1/4 teaspoon salt

Next, mix the wet ingredients in another bowl. Beat together:

  • 2 large eggs
  • 1 1/4 cups milk
  • 2 tablespoons melted butter
  • 1/2 teaspoon vanilla extract

Now, combine the mixtures. Gradually pour the wet ingredients into the dry ones. Whisk until it’s smooth and lump-free. Let the batter rest for 30 minutes at room temperature. This step helps the crepes become tender.

Cooking the Crepes

Heat a non-stick skillet over medium heat. Lightly grease it with extra melted butter. Pour about 1/4 cup of batter into the skillet. Quickly tilt the pan to spread the batter into a thin layer. Cook for about 1-2 minutes until the underside is lightly golden. Then, use a spatula to flip the crepe. Cook the other side for another minute. Remove the cooked crepe and stack it on a plate. Repeat this process with the remaining batter.

Assembling the Crepes

Now, let’s assemble the crepes. Take one crepe and spread a generous tablespoon of chocolate hazelnut spread on one half. You can use Nutella or your favorite brand. Fold the crepe over once, then fold it again to form a triangle or roll it up. For a finishing touch, dust the crepes with powdered sugar and sprinkle crushed hazelnuts on top. Enjoy your delicious creation!

Tips & Tricks

Tips for Perfect Crepes

  • Ensuring a smooth batter: Mix your dry ingredients first. Then, whisk the wet ingredients well. Slowly combine the two until no lumps remain. This step is key for smooth crepes.
  • Ideal cooking temperature: Use medium heat. If the pan is too hot, the crepes will burn. A well-heated pan cooks crepes evenly.
  • Stacking crepes without sticking: Place parchment paper between cooked crepes. This keeps them from sticking together. It also makes serving easier.

Common Mistakes to Avoid

  • Over-mixing batter: Mixing too much adds air and makes crepes tough. Just mix until smooth.
  • Using too much heat: High heat can burn your crepes. Stick to medium for the best results.
  • Not resting the batter: Let the batter rest for 30 minutes. This helps the flour absorb liquid and improves the texture.

Serving Suggestions

  • Ideal pairings for toppings: Pair your crepes with fresh fruits like bananas or strawberries. They add brightness and flavor.
  • Presentation ideas: Stack the crepes high and dust with powdered sugar. Add crushed hazelnuts on top for a nice crunch.
  • Best beverages to enjoy with crepes: Serve with coffee or hot chocolate. They complement the rich flavors of chocolate hazelnut spread.

Pro Tips

  1. Rest the Batter: Allowing the crepe batter to rest for 30 minutes helps develop the gluten, resulting in a more tender crepe.
  2. Even Cooking: Ensure your skillet is at a consistent medium heat to cook the crepes evenly; too high can burn them.
  3. Variations: Experiment with different fillings like fresh fruits, whipped cream, or even savory options to diversify your crepe experience.
  4. Garnish Right Before Serving: For the best presentation, add powdered sugar and crushed hazelnuts just before serving to keep them fresh and appealing.

Variations

Different Flavor Combinations

You can have fun with flavors in your crepes. Try adding fruits like bananas or strawberries. These fruits give a fresh taste that pairs well with the rich chocolate hazelnut spread. You can also add spices like cinnamon or nutmeg for warmth and depth. Just a pinch can make a big difference. Another great idea is to use flavored chocolate spreads. Think of caramel or orange chocolate spreads to switch things up.

Dietary Adaptations

If you need gluten-free crepes, you can swap all-purpose flour for almond or oat flour. Both work great and still taste delicious. For dairy-free options, use almond or coconut milk instead of regular milk. You can also replace the butter with coconut oil. If you want a vegan version, simply use flax eggs or mashed bananas instead of real eggs. The crepes will still be soft and tasty.

Gourmet Toppings

Toppings can really elevate your crepes. Nut butters like almond or peanut work well. You can add jelly for a fun twist. Whipped cream or ice cream makes a rich addition, too. For sauces, drizzle caramel or more chocolate sauce over the top. These gourmet toppings create an amazing dessert experience that is hard to resist.

Storage Info

Storing Leftover Crepes

To keep your leftover crepes fresh, place them in a stack. Layer parchment paper between each crepe. This helps prevent sticking. Wrap the stack in plastic wrap or place it in an airtight container. Store them in the fridge for up to three days. If you want to save them longer, freeze the crepes. Use freezer-safe bags and remove as much air as you can. They can last for up to two months in the freezer.

Reheating Instructions

When you’re ready to enjoy your crepes again, you can reheat them easily. The best way is to use a skillet over medium heat. Place the crepe in the skillet for about 30 seconds on each side. This warms them up and keeps them soft. You can also use a microwave. Place a damp paper towel over the crepe to keep it moist. Heat it for about 15 to 20 seconds. This method is quick but might make them a bit chewier.

Shelf Life

Crepes have a good shelf life if stored properly. In the fridge, they stay fresh for up to three days. If frozen, you can enjoy them for up to two months. Always check for signs of spoilage. If they smell sour or have a slimy texture, it’s best to discard them. Keeping an eye on your crepes helps you enjoy them at their best!

FAQs

What is the best way to keep crepes warm?

To keep crepes warm, stack them on a plate. Cover the stack with foil. You can also place the plate in a warm oven set to 200°F (93°C). This helps maintain their warmth without cooking them further.

Can I make the batter in advance?

Yes, you can make the batter in advance. Mix the ingredients and store it in the fridge. It will stay fresh for up to two days. Just remember to give it a good stir before using.

How do I know when crepes are done cooking?

Crepes are done when the edges lift easily from the pan. The bottom should be lightly golden. Flip the crepe and cook for another minute. It should be cooked through but still soft.

Is chocolate hazelnut spread gluten-free?

Most chocolate hazelnut spreads are gluten-free. Always check the label to be sure. Some brands may have gluten due to cross-contamination in factories.

Can I freeze assembled chocolate hazelnut crepes?

Yes, you can freeze assembled crepes. Place parchment paper between them to prevent sticking. Store in an airtight container or freezer bag. They can last up to two months in the freezer.

In this article, we covered how to make delicious chocolate hazelnut crepes. We discussed essential ingredients, step-by-step instructions, tips for success, and variations to try. Remember to mix your batter well and control the heat when cooking. Store leftovers safely to enjoy later, and get creative with toppings! Experimenting with flavors makes this recipe your own. With the right techniques and some practice, you can master crepes and impress everyone. Enjoy your cooking journe

To make delightful chocolate hazelnut crepes, you'll need some simple ingredients. Here’s what you will gather before you start cooking: - 1 cup all-purpose flour - 2 large eggs - 1 1/4 cups milk - 2 tablespoons melted butter (plus extra for cooking) - 1 tablespoon sugar - 1/2 teaspoon vanilla extract - 1/4 teaspoon salt - 1/2 cup chocolate hazelnut spread (like Nutella) - 1/4 cup crushed hazelnuts (for garnish) - Powdered sugar (for dusting) Each ingredient plays a key role in creating the perfect crepe. The all-purpose flour gives structure, while eggs add richness. Milk keeps the batter smooth and creamy. Butter adds flavor and helps in cooking. Sugar and vanilla extract bring sweetness and aroma. Salt balances the flavors. The star of this recipe is the chocolate hazelnut spread. It melts beautifully inside the crepes, making them irresistible. Crushed hazelnuts add a nice crunch, and powdered sugar gives a lovely finish. With these ingredients, you're ready to create a sweet treat that everyone will love! {{ingredient_image_1}} First, gather your dry ingredients. In a mixing bowl, whisk together: - 1 cup all-purpose flour - 1 tablespoon sugar - 1/4 teaspoon salt Next, mix the wet ingredients in another bowl. Beat together: - 2 large eggs - 1 1/4 cups milk - 2 tablespoons melted butter - 1/2 teaspoon vanilla extract Now, combine the mixtures. Gradually pour the wet ingredients into the dry ones. Whisk until it's smooth and lump-free. Let the batter rest for 30 minutes at room temperature. This step helps the crepes become tender. Heat a non-stick skillet over medium heat. Lightly grease it with extra melted butter. Pour about 1/4 cup of batter into the skillet. Quickly tilt the pan to spread the batter into a thin layer. Cook for about 1-2 minutes until the underside is lightly golden. Then, use a spatula to flip the crepe. Cook the other side for another minute. Remove the cooked crepe and stack it on a plate. Repeat this process with the remaining batter. Now, let's assemble the crepes. Take one crepe and spread a generous tablespoon of chocolate hazelnut spread on one half. You can use Nutella or your favorite brand. Fold the crepe over once, then fold it again to form a triangle or roll it up. For a finishing touch, dust the crepes with powdered sugar and sprinkle crushed hazelnuts on top. Enjoy your delicious creation! - Ensuring a smooth batter: Mix your dry ingredients first. Then, whisk the wet ingredients well. Slowly combine the two until no lumps remain. This step is key for smooth crepes. - Ideal cooking temperature: Use medium heat. If the pan is too hot, the crepes will burn. A well-heated pan cooks crepes evenly. - Stacking crepes without sticking: Place parchment paper between cooked crepes. This keeps them from sticking together. It also makes serving easier. - Over-mixing batter: Mixing too much adds air and makes crepes tough. Just mix until smooth. - Using too much heat: High heat can burn your crepes. Stick to medium for the best results. - Not resting the batter: Let the batter rest for 30 minutes. This helps the flour absorb liquid and improves the texture. - Ideal pairings for toppings: Pair your crepes with fresh fruits like bananas or strawberries. They add brightness and flavor. - Presentation ideas: Stack the crepes high and dust with powdered sugar. Add crushed hazelnuts on top for a nice crunch. - Best beverages to enjoy with crepes: Serve with coffee or hot chocolate. They complement the rich flavors of chocolate hazelnut spread. Pro Tips Rest the Batter: Allowing the crepe batter to rest for 30 minutes helps develop the gluten, resulting in a more tender crepe. Even Cooking: Ensure your skillet is at a consistent medium heat to cook the crepes evenly; too high can burn them. Variations: Experiment with different fillings like fresh fruits, whipped cream, or even savory options to diversify your crepe experience. Garnish Right Before Serving: For the best presentation, add powdered sugar and crushed hazelnuts just before serving to keep them fresh and appealing. {{image_2}} You can have fun with flavors in your crepes. Try adding fruits like bananas or strawberries. These fruits give a fresh taste that pairs well with the rich chocolate hazelnut spread. You can also add spices like cinnamon or nutmeg for warmth and depth. Just a pinch can make a big difference. Another great idea is to use flavored chocolate spreads. Think of caramel or orange chocolate spreads to switch things up. If you need gluten-free crepes, you can swap all-purpose flour for almond or oat flour. Both work great and still taste delicious. For dairy-free options, use almond or coconut milk instead of regular milk. You can also replace the butter with coconut oil. If you want a vegan version, simply use flax eggs or mashed bananas instead of real eggs. The crepes will still be soft and tasty. Toppings can really elevate your crepes. Nut butters like almond or peanut work well. You can add jelly for a fun twist. Whipped cream or ice cream makes a rich addition, too. For sauces, drizzle caramel or more chocolate sauce over the top. These gourmet toppings create an amazing dessert experience that is hard to resist. To keep your leftover crepes fresh, place them in a stack. Layer parchment paper between each crepe. This helps prevent sticking. Wrap the stack in plastic wrap or place it in an airtight container. Store them in the fridge for up to three days. If you want to save them longer, freeze the crepes. Use freezer-safe bags and remove as much air as you can. They can last for up to two months in the freezer. When you’re ready to enjoy your crepes again, you can reheat them easily. The best way is to use a skillet over medium heat. Place the crepe in the skillet for about 30 seconds on each side. This warms them up and keeps them soft. You can also use a microwave. Place a damp paper towel over the crepe to keep it moist. Heat it for about 15 to 20 seconds. This method is quick but might make them a bit chewier. Crepes have a good shelf life if stored properly. In the fridge, they stay fresh for up to three days. If frozen, you can enjoy them for up to two months. Always check for signs of spoilage. If they smell sour or have a slimy texture, it's best to discard them. Keeping an eye on your crepes helps you enjoy them at their best! To keep crepes warm, stack them on a plate. Cover the stack with foil. You can also place the plate in a warm oven set to 200°F (93°C). This helps maintain their warmth without cooking them further. Yes, you can make the batter in advance. Mix the ingredients and store it in the fridge. It will stay fresh for up to two days. Just remember to give it a good stir before using. Crepes are done when the edges lift easily from the pan. The bottom should be lightly golden. Flip the crepe and cook for another minute. It should be cooked through but still soft. Most chocolate hazelnut spreads are gluten-free. Always check the label to be sure. Some brands may have gluten due to cross-contamination in factories. Yes, you can freeze assembled crepes. Place parchment paper between them to prevent sticking. Store in an airtight container or freezer bag. They can last up to two months in the freezer. In this article, we covered how to make delicious chocolate hazelnut crepes. We discussed essential ingredients, step-by-step instructions, tips for success, and variations to try. Remember to mix your batter well and control the heat when cooking. Store leftovers safely to enjoy later, and get creative with toppings! Experimenting with flavors makes this recipe your own. With the right techniques and some practice, you can master crepes and impress everyone. Enjoy your cooking journey!

Chocolate Hazelnut Crepes

Delicious thin crepes filled with chocolate hazelnut spread and garnished with crushed hazelnuts.
Prep Time 15 minutes
Cook Time 45 minutes
Total Time 1 hour
Course Dessert
Cuisine French
Servings 4
Calories 250 kcal

Ingredients
  

  • 1 cup all-purpose flour
  • 2 large eggs
  • 1.25 cups milk
  • 2 tablespoons melted butter (plus extra for cooking)
  • 1 tablespoon sugar
  • 0.5 teaspoon vanilla extract
  • 0.25 teaspoon salt
  • 0.5 cup chocolate hazelnut spread (like Nutella)
  • 0.25 cup crushed hazelnuts (for garnish)
  • to taste powdered sugar (for dusting)

Instructions
 

  • In a mixing bowl, whisk together the flour, sugar, and salt.
  • In another bowl, beat the eggs and then add the milk, melted butter, and vanilla extract. Mix well.
  • Gradually add the wet ingredients to the dry ingredients, whisking until smooth and lump-free. Let the batter rest for 30 minutes at room temperature.
  • Heat a non-stick skillet over medium heat and lightly grease with extra melted butter.
  • Pour about 1/4 cup of the crepe batter into the skillet and quickly tilt the pan in a circular motion to spread the batter into a thin layer.
  • Cook for about 1-2 minutes or until the underside is lightly golden, then use a spatula to flip the crepe and cook for another minute.
  • Remove the crepe from the skillet and repeat the process with the remaining batter, stacking the cooked crepes on a plate.
  • To assemble, spread a generous tablespoon of chocolate hazelnut spread over one half of a crepe, then fold it over twice to form a triangle or roll it up.
  • Dust with powdered sugar and sprinkle crushed hazelnuts on top before serving.

Notes

Let the batter rest for best results.
Keyword chocolate, crepes, dessert, hazelnut

WANT TO SAVE THIS RECIPE?

Leave a Comment

Recipe Rating