Craving a sweet treat without turning on the oven? You’re in the right place! In just minutes, you can whip up delicious no-bake chocolate peanut butter cups. These simple delights are perfect for any occasion. From ingredient tips to easy steps, I’ll guide you through making these tasty cups that everyone will love. Get ready to indulge in a snack that’s quick, easy, and oh-so-satisfying!
Why I Love This Recipe
- Easy to Make: This no-bake recipe requires minimal effort and time, making it perfect for anyone craving a sweet treat without the hassle.
- Irresistible Flavor Combination: The rich chocolate and creamy peanut butter create a delightful flavor balance that is hard to resist.
- Customizable: You can easily adjust the sweetness or add your favorite ingredients like nuts or shredded coconut for a personal touch.
- Perfect for Sharing: These cups are great for parties, gatherings, or simply to enjoy with family and friends.
Ingredients
Required Ingredients for Chocolate Peanut Butter Cups
To make these tasty Chocolate Peanut Butter Cups, you need just a few simple items:
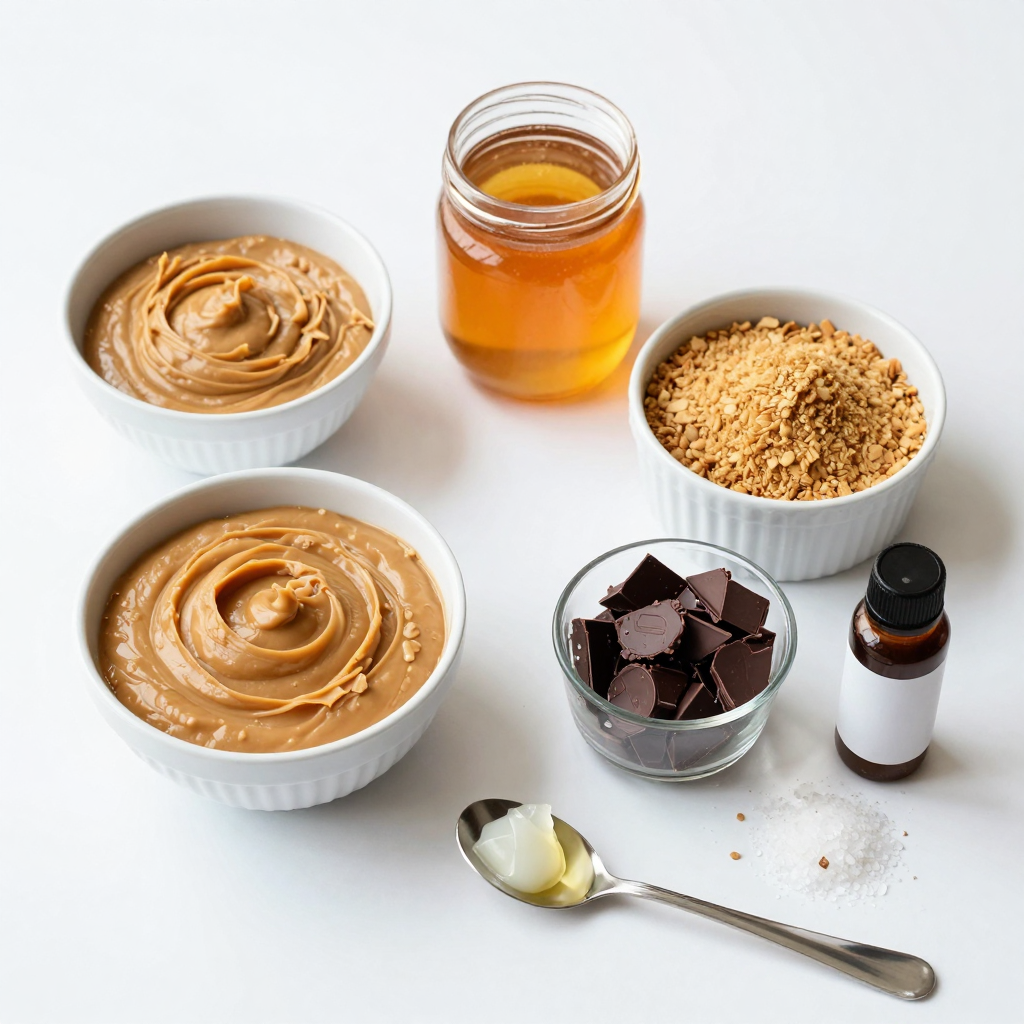
– 1 cup peanut butter (creamy or crunchy)
– 1/4 cup honey or maple syrup
– 1 cup graham cracker crumbs
– 1/2 teaspoon vanilla extract
– 1/2 cup dark chocolate chips
– 1 tablespoon coconut oil
– A pinch of sea salt
These ingredients work together to create a rich and satisfying treat.
Ingredient Substitutions
You can switch some ingredients if needed. Here are a few ideas:
– Use almond butter instead of peanut butter for a nut-free option.
– Swap honey for agave syrup if you prefer a vegan sweetener.
– Use crushed cookies instead of graham cracker crumbs for a different taste.
– If you like white chocolate, try that instead of dark chocolate.
These swaps can help you make the recipe fit your tastes or dietary needs.
Measuring Tips for Precision
Measuring ingredients correctly is key for the best results. Here are some tips:
– Use a dry measuring cup for peanut butter and graham cracker crumbs. Fill the cup, then level it off with a knife.
– For sticky ingredients like honey, lightly grease the measuring cup with oil. This helps it pour out cleanly.
– When measuring chocolate chips, make sure to fill the cup without packing them down.
Following these tips will help make sure your cups turn out perfectly every time!
Step-by-Step Instructions
Preparing the Peanut Butter Mixture
Start by gathering your ingredients. In a mixing bowl, combine 1 cup of peanut butter, 1/4 cup of honey or maple syrup, 1 cup of graham cracker crumbs, 1/2 teaspoon of vanilla extract, and a pinch of sea salt. Mix this until it’s smooth and thick. This mixture is the heart of your peanut butter cups.
Once mixed, you can prepare your muffin tin. Line it with cupcake liners. This step makes it easy to remove the cups later. Now, spoon about 1 tablespoon of the peanut butter mixture into each liner. Press it down gently to form an even layer. Save some of this mixture for later.
Melting the Chocolate and Assembling the Cups
Next, let’s melt the chocolate. In a microwave-safe bowl, combine 1/2 cup of dark chocolate chips and 1 tablespoon of coconut oil. Microwave in 20-second bursts, stirring each time until it’s smooth. Be careful not to overheat it; you want a nice, silky melt.
Now, pour a layer of this melted chocolate over the peanut butter mixture in each cup. Fill them about halfway. Tap the muffin tin gently on the counter to remove any air bubbles. It’s important for a nice finish! Place the muffin tin in the fridge for about 10-15 minutes to let the chocolate set.
Setting and Storing the Cups
After the chocolate layer has firmed up, it’s time for more peanut butter. Take the reserved peanut butter mixture and add a dollop on top of each cup. Spread it out evenly.
Now, we’ll cover it with chocolate again. Pour another layer of melted chocolate on top of the peanut butter layer. Make sure to cover it all. Return the muffin tin to the fridge for at least 30 minutes or until the cups are fully set.
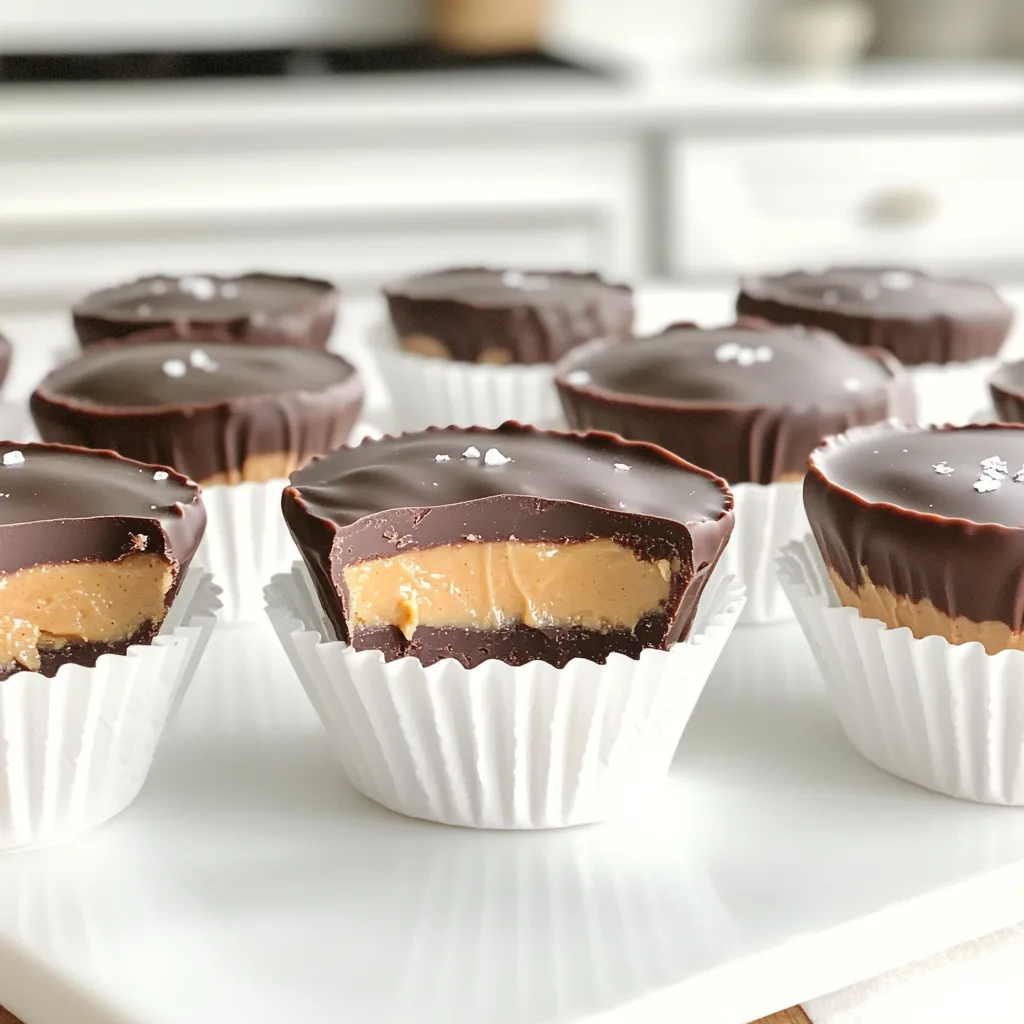
Once set, gently peel the liners away from the cups. Store your no-bake treats in an airtight container in the fridge. Enjoy these sweet bites whenever you want a quick treat!
Pro Tips
- Use Natural Peanut Butter: Opt for natural peanut butter without added sugars or oils for a healthier option that retains a rich flavor.
- Chill Between Layers: Allow each layer to set in the fridge before adding the next, ensuring that the layers don’t mix and maintain their distinct flavors.
- Experiment with Sweeteners: Try different sweeteners like agave syrup or brown rice syrup to find the perfect balance of sweetness for your taste.
- Store in the Freezer: For a firmer texture, store your chocolate peanut butter cups in the freezer; they make for a refreshing treat on warm days!
Tips & Tricks
Achieving the Perfect Consistency
For the best texture, mix your peanut butter, honey, graham cracker crumbs, and sea salt well. Make sure there are no lumps. This creates a smooth and thick mixture. If it’s too dry, add a little more honey. If it’s too sticky, add more crumbs. The right balance keeps the cups from falling apart.
Preventing Chocolate from Seizing
When melting chocolate, use a microwave-safe bowl. Combine dark chocolate chips with coconut oil. Heat in short bursts of 20 seconds. Stir between each burst to keep the chocolate smooth. If you see any lumps, don’t panic. Stirring usually fixes this. If it does seize, you can add a bit of coconut oil and stir again.
Best Practices for Easy Removal from Liners
To remove cups easily, use cupcake liners. Make sure to line your muffin tin well. After chilling, gently peel the liners off. If they stick, try running a knife around the edge. This helps to loosen the cups without damaging them. Enjoy your tasty treats without any hassle!
Variations
Adding Different Nut Butters
You can switch up the nut butter in this recipe. Almond butter works well and adds a new flavor. Cashew butter gives a creamy, mild taste. Sunflower seed butter is a great choice for nut-free options. Each nut butter offers a unique twist while keeping the treat delicious.
Incorporating Additional Flavors or Toppings
Feel free to get creative with flavors! Try adding a splash of cinnamon for warmth. You can mix in some mini chocolate chips for extra sweetness. Want a crunch? Toss in chopped nuts or crispy rice. Drizzle melted white chocolate on top for a fun look and taste. Each addition makes your peanut butter cups special.
Making Vegan or Gluten-Free Versions
To make these cups vegan, use maple syrup instead of honey. Choose dark chocolate chips that are dairy-free. For a gluten-free option, use gluten-free graham crackers. This way, everyone can enjoy these tasty treats without worry. It’s easy to adapt this recipe to fit your dietary needs!
Storage Info
How to Store No-Bake Chocolate Peanut Butter Cups
To keep your no-bake chocolate peanut butter cups fresh, store them in an airtight container. Place a layer of parchment paper between layers if needed. This helps avoid sticking. Keep them in the fridge. They will stay good for about one week.
Freezing Instructions for Longer Storage
If you want to save some for later, freezing works great. Wrap each cup in plastic wrap or foil. Place them in a freezer-safe bag or container. This way, they can last up to three months in the freezer. When you’re ready to eat, just thaw them in the fridge.
Best Practices for Keeping Freshness
To maintain the best flavor and texture, avoid leaving them at room temperature. Heat can melt the chocolate and change their look. Always check for any signs of spoilage, like off smells or changes in texture. Following these tips will ensure your treats stay tasty and enjoyable!
FAQs
Can I use milk chocolate instead of dark chocolate?
Yes, you can use milk chocolate. It will give a sweeter taste. Milk chocolate melts well, too. Just follow the same melting steps. It blends nicely with the peanut butter.
How long do no-bake peanut butter cups last?
These cups last about a week in the fridge. Keep them in an airtight container. If you freeze them, they last for up to three months. Just let them thaw before eating.
Can I make these cups ahead of time?
Absolutely! You can make them a day or two in advance. Just store them in the fridge. They taste great after sitting for a bit, too. The flavors blend well together over time.
You learned how to make tasty no-bake chocolate peanut butter cups. We discussed the right ingredients and easy steps to mix, melt, and store them. Remember to try different nut butters or toppings for fun variations. Storing your cups correctly keeps them fresh longer. With these tips, I hope you feel ready to start. Enjoy creating your delicious treats!


