
If you love chocolate and peanut butter, this no-bake pie is a must-try! It’s a rich, creamy delight that’s easy to make and perfect for any occasion. You’ll feel like a pro in the kitchen as we guide you step-by-step. Get ready to impress your friends and family with this yummy treat that needs no oven. Let’s dive into the tasty world of Chocolate Peanut Butter No-Bake Pie!
Why I Love This Recipe
- Decadent Flavor Combination: The rich chocolate crust combined with the creamy peanut butter filling creates an irresistible dessert that satisfies any sweet tooth.
- No-Bake Convenience: This pie is incredibly easy to make and requires no baking, making it perfect for hot summer days or when you’re short on time.
- Customizable Toppings: You can personalize this pie with your favorite toppings, from chopped nuts to chocolate shavings, adding a fun touch to each slice.
- Crowd-Pleaser: Whether for a family gathering or a party, this pie is always a hit, appealing to both kids and adults alike.
Ingredients
Main Ingredients
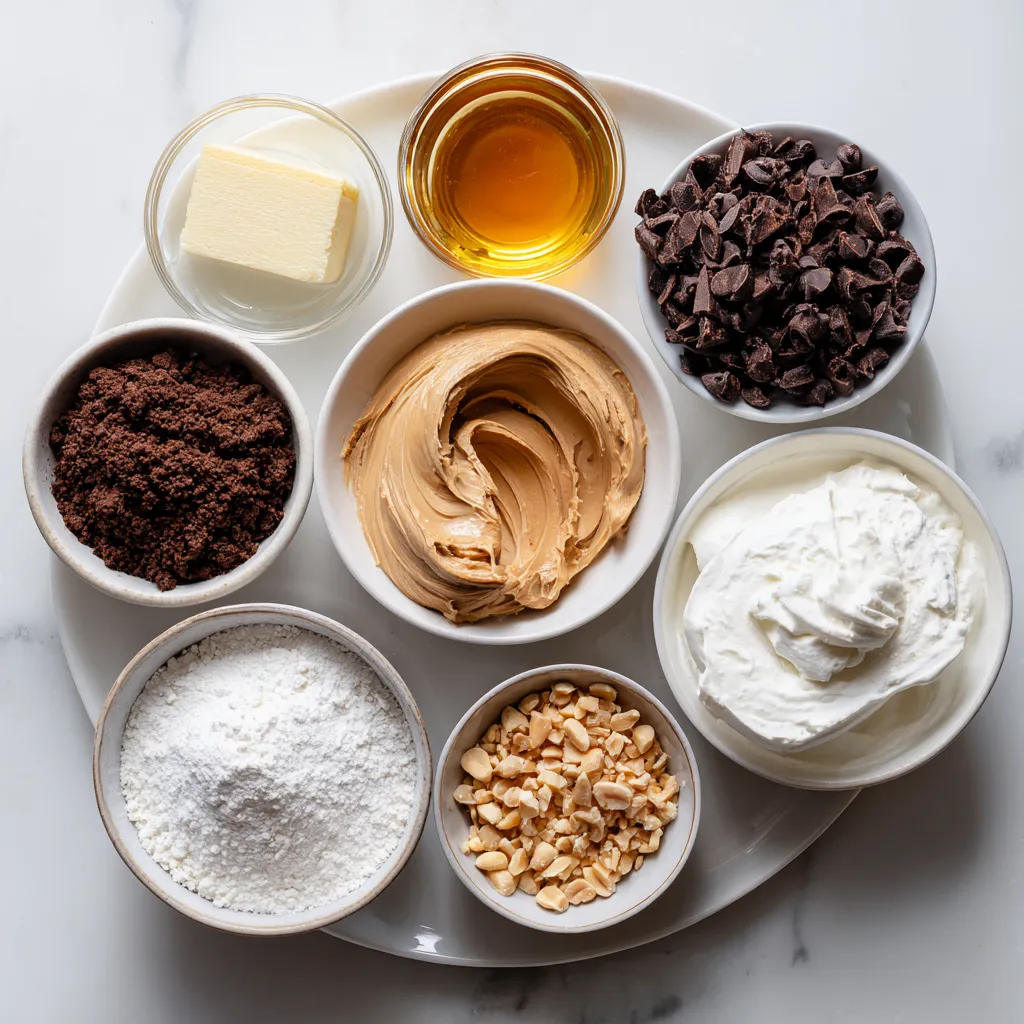
To make this pie, you will need:
– 1 ½ cups chocolate cookie crumbs
– ½ cup unsalted butter, melted
– 1 cup creamy peanut butter
– 1 cup powdered sugar
– 8 oz cream cheese, softened
– 1 cup whipped cream (or whipped topping)
– 1 cup semi-sweet chocolate chips
– 2 tablespoons coconut oil
These ingredients create a rich flavor and smooth texture. The chocolate cookie crumbs make a great crust. The peanut butter filling is creamy and sweet. The melted chocolate topping adds a nice finish.
Optional Garnishes
For extra flair, you can add:
– Chopped peanuts
– Chocolate shavings
These garnishes not only look nice; they also add some crunch and extra chocolate flavor. You can adjust the amount based on your taste.
Equipment Needed
To prepare this pie, gather these tools:
– Mixing bowls
– A pie pan (9-inch size)
– A spatula
– Microwave-safe bowl
– Electric mixer or whisk
Having the right tools makes the process easier and more fun. You can mix and pour with ease, ensuring the pie turns out great!
Step-by-Step Instructions
Preparing the Crust
Start by mixing 1 ½ cups of chocolate cookie crumbs with ½ cup of melted butter. Stir until the crumbs are fully coated. Next, press this mixture into a 9-inch pie pan. Make sure to pack it tightly on the bottom and up the sides. This step is key for a sturdy crust. Chill the crust in the fridge while you prepare the filling.
Making the Peanut Butter Filling
In a large bowl, mix 1 cup of creamy peanut butter with 8 oz of softened cream cheese. Blend them until the mixture is smooth. Gradually add in 1 cup of powdered sugar while mixing. Keep going until it’s fluffy and well-combined. This filling is rich and delicious.
Incorporating the Whipped Cream
Now, gently fold in 1 cup of whipped cream. Be careful not to deflate it too much. Use a spatula and mix until the whipped cream is fully blended with the peanut butter mixture. This step gives the filling a light and airy texture.
Filling the Crust
Once the crust is chilled, pour the peanut butter filling into it. Spread the filling evenly with a spatula. Smooth the top to create a nice finish. This pie will look so good!
Preparing and Applying the Chocolate Topping
In a microwave-safe bowl, combine 1 cup of semi-sweet chocolate chips and 2 tablespoons of coconut oil. Heat the bowl in the microwave in 30-second bursts, stirring in between. Keep heating until the chocolate is melted and smooth. Pour this melted chocolate over the peanut butter filling. Use a spatula to spread it evenly.
Chilling the Pie
Finally, place the pie in the fridge. Let it chill for at least 4 hours or overnight for the best results. This time lets the pie set perfectly. When you’re ready to serve, slice into wedges and enjoy!
Tips & Tricks
Perfecting the Crust
To make a great crust, use fresh chocolate cookie crumbs. Mix them well with melted butter. Press the mixture firmly into the pie pan. Make sure it is even and smooth. Chilling the crust helps it hold its shape. I suggest chilling for at least 30 minutes. This step makes a big difference in texture.
Achieving a Smooth Filling
For a smooth filling, use softened cream cheese. It blends easier with the peanut butter. Mix them together until no lumps remain. Gradually add powdered sugar for sweetness. This keeps the mixture fluffy and light. When adding whipped cream, fold gently. This keeps the mixture airy and creamy. A smooth filling ensures each bite is dreamy.
Serving Suggestions
Slice the pie into even wedges for serving. It looks nice and is easy to share. You can add chopped peanuts on top for crunch. Chocolate shavings also add a nice touch. Serve it cold for the best flavor. Pair it with a scoop of vanilla ice cream for a treat. Enjoy your delicious creation!
Pro Tips
- Use Room Temperature Ingredients: Ensure the cream cheese and peanut butter are at room temperature for easier mixing and a smoother filling.
- Chill Between Steps: Refrigerate the pie at different stages to help maintain structure, especially after adding the filling and before pouring the chocolate topping.
- Experiment with Toppings: Feel free to customize your pie with additional toppings like crushed pretzels, drizzled caramel, or even sea salt for an extra flavor boost.
- Make Ahead: This pie is perfect for making ahead of time; it can be stored in the refrigerator for up to three days without losing flavor or texture.
Variations
Gluten-Free Options
You can make this pie gluten-free with a few changes. Use gluten-free chocolate cookies for the crust. Many brands offer tasty options. Check labels to ensure they are certified gluten-free. This way, everyone can enjoy this treat!
Adding Flavor Variations
Want to mix things up? Try adding flavors to the filling. You can add a teaspoon of vanilla extract for extra depth. Or, mix in a pinch of sea salt for a sweet-salty balance. For a twist, add a layer of banana slices before the chocolate topping. Each option brings a new taste!
Dietary Substitutions
If you need to make dietary swaps, it’s simple! Use almond butter or sunflower seed butter in place of peanut butter. For a lighter filling, replace cream cheese with Greek yogurt. You can also use sugar substitutes like stevia or monk fruit sweetener. These changes keep the pie delicious and friendly for various diets!
Storage Info
Best Practices for Storing Leftovers
To store leftovers, first cover the pie with plastic wrap. This keeps the pie fresh and moist. You can also use a pie keeper if you have one. Make sure to chill it in the fridge. This pie stays tasty for up to three days.
Tips for Freezing the Pie
If you want to freeze the pie, first let it set. Wrap it well in plastic wrap, then in aluminum foil. This helps prevent freezer burn. You can freeze it for up to a month. When ready to eat, thaw it in the fridge overnight.
Shelf Life Information
This no-bake pie lasts about three days in the fridge. If you freeze it, it can last one month. For the best taste, enjoy it within that time. Always check for changes in smell or texture before eating leftovers.
FAQs
Can I use crunchy peanut butter instead?
Yes, you can use crunchy peanut butter. It adds a nice texture. The crunch pairs well with the creamy filling. If you love peanuts, it’s a great choice. Just remember, the flavor will be a bit different.
How long does the pie need to chill?
The pie needs to chill for at least four hours. Chilling helps it set properly. For the best results, let it chill overnight. This extra time allows the flavors to meld together.
Can I make this pie ahead of time?
Absolutely! This pie is perfect for making ahead. You can prepare it a day or two in advance. Just keep it covered in the fridge. It will be ready when you need it.
What is the best way to slice no-bake pie?
To slice the pie, use a sharp knife. Dip the knife in hot water for easy cutting. Wipe the knife clean between slices. This keeps the edges neat and tidy.
How can I make the pie richer in chocolate flavor?
To enhance the chocolate flavor, add more chocolate chips. You can mix some into the peanut butter filling too. Another option is to use dark chocolate for the topping. This adds depth and richness to every bite.
This blog post covered how to make a tasty no-bake peanut butter pie. We explored the needed ingredients and tools. I shared step-by-step instructions, offering tips to perfect your pie. You learned about variations and storage too.
In my view, this pie is a fun treat for all. Enjoy making it your own! Happy bakin


