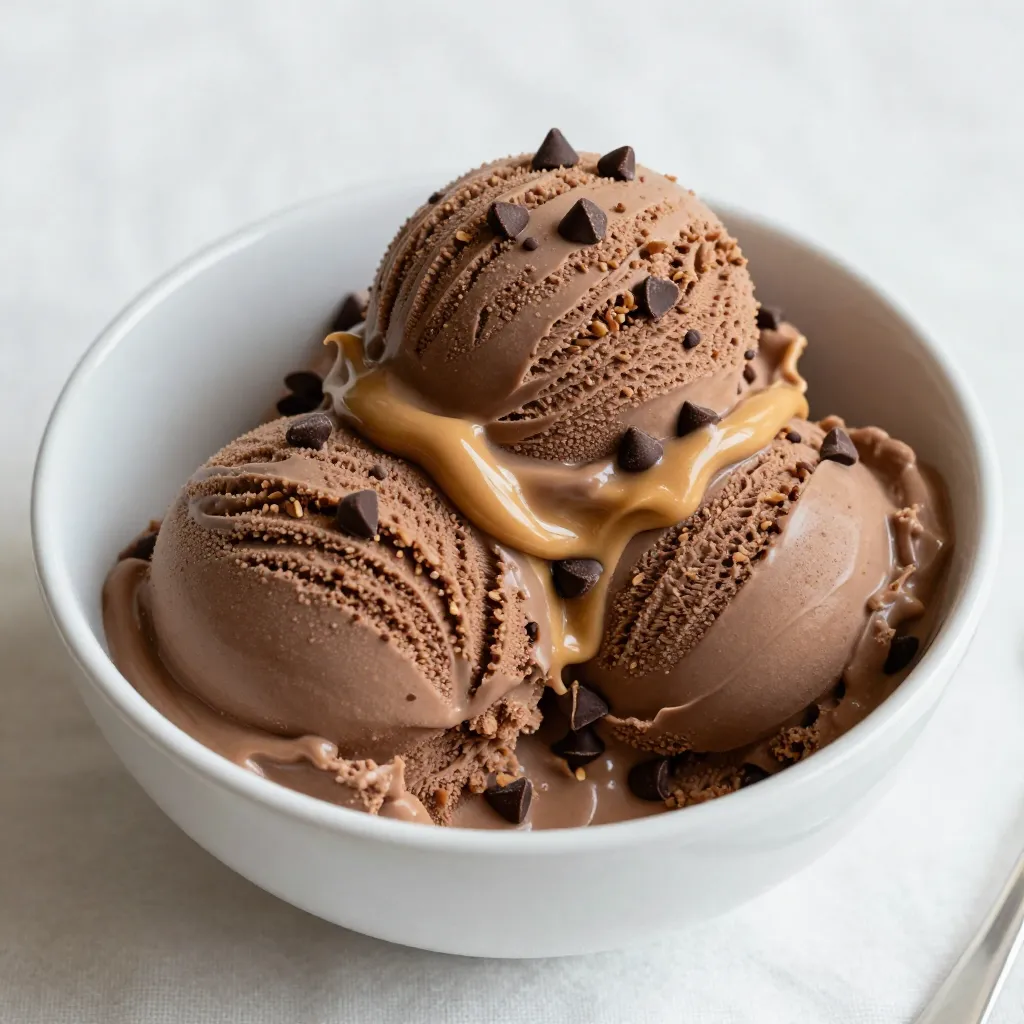
Craving a treat that combines the rich flavors of chocolate and peanut butter? Look no further! My Chocolate Peanut Butter Swirl Ice Cream is the perfect solution. This creamy delight is simple to make and will impress your friends and family. You’ll learn how to mix up a luxurious base and create a dreamy swirl for a satisfying treat. Let’s get started on this indulgent adventure!
Why I Love This Recipe
- Decadent Flavor: This chocolate peanut butter swirl ice cream combines the rich flavors of chocolate and creamy peanut butter, making each scoop an indulgent treat.
- Easy to Make: With just a few simple ingredients and an ice cream maker, you can create this delicious dessert in no time.
- Perfect for Sharing: This recipe yields 6-8 servings, making it an ideal dessert for gatherings, parties, or family movie nights.
- Customizable Toppings: Add your favorite toppings like crushed peanuts or chocolate shavings for a personal touch and extra texture.
Ingredients
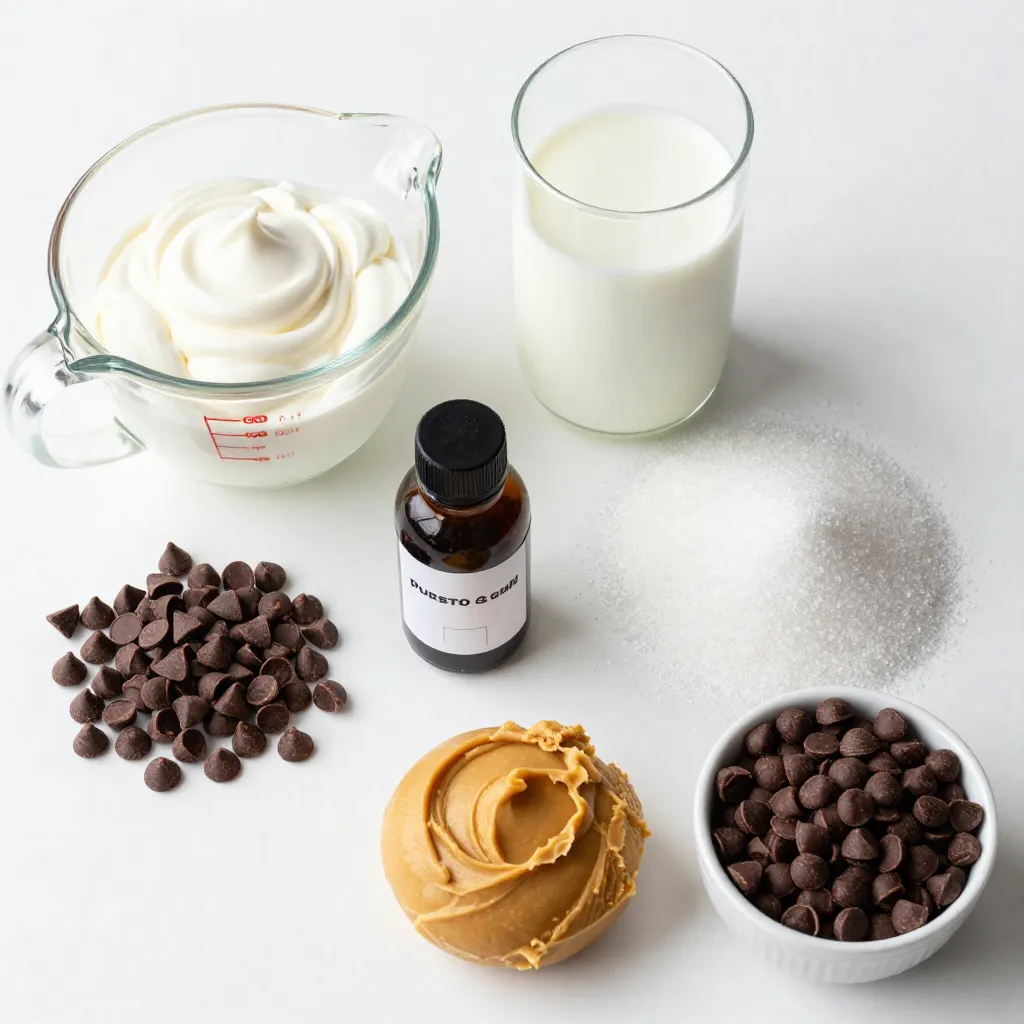
Main Ingredients
– 2 cups heavy cream
– 1 cup whole milk
– 3/4 cup granulated sugar
– 1 teaspoon pure vanilla extract
Flavor Additions
– 1/2 cup semi-sweet chocolate chips
– 1/2 cup creamy peanut butter
– 1/4 cup mini chocolate chips
To make the best Chocolate Peanut Butter Swirl Ice Cream, I focus on quality ingredients. The heavy cream and whole milk create a rich base. Granulated sugar adds just the right sweetness. Pure vanilla extract brings warmth and depth.
For the flavor, I love using semi-sweet chocolate chips. They melt beautifully and mix well with the peanut butter. Creamy peanut butter gives a smooth texture and nutty taste. Mini chocolate chips add fun crunch and extra chocolatey goodness.
These ingredients come together to create a treat that is creamy and delightful. Each scoop bursts with flavor. You can taste the rich chocolate and the nutty peanut butter in every bite.
Step-by-Step Instructions
Mixing the Base
To start, grab a large mixing bowl. Add 2 cups of heavy cream, 1 cup of whole milk, 3/4 cup of granulated sugar, and 1 teaspoon of pure vanilla extract. Whisk everything together until the sugar fully dissolves. This step is key. You want a smooth, sweet base for your ice cream.
Churning the Ice Cream
Now, pour your creamy mixture into your ice cream maker. Follow your machine’s instructions. Let it churn for about 20 to 25 minutes. You will see it transform into a soft-serve consistency. It’s exciting to watch!
Creating the Swirl
While your ice cream churns, melt 1/2 cup of semi-sweet chocolate chips. Use a microwave-safe bowl and heat in 30-second intervals. Stir in between until smooth, then let it cool slightly. Once the ice cream is ready, transfer half into a freezer-safe container. Drizzle half of the melted chocolate and half of 1/2 cup of creamy peanut butter over it. Use a knife or skewer to swirl them gently. Add the remaining ice cream on top, followed by the rest of the chocolate and peanut butter. Swirl again for a beautiful marbled look. For added crunch, sprinkle 1/4 cup of mini chocolate chips on top. Cover it tightly and freeze for at least 4 hours. Your delightful treat is almost ready!
Tips & Tricks
Achieving the Perfect Texture
For creamy ice cream, the right temperature is key. Chill your mixing bowl and the ice cream maker bowl in the freezer for about 30 minutes before use. This helps keep the base cold and aids in churning. When you churn the ice cream, aim for about 20 to 25 minutes. The mixture should reach a soft-serve texture before you add the swirl.
Cooling melted chocolate is also important. After melting the semi-sweet chocolate chips, let it sit for a few minutes. It should be warm, not hot, when you swirl it into the ice cream. Hot chocolate can melt the ice cream too much and ruin the texture.
Presentation Tips
Serving your ice cream well can make it an even bigger treat. You can scoop the ice cream into bowls for a classic look. Drizzle on some extra melted chocolate and peanut butter before serving. This adds flavor and makes it pretty.
If you prefer cones, use waffle cones for a crunchy touch. Add a sprinkle of crushed peanuts or chocolate shavings on top. This will not only make it look good but also add some fun texture.
Keeping Ice Cream Fresh
To store your homemade ice cream, use a freezer-safe container. Make sure to press a piece of plastic wrap directly onto the surface of the ice cream. This helps prevent ice crystals from forming.
Your ice cream can stay fresh for about two weeks. To check if it’s still good, look for any signs of freezer burn. If the ice cream has an odd smell or color, it’s best to throw it away.
Pro Tips
- Chill Your Ingredients: For a creamier texture, chill your heavy cream and milk in the fridge for a few hours before mixing. This helps the ice cream churn more efficiently.
- Swirling Technique: When swirling in the chocolate and peanut butter, use a gentle hand to create beautiful ribbons without fully mixing them in. This enhances the visual appeal!
- Storage Tips: To prevent ice crystals from forming, press a piece of plastic wrap directly onto the surface of the ice cream before sealing the container. This keeps it fresher for longer.
- Serving Suggestions: For a decadent treat, serve your ice cream with a drizzle of hot fudge and a sprinkle of crushed peanuts or chocolate shavings on top.
Variations
Alternative Nut Butters
You can switch peanut butter for almond or cashew butter. Both options add a new flavor. Almond butter brings a light, nutty taste. Cashew butter is creamy and sweet. This change makes the ice cream unique and fun.
Flavor Swaps
Try different chocolates or flavors for a twist. You can use dark chocolate or milk chocolate. Each type gives a new taste. Swap mini chocolate chips for nuts or candy. Chopped walnuts or crushed Oreos work well. These swaps create a new texture and taste adventure.
Dairy-Free Option
For a dairy-free version, use coconut cream and your favorite plant-based milk. Coconut cream gives a rich, creamy base. Almond milk or oat milk are great choices. This option is perfect for vegans or those with lactose issues. The flavor remains rich and satisfying.
Storage Info
Best Practices for Freezing
To keep your Chocolate Peanut Butter Swirl Ice Cream fresh, use freezer-safe containers. Choose airtight containers to prevent ice crystals from forming. Fill the container, but leave a little space at the top. This space helps when the ice cream expands while freezing. Close the lid tightly to keep air out. You can also press plastic wrap against the surface of the ice cream before sealing the lid. This gives extra protection against freezer burn.
Shelf Life
Your ice cream stays fresh in the freezer for about 2 to 3 months. After this time, it may lose flavor and texture. If the ice cream changes color or develops ice crystals, it may not taste good. A strong freezer smell can also ruin the flavor. If you see these signs, it’s best to toss it out.
Refreezing Guidelines
You can refreeze melted ice cream, but it may not taste as good. If it melts completely, you should only refreeze it once. Ice crystals form when ice cream melts and refreezes, leading to a grainy texture. To avoid this, try to keep it frozen as much as possible. If you plan to use melted ice cream, mix it well before freezing again. This helps blend the texture back together.
FAQs
How to make Chocolate Peanut Butter Swirl Ice Cream without an ice cream maker?
You can make this ice cream without a maker. First, mix the base as usual. After whisking the cream, milk, sugar, and vanilla, pour it into a large, shallow dish. Place it in the freezer. Every 30 minutes, stir the mixture with a fork. This breaks up ice crystals and helps it become creamy. Repeat this step for about 3-4 hours. When it’s thick and fluffy, add the melted chocolate and peanut butter. Swirl them in to create that tasty marbled look.
Can you use natural peanut butter for this recipe?
Yes, you can use natural peanut butter. It gives a richer taste and slight texture change. Natural peanut butter often has oil on top, so stir it well before measuring. This type may be thicker than creamy peanut butter. The texture might be a bit less smooth, but the flavor will shine through. If you want it creamier, consider mixing in a bit of oil to loosen it up.
What are some toppings that go well with this ice cream?
Toppings can make your ice cream even better! Here are some ideas:
– Crushed peanuts for a nice crunch.
– Extra mini chocolate chips for added texture.
– Drizzles of melted chocolate or peanut butter on top.
– Whipped cream for a light touch.
– Sliced bananas for a fruity twist.
– Sprinkles for a fun pop of color.
Feel free to mix and match your favorites!
This blog post outlined how to make delicious Chocolate Peanut Butter Swirl Ice Cream. We covered essential ingredients, step-by-step instructions, and tips for the perfect texture. You learned about variations, storage methods, and answers to common questions.
Making homemade ice cream can be fun and rewarding. Experiment with flavors and find your favorite combo. Enjoy your creamy creation with loved one


