
Are you ready to dive into a sweet adventure? Making Cookies & Cream No-Churn Ice Cream is easier than you think! This delightful treat requires no ice cream maker, just some simple ingredients and your kitchen. I’ll guide you through every step to achieve rich, creamy goodness. Whether for a hot summer day or a special gathering, this ice cream will impress. Let’s make your dessert dreams come true!
Why I Love This Recipe
- Simple Preparation: This no-churn ice cream requires no fancy equipment, making it accessible for everyone.
- Decadent Flavor: The combination of creamy vanilla and chocolate sandwich cookies creates an irresistible taste.
- Customizable: You can easily swap out the cookie type or add mix-ins to suit your taste preferences.
- Perfect for Any Occasion: This delightful treat is great for parties, family gatherings, or a sweet indulgence anytime.
Ingredients
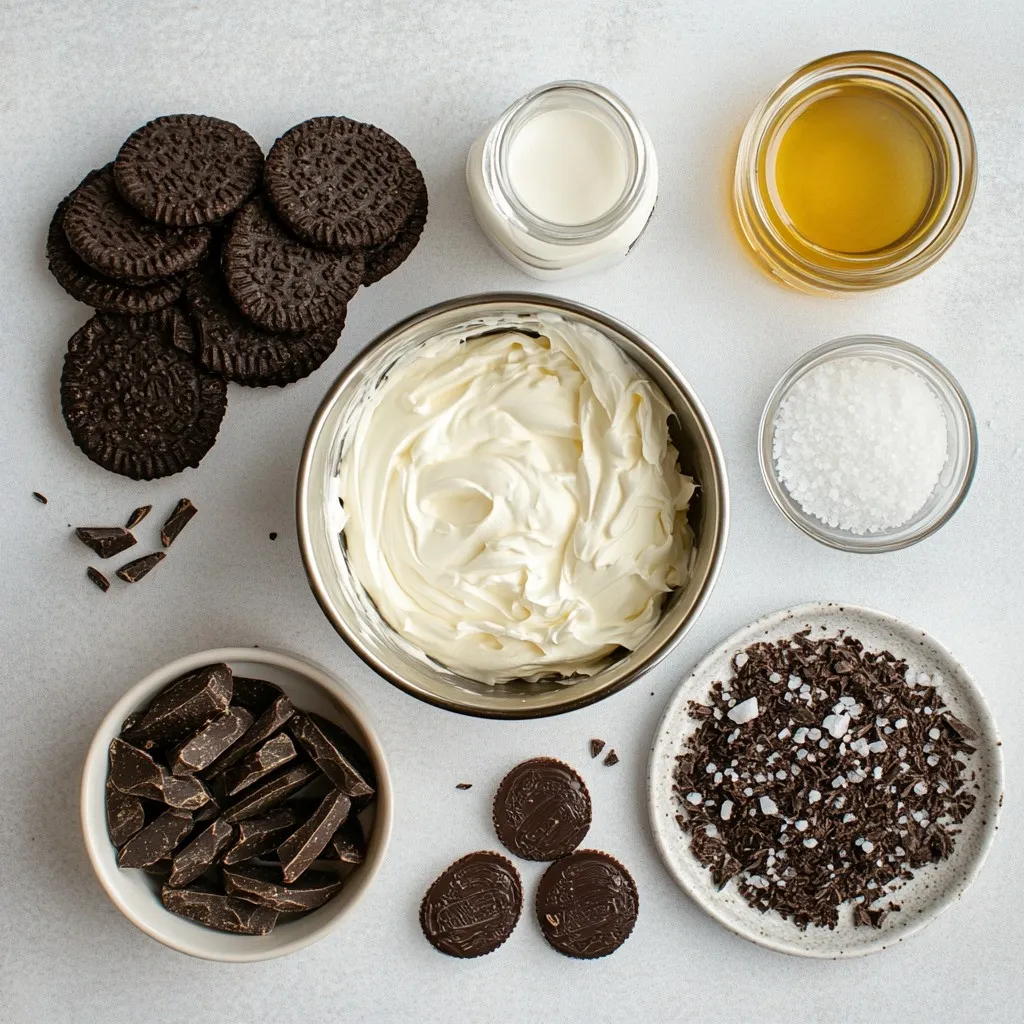
Primary Ingredients for Cookies & Cream No-Churn Ice Cream
To make this creamy treat, gather these key items:
– 2 cups heavy whipping cream
– 1 cup sweetened condensed milk
– 1 teaspoon vanilla extract
– 1/2 cup crushed chocolate sandwich cookies
– Pinch of salt
These ingredients create a rich, smooth ice cream. The heavy cream gives it a fluffy texture. Sweetened condensed milk adds sweetness and creaminess. The vanilla extract enhances the flavor. The chocolate cookies provide that classic cookies and cream taste.
Optional Garnishes and Additional Ingredients
You can add a few fun touches to your ice cream:
– Extra crushed chocolate sandwich cookies for the top.
– Chocolate syrup for drizzling.
– Whipped cream for extra fluffiness.
These garnishes make your dessert look even better and taste more exciting. Feel free to get creative!
Notes on Ingredient Quality
Using high-quality ingredients makes a big difference. Choose fresh heavy cream for the best texture. The sweetened condensed milk should be smooth and not grainy. Use good chocolate cookies; they should be crunchy and flavorful. Fresh ingredients lead to a delicious ice cream that everyone will love.
Step-by-Step Instructions
Preparing the Whipped Cream
To start, grab a large mixing bowl and measure out 2 cups of heavy whipping cream. Using an electric mixer, whip the cream on medium-high speed. Keep mixing until soft peaks form, which takes about 3-5 minutes. This step is key for a light and fluffy ice cream. It should look smooth and creamy.
Combining the Sweetened Condensed Milk Mixture
In a separate bowl, mix 1 cup of sweetened condensed milk, 1 teaspoon of vanilla extract, and a pinch of salt. Use a whisk to blend until smooth. This mixture adds sweetness and flavor to your ice cream. Make sure it is well combined before you move on.
Folding Technique to Maintain Fluffiness
Now, it’s time to combine the two mixtures. Take the whipped cream and gently fold it into the sweetened condensed milk mixture. Do this in batches to keep the whipped cream fluffy. Use a spatula and scoop from the bottom, lifting it over the top. This keeps air in the cream, making your ice cream light.
Freezing Process Where to Store
Once everything is mixed, add in ½ cup of crushed chocolate sandwich cookies. Gently fold them in so they are evenly spread. Now, transfer the mixture into an airtight container. Spread it evenly and top with extra crushed cookies for garnish. Cover it with a lid or plastic wrap. Freeze for at least 4 hours, or until the ice cream is firm. When ready, scoop it into bowls or cones and enjoy!
Tips & Tricks
Achieving the Perfect Creamy Texture
To get a smooth and creamy ice cream, whip the heavy cream until soft peaks form. This usually takes 3-5 minutes. A good texture makes your ice cream delightful. Be gentle when you mix the whipped cream with the other ingredients. This keeps it light and fluffy.
How to Use an Electric Mixer Effectively
When using an electric mixer, start on a low speed. This prevents splatters and mess. Gradually increase the speed to medium-high. Keep an eye on the cream as you mix. Stop as soon as you see soft peaks. If you overwhip, the ice cream can become grainy.
Common Mistakes to Avoid
One mistake is mixing too hard when combining the whipped cream. This can deflate the air you added. Another common error is not chilling your mixing bowl. A cold bowl helps whip the cream better. Lastly, avoid using expired ingredients. Fresh ingredients give you the best flavor.
Pro Tips
- Use Chilled Ingredients: For the best texture, make sure your heavy cream and mixing bowl are chilled before whipping. This helps the cream whip up faster and achieve better volume.
- Don’t Overmix: When folding the whipped cream into the condensed milk mixture, do so gently. Overmixing can deflate the whipped cream, resulting in a denser ice cream.
- Experiment with Mix-Ins: Feel free to get creative with your mix-ins! You can add chocolate chips, nuts, or even swirls of fudge for added texture and flavor.
- Cover Well for Freezing: Ensure your container is airtight when freezing to prevent ice crystals from forming on the surface of your ice cream.
Variations
Alternative Cookie Add-ins
You can switch up the cookies in this ice cream. Try using different types of cookies for fun flavors. Here are some ideas:
– Oreo Thin Crisps for a light crunch.
– Chocolate Chip Cookies for a sweet twist.
– Peanut Butter Cookies for a nutty flavor.
Each cookie adds its own taste and texture. Feel free to mix and match!
Flavor Enhancements
Want to spice things up? Add extra flavors to your ice cream. Here are a few yummy ideas:
– Mint extract gives a cool, fresh taste.
– Chocolate chips add more chocolatey goodness.
– Caramel sauce swirled in creates a sweet surprise.
These small changes can make a big difference in taste.
Dairy-Free or Vegan Substitutions
You can make this ice cream dairy-free or vegan. Use coconut cream instead of heavy cream. For the sweetened condensed milk, try using coconut milk. This keeps the ice cream creamy and rich. A pinch of salt is still a must! You won’t miss the dairy in this tasty treat.
Storage Information
How to Properly Store No-Churn Ice Cream
To keep your cookies & cream no-churn ice cream tasty, store it in an airtight container. This helps keep out air and prevents ice crystals. Make sure to press a piece of plastic wrap on top of the ice cream before sealing it. This extra step keeps the ice cream fresh and creamy.
Shelf Life and Signs of Spoilage
Your no-churn ice cream lasts about two weeks in the freezer. After that, it may lose flavor and texture. Check for ice crystals on top or a grainy texture. If you see either, it may be time to toss it. Always trust your taste buds—if it tastes off, don’t eat it!
Re-Freezing Tips
If you need to refreeze your ice cream, do it carefully. Let it soften slightly at room temperature before scooping. Do not leave it out too long, as this can lead to spoilage. Re-freezing can change the texture, so try to only freeze it once for the best experience.
FAQs
Can I use a different type of cookie?
Yes, you can! Feel free to switch the chocolate sandwich cookies for any cookie you like. Try using vanilla wafers or even peanut butter cookies. Each type will change the flavor a bit. Just remember to crush them well before adding to the mix.
How long does it take for the ice cream to freeze?
It takes at least 4 hours for this ice cream to freeze well. If you want it extra firm, leave it in the freezer longer. Just make sure to cover it well to avoid ice crystals.
What is the best way to serve no-churn ice cream?
I love to scoop this ice cream into bowls or cones. You can use a warm ice cream scoop to make it easier. Top with extra crushed cookies for a nice touch. You can also drizzle some chocolate sauce over it for fun.
Can I make this recipe ahead of time?
Absolutely! This recipe is great for making ahead. You can prepare it a day or two before you need it. Just keep it stored in the freezer, and it will be ready when you are.
You now know how to make cookies and cream no-churn ice cream at home. We covered the key ingredients, from whipped cream to sweetened condensed milk. You learned how to mix and freeze the ice cream properly. I shared tips to get the best texture and avoid common mistakes. Don’t forget to explore fun flavor variations and proper storage tips. Enjoy your creamy treat and share it with loved ones. Making ice cream at home is easy, fun, and rewarding. You have all the tools you need to create a delicious desser


