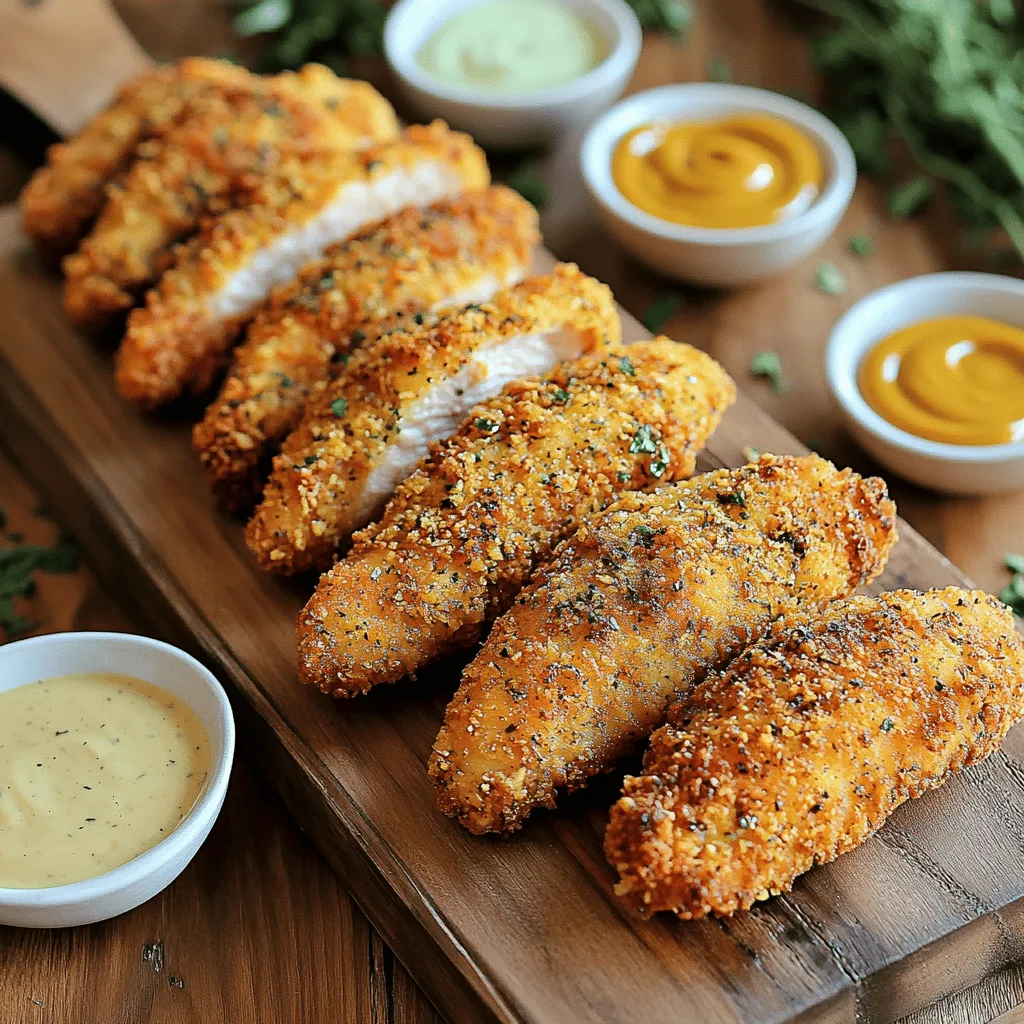
If you crave the crunch of golden-brown chicken tenders, you’re in the right place! This simple recipe lets you create homemade chicken tenders that are crispy and packed with flavor. I’ll guide you through easy steps, essential ingredients, and tips to perfect your frying technique. Whether you want to spice them up or keep them classic, my variations will have everyone asking for more. Let’s get cooking!
Why I Love This Recipe
- Simple Preparation: These chicken tenders are easy to make, requiring minimal ingredients and straightforward steps.
- Flavorful Marinade: The buttermilk marinade not only tenderizes the chicken but also infuses it with delicious flavor.
- Perfectly Crunchy: The combination of flour and panko breadcrumbs creates an irresistibly crispy coating.
- Customizable Heat: Add cayenne pepper for a spicy kick or leave it out for a mild version that kids will love.
Ingredients
Main Ingredients for Chicken Tenders
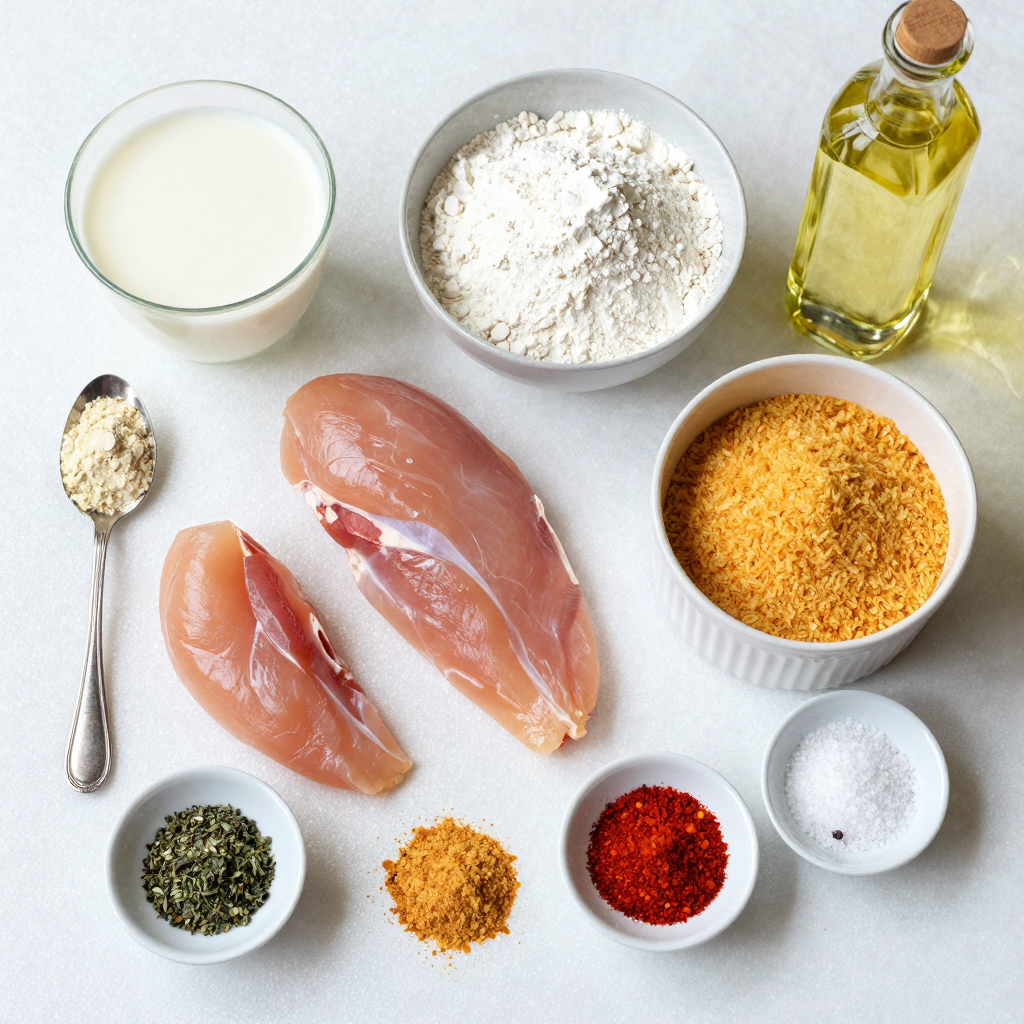
To make tasty chicken tenders, you will need a few main items:
– 1 pound chicken breast, cut into strips
– 1 cup buttermilk
– 1 cup all-purpose flour
– 1/2 cup breadcrumbs (panko for extra crunch)
These basic ingredients give your chicken tenders a juicy center and a crispy outside. The chicken breast is the star here. It cooks quickly and stays tender.
Seasoning and Coating Essentials
The right seasonings make your tenders pop. Here’s what you’ll need:
– 1 teaspoon garlic powder
– 1 teaspoon onion powder
– 1 teaspoon dried oregano
– 1 teaspoon smoked paprika
– Salt and pepper to taste
– 1/2 teaspoon cayenne pepper (optional for heat)
Mix these spices with the flour and breadcrumbs. They add great flavor to your tenders. The cayenne pepper gives a nice kick if you like some heat.
Oil for Frying
You need oil to fry your chicken tenders. I suggest using vegetable oil. Pour enough oil to cover the bottom of your frying pan, about 1/4 inch deep. Heat the oil to 350°F (175°C). This temperature helps your tenders get that golden brown color and stay crispy.
Step-by-Step Instructions
How to Marinate the Chicken
To begin, take your chicken breast strips and place them in a bowl. Pour in the buttermilk, making sure all the pieces are covered. This step is key. It helps the chicken stay juicy and adds flavor. Cover the bowl and put it in the fridge. Let it marinate for at least one hour. For the best taste, leave it overnight. The longer it sits, the more tender it becomes.
Preparing the Coating Mixture
While the chicken marinates, it’s time to prepare the coating. Grab a separate shallow dish for this. In the dish, mix the all-purpose flour, breadcrumbs, garlic powder, onion powder, dried oregano, smoked paprika, salt, and pepper. If you like some heat, add cayenne pepper. This mixture will give your chicken the perfect crunchy crust. Make sure it’s well combined.
Frying the Chicken Tendies
Now, let’s fry those tenders! Start by heating vegetable oil in a large skillet. Pour enough oil to cover the bottom, about a quarter inch deep. Heat it over medium-high heat until it reaches about 350°F. This is important for getting that crispy texture.
Take the marinated chicken out of the fridge. Let the excess buttermilk drip off. Dredge each strip in the coating mixture, making sure every piece is coated. Shake off any extra flour. Carefully place the chicken strips into the hot oil in batches. Fry them for about 4 to 5 minutes on each side. You want them golden brown and cooked through. The inside should reach 165°F.
Once done, move the chicken tenders to a paper towel-lined plate. This drains excess oil. Sprinkle a pinch of salt on top while they’re hot. Enjoy your crispy chicken tenders with your favorite dipping sauces!
Pro Tips
- Marinate Longer for Flavor: The longer you marinate the chicken in buttermilk, the more tender and flavorful it will become. Aim for at least 1 hour, but overnight is ideal.
- Use Panko for Extra Crunch: For an extra crispy texture, use panko breadcrumbs instead of regular breadcrumbs. They provide a delightful crunch that enhances the chicken tenders.
- Maintain Oil Temperature: Make sure to keep the oil at the right temperature (about 350°F/175°C) while frying. This will ensure that the chicken cooks evenly and doesn’t absorb too much oil.
- Perfect Dipping Sauce Pairings: Serve your chicken tenders with a variety of dipping sauces to elevate your meal. Try honey mustard, ranch, or even a spicy sriracha mayo for a kick.
Tips & Tricks
Achieving Perfectly Crispy Tenders
To get your chicken tenders crispy, follow a few key steps. First, use panko breadcrumbs for extra crunch. They make a big difference. Make sure to coat the chicken evenly. Shake off excess coating to avoid clumps. Fry in small batches to keep the oil hot. This helps them cook evenly and stay crispy.
Marination Time for Best Flavor
Marinating your chicken is vital for great taste. I recommend at least one hour in buttermilk. This step adds moisture and flavor. If you can, let it marinate overnight. The longer it sits, the better the flavor. The buttermilk tenderizes the meat and adds a tangy taste.
Maintaining Oil Temperature
Keeping the oil at the right temperature is crucial. Use a thermometer to check if it’s about 350°F. If the oil is too cool, the tenders will absorb excess oil and become soggy. If it’s too hot, they will burn. Frying in batches helps maintain that perfect temperature. Adjust the heat as needed to keep it steady.
Variations
Flavor Enhancements (Spicy, Herb-Based)
You can easily change the flavor of your chicken tenders. For a spicy kick, add cayenne pepper to the coating. Use one teaspoon for mild heat or more for extra spice. You can also mix in some chili powder or hot sauce into the buttermilk. If you prefer herbs, try adding fresh or dried herbs. Rosemary, thyme, or basil can bring a fresh taste. Blend them into the coating for a tasty twist.
Oven-Baked Alternative Recipe
If you want a lighter option, try oven-baking your chicken tenders. Preheat your oven to 425°F (220°C). After coating the chicken strips, place them on a baking sheet lined with parchment paper. Spray them lightly with cooking spray for crispiness. Bake for about 20-25 minutes, flipping halfway through. You’ll get a crunchy result without frying. This method is great for a quick meal with less mess.
Gluten-Free Options
You can enjoy chicken tenders even if you need a gluten-free recipe. Substitute the all-purpose flour with a gluten-free flour blend. You can also use crushed cornflakes or almond flour for the coating. Make sure to check the labels on your breadcrumbs. Many brands offer gluten-free options. These changes keep the taste delicious while catering to dietary needs. Enjoy your tenders without worry!
Storage Info
How to Store Leftover Chicken Tenders
To keep leftover chicken tenders fresh, place them in an airtight container. Make sure they cool down to room temperature before sealing. If you leave them out too long, they can spoil. Store the container in the fridge. They should stay good for 3 to 4 days.
Freezing and Reheating Tips
If you want to keep chicken tenders longer, freezing is a great option. Wrap each tender in plastic wrap or aluminum foil. Then, place them in a freezer bag. This helps prevent freezer burn. When you want to eat them, let them thaw in the fridge overnight. Reheat in the oven for about 10 to 15 minutes at 375°F (190°C). This keeps them crispy.
Best Practices for Preserving Freshness
Use these tips to keep your chicken tenders fresh:
– Store them in a single layer if possible.
– Avoid stacking them, as this can make them soggy.
– Use parchment paper between layers if necessary.
– Keep the tenders away from strong-smelling foods. This helps maintain their flavor.Enjoy your crispy chicken tenders!
FAQs
How do I make chicken tenders without buttermilk?
You can skip buttermilk by using milk or yogurt. Mix one cup of milk with a tablespoon of vinegar. Let it sit for five minutes. This mix works well for marinating chicken. It adds flavor and tenderizes the meat.
Can I use chicken thighs instead of breasts?
Yes, chicken thighs work great for tender strips. They have more flavor and stay juicy. Cut the thighs into strips, just like the breasts. You can follow the same steps for marination and coating.
What dipping sauces pair best with chicken tenders?
Many sauces go well with chicken tenders. Some favorites include:
– Honey mustard
– Ranch dressing
– Barbecue sauce
– Buffalo sauce
– Sweet and sour sauce
These sauces add fun flavors and keep meals exciting.
How long will homemade chicken tenders last in the fridge?
Homemade chicken tenders last about three to four days in the fridge. Store them in an airtight container. To keep them fresh, let them cool before sealing.
What’s the best way to reheat chicken tenders?
To reheat chicken tenders, use the oven or air fryer. Preheat the oven to 375°F (190°C). Place tenders on a baking sheet. Heat for about 10-15 minutes until hot and crispy. The air fryer also works well for reheating. Enjoy your crispy chicken tenders again!
In this post, we explored how to make chicken tenders. First, we covered the ingredients, like the main components and spices needed. Next, I shared step-by-step instructions for marinating and frying. Then, I offered tips for crispy results and ideas for flavor variations. We also discussed how to store leftovers properly. Remember, you can easily adapt this recipe to suit your tastes. Enjoy making and sharing your homemade chicken tenders with family and friends!