Get ready to indulge in a sweet treat that combines rich chocolate and creamy cheesecake! My irresistible Oreo Cheesecake Brownies are easy to make and will wow your friends and family. In this post, I’ll share all the ingredients, step-by-step instructions, and helpful tips. Whether you want to customize your brownies or find the best way to store them, I've got you covered. Let’s dive into this delicious recipe!
Why I Love This Recipe
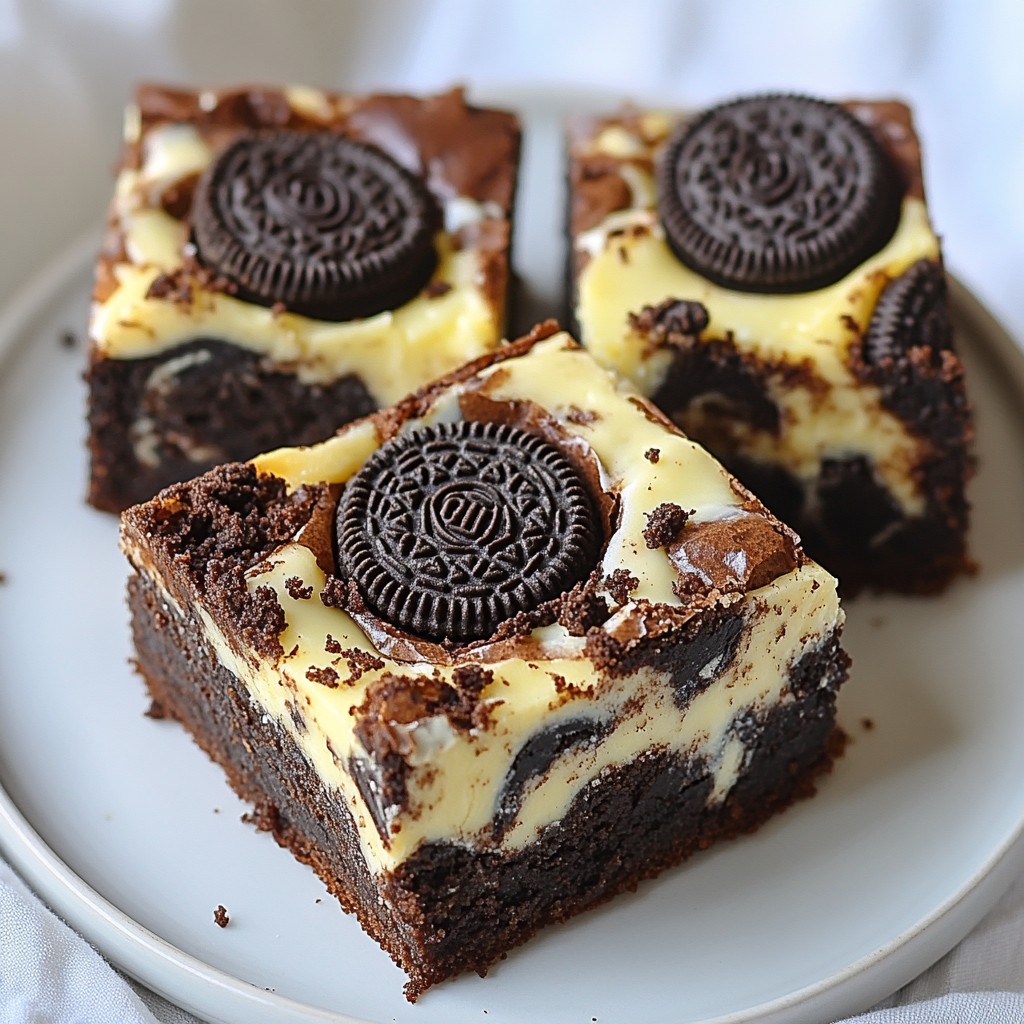
- Decadent Flavor: The combination of rich chocolate brownies with creamy cheesecake and crunchy Oreo pieces makes every bite an indulgent treat.
- Easy to Make: With simple ingredients and straightforward steps, anyone can whip up these delicious brownies in no time.
- Perfect for Sharing: Cut into squares, these brownies are perfect for gatherings, parties, or just a sweet treat to share with friends and family.
- Customizable Delight: You can easily adapt this recipe by adding your favorite cookies or toppings, making it versatile for any occasion.
Ingredients
Essential Ingredients List
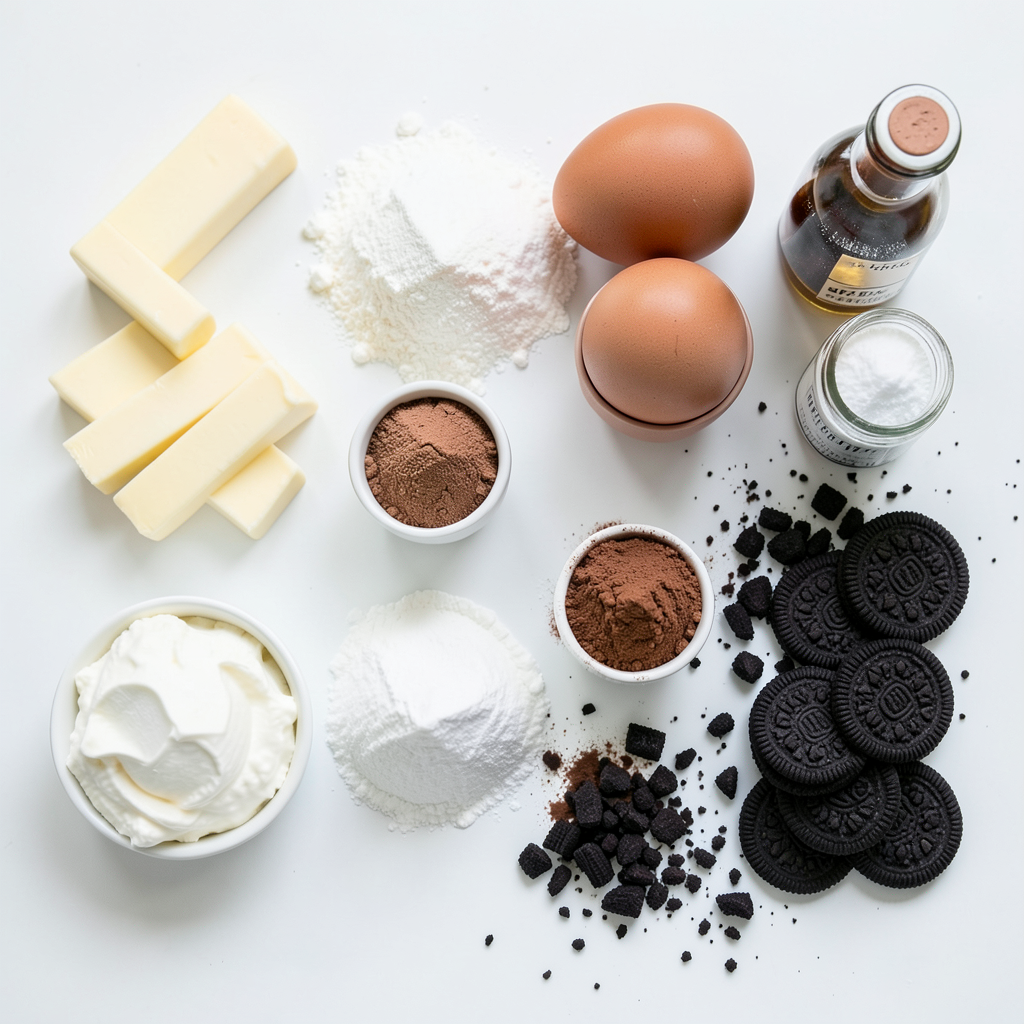
To make these Oreo cheesecake brownies, you need the following items:
- 1 cup unsalted butter (2 sticks)
- 1 ½ cups granulated sugar
- 1 cup brown sugar, packed
- 4 large eggs
- 1 teaspoon vanilla extract
- 1 cup all-purpose flour
- 1 cup unsweetened cocoa powder
- 1 teaspoon baking powder
- ½ teaspoon salt
- 8 oz cream cheese, softened
- ½ cup powdered sugar
- 1 teaspoon vanilla extract (for cheesecake layer)
- 12 Oreo cookies, coarsely chopped
- Extra crushed Oreo cookies for garnish
These ingredients create a rich and creamy dessert.
Optional Ingredients for Customization
You can adjust the recipe to suit your taste. Here are some ideas:
- Add chocolate chips for extra chocolate flavor.
- Use different flavored Oreo cookies, like mint or peanut butter.
- Include nuts like walnuts or pecans for a crunch.
- Drizzle melted chocolate on top for added sweetness.
These options let you make the recipe your own.
Ingredient Substitutions
If you need alternatives, consider these swaps:
- Use margarine instead of butter for a dairy-free option.
- Replace granulated sugar with coconut sugar for a healthier choice.
- Swap cream cheese with vegan cream cheese for a plant-based version.
- Use gluten-free flour in place of all-purpose flour if needed.
These substitutions can help fit your dietary needs while keeping the flavor intact.
Step-by-Step Instructions
Preparing the Oven and Pan
First, preheat your oven to 350°F (175°C). This heat ensures the brownies bake evenly. Next, take a 9x13-inch baking pan. You can grease it with butter or line it with parchment paper. Both methods help with easy removal later.
Making the Brownie Batter
In a medium saucepan, melt 1 cup of unsalted butter over low heat. As it melts, remove it from the heat. Now, whisk in 1 ½ cups of granulated sugar and 1 cup of brown sugar. Mix well until smooth. Let this mixture cool a bit, then whisk in 4 large eggs. Don’t forget to add 1 teaspoon of vanilla extract. Mix until it’s all combined.
In another bowl, sift together 1 cup of all-purpose flour, 1 cup of unsweetened cocoa powder, 1 teaspoon of baking powder, and ½ teaspoon of salt. Gradually add this dry mix to your wet mix. Stir gently until just combined. Be careful not to overmix.
Creating the Cheesecake Layer
In a medium bowl, beat 8 oz of softened cream cheese until it’s smooth. Add ½ cup of powdered sugar and 1 teaspoon of vanilla extract for flavor. Mix until creamy. Fold in 12 coarsely chopped Oreo cookies. This adds great texture to your cheesecake layer.
Assembling and Baking the Brownies
Pour half of the brownie batter into your prepared baking pan. Spread it evenly. Next, spoon the cheesecake mixture over this layer. Spread it gently to cover the brownie batter. Finally, pour the remaining brownie batter on top, smoothing it out.
Now, take a knife or toothpick. Use it to gently swirl the batter together. This creates a beautiful marbled effect in your brownies.
Bake your creation in the preheated oven for 30-35 minutes. To check if they’re done, insert a toothpick into the center. It should come out with a few moist crumbs, but not wet batter.
Cooling and Serving Instructions
Once baked, remove the pan from the oven. Let the brownies cool in the pan for at least 20 minutes. After that, transfer them to a wire rack to cool completely. Once cool, cut into squares. For a tasty touch, sprinkle crushed Oreo cookies on top before serving. Enjoy every bite of your delicious Oreo cheesecake brownies!
Tips & Tricks
Baking Tips for the Perfect Brownies
To bake the best Oreo cheesecake brownies, follow these simple tips:
- Measure correctly: Use proper measuring cups. Too much flour can make brownies dry.
- Use room temperature ingredients: Let your eggs and cream cheese sit out. This helps them mix better.
- Don’t overmix: Mix just until combined. Overmixing can lead to tough brownies.
- Swirl gently: When creating the marbled effect, use light touches. Too much mixing can blend the layers.
- Check the oven: Ovens can vary. Use a toothpick to test for doneness. Look for a few moist crumbs.
Common Mistakes to Avoid
Here are mistakes to steer clear of for perfect brownies:
- Skipping the parchment paper: It makes removal easier. Without it, brownies may stick to the pan.
- Not cooling before cutting: Cutting too soon can make a mess. Let them cool first for clean squares.
- Using cold ingredients: Cold eggs or cream cheese can create lumps. Always use room temperature.
- Not measuring baking powder: Too much can make brownies rise and then fall, leading to dense treats.
Serving Suggestions for Oreo Cheesecake Brownies
Enhance your Oreo cheesecake brownies with these serving ideas:
- Serve warm: Warm brownies with a scoop of vanilla ice cream melt in your mouth.
- Add toppings: Drizzle chocolate sauce or whipped cream on top. Crushed Oreos add a nice crunch.
- Pair with coffee: The rich flavors of brownies go well with coffee or milk.
- Use as a base: Cut brownies into small squares for dessert platters. They make a great addition to parties.
Pro Tips
- Use Room Temperature Ingredients: Make sure your eggs and cream cheese are at room temperature for a smoother and creamier batter.
- Don't Overmix the Batter: When combining the dry and wet ingredients, mix just until combined to keep the brownies fudgy and moist.
- Customize the Toppings: Feel free to add other toppings like chocolate chips or nuts to the brownie layer for added texture and flavor.
- Chill Before Serving: For the best texture, chill the brownies in the fridge for a couple of hours before cutting into squares.
Variations
Gluten-Free Oreo Cheesecake Brownies
To make gluten-free Oreo cheesecake brownies, swap the all-purpose flour for a gluten-free blend. Many blends work well in baking. Look for one that contains xanthan gum for better texture. The rest of the recipe stays the same. You still get a rich brownie and creamy cheesecake. Just be careful to check that your Oreo cookies are gluten-free. Some brands offer gluten-free options.
Vegan Version of Oreo Cheesecake Brownies
For a vegan twist, replace butter with coconut oil or vegan butter. Use flax eggs instead of regular eggs. To make flax eggs, mix 1 tablespoon of ground flaxseed with 3 tablespoons of water. Let it sit for a few minutes to thicken. For the cheesecake layer, swap cream cheese for vegan cream cheese. This keeps the flavor and texture intact. You can still enjoy the same great taste while sticking to a vegan diet.
Flavor Variations and Add-ins
You can customize your Oreo cheesecake brownies in many fun ways. Try adding mint extract to the brownie batter for a fresh twist. Chopped nuts, like walnuts or pecans, add crunch and flavor. Swirl in caramel or peanut butter for a unique taste. You could also mix in other crushed cookies, like chocolate sandwich cookies or peanut butter cookies. These small changes can create a whole new dessert experience. Feel free to experiment!
Storage Info
How to Store Oreo Cheesecake Brownies
To keep your Oreo cheesecake brownies fresh, store them in an airtight container. Make sure they cool completely before you seal them. This way, they won’t get soggy. Place a piece of parchment paper between layers if you stack them. This helps prevent sticking. Stored this way, they can last up to a week in the fridge.
Freezing Instructions for Leftovers
If you have leftovers, freezing is a great option. Cut the brownies into squares. Wrap each piece tightly in plastic wrap. Then, place them in a freezer-safe bag. Make sure to remove as much air as possible. You can freeze them for up to three months. When you want to enjoy them, just thaw them in the fridge overnight.
Reheating Tips for Best Texture
To reheat your brownies, use the oven for the best texture. Preheat your oven to 350°F (175°C). Place the brownies in an oven-safe dish. Cover them loosely with foil to keep them moist. Heat for about 10-15 minutes. If you like them warm, you can also use the microwave. Heat for 10-15 seconds at a time until warm. Enjoy your delicious treat!
FAQs
What Can I Use Instead of Cream Cheese?
If you don't have cream cheese, use ricotta or mascarpone. Both give a nice texture. You can also try Greek yogurt for a lighter option. Just remember, these swaps might change the taste a little.
How Do I Know When the Brownies are Done?
To check if the brownies are done, use a toothpick. Insert it into the center. If it comes out with a few moist crumbs, they are ready. If it has wet batter, bake for a few more minutes. Keep an eye on them to avoid over-baking.
Can I Make These Brownies Ahead of Time?
Yes, you can make these brownies ahead. They stay fresh for a few days in an airtight container. You can also freeze them for longer storage. Just wrap them tightly in plastic wrap and foil. Let them thaw in the fridge when you are ready to enjoy.
You learned about the key ingredients for Oreo Cheesecake Brownies and how to choose them. I guided you through step-by-step instructions for making this tasty treat. We also discussed useful tips and common mistakes to avoid. You explored fun variations and how to store these brownies long-term.
Now, mix and match ingredients to create your own version. Enjoy baking, and savor each bite of your delicious creation!


