Are you ready to indulge in something truly delightful? This No-Bake Chocolate Peanut Butter Fudge combines rich chocolate and creamy peanut butter for a treat you can’t resist. With just a handful of simple ingredients, you can whip up this sweet snack in no time. No baking means less fuss and more fun in the kitchen! Dive into the recipe to discover tips and tricks for perfect fudge every time.
Why I Love This Recipe
- Quick and Easy: This no-bake fudge takes just 10 minutes to prepare, making it perfect for those last-minute cravings.
- Rich Flavor: The combination of creamy peanut butter and rich cocoa creates a decadent treat that satisfies sweet tooth cravings.
- Healthy Ingredients: With natural sweeteners like maple syrup and wholesome coconut oil, this fudge is a guilt-free indulgence.
- Customizable: You can easily add mix-ins like nuts or dried fruit to personalize your fudge to your taste.
Ingredients
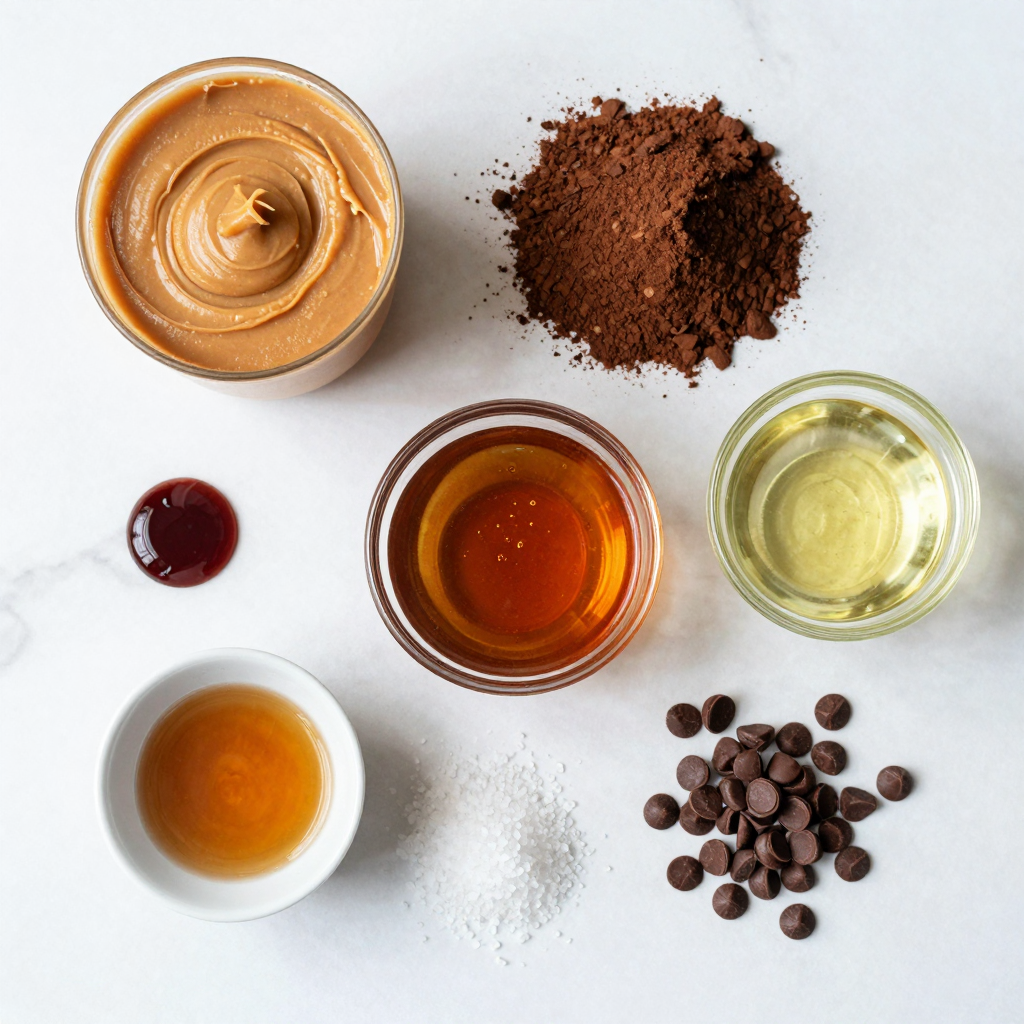
List of Main Ingredients
– 1 cup creamy peanut butter
– 1/2 cup unsweetened cocoa powder
– 1/4 cup maple syrup or honey
– 1/4 cup coconut oil, melted
– 1 teaspoon vanilla extract
– 1/4 teaspoon salt
– 1/2 cup mini chocolate chips (optional)
The main ingredients are simple. Creamy peanut butter gives a rich taste. Cocoa powder adds a deep chocolate flavor. Maple syrup or honey sweetens it perfectly. Melted coconut oil helps bind everything together. A hint of vanilla extract enhances the flavors. The salt balances the sweetness. Mini chocolate chips can add some fun texture.
Ingredient Substitutions
You can switch out some ingredients if needed. For sweeteners, try agave or stevia. These are good if you want low sugar. If you don’t have peanut butter, almond or cashew butter works well. Both give a different taste but stay creamy. For dairy-free options, use coconut oil and ensure your chocolate chips are dairy-free. This way, everyone can enjoy the fudge!
Step-by-Step Instructions
Preparation Steps
– In a medium bowl, mix the creamy peanut butter, cocoa powder, maple syrup, melted coconut oil, vanilla extract, and salt.
– Whisk until the mixture is smooth. Make sure there are no lumps from the cocoa powder.
– If you want extra texture, fold in the mini chocolate chips. Distribute them evenly.
Assembly Steps
– Line an 8×8 inch baking dish with parchment paper. Leave some paper hanging over the sides. This makes it easy to lift the fudge out later.
– Pour the fudge mixture into the lined baking dish. Use a spatula to spread it evenly.
– Place the dish in the refrigerator. Chill it for at least 2 hours, or until firm to the touch.
Serving Suggestions
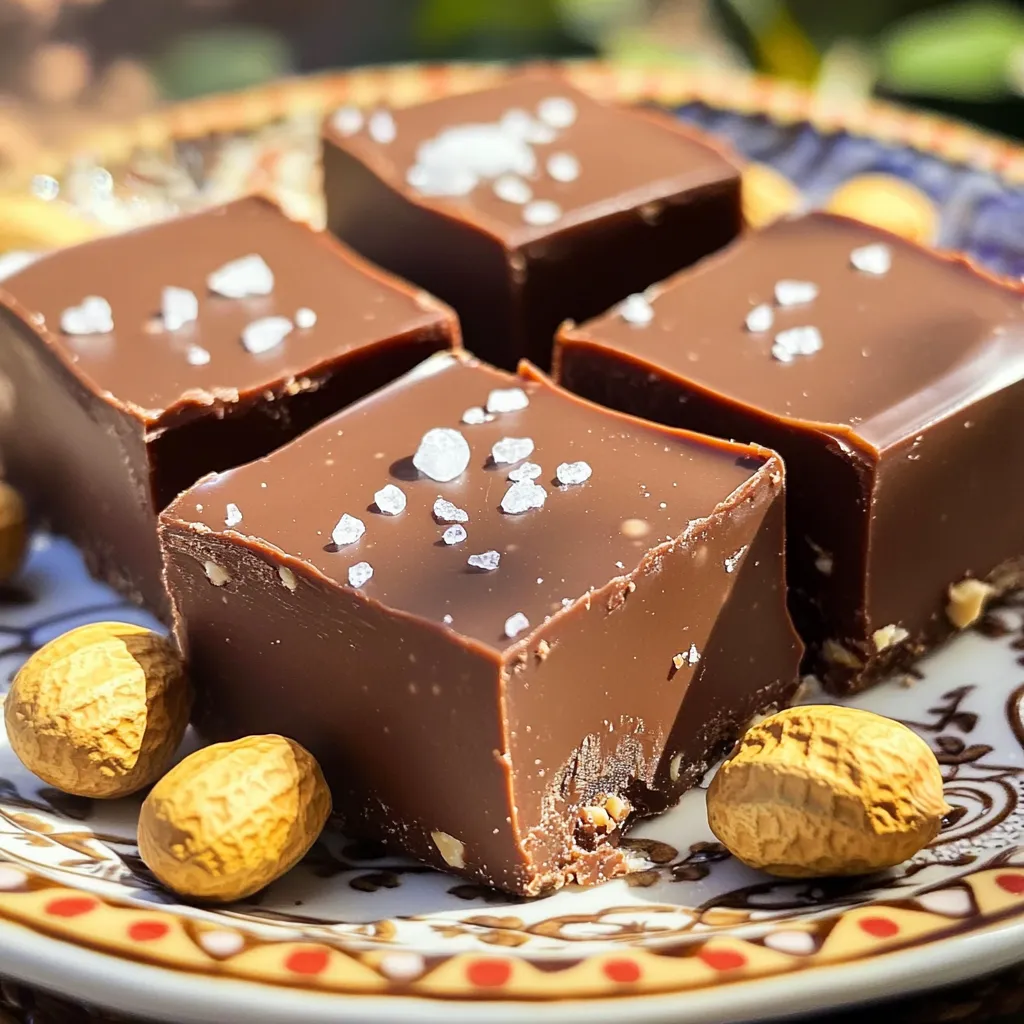
– Use a sharp knife to cut the fudge into squares or rectangles.
– For a pretty presentation, serve the fudge on a decorative plate. Garnish with a sprinkle of sea salt or whole peanuts.
Pro Tips
- Use Natural Peanut Butter: For a healthier option, choose natural peanut butter without added sugars or oils. This will enhance the flavor and texture of your fudge.
- Chill Longer for Firmer Fudge: If you prefer a firmer texture, let the fudge chill for an extra hour. The longer it sets, the better it will hold its shape when cut.
- Experiment with Flavors: Add a pinch of cinnamon or a dash of espresso powder to the mixture for a unique twist on the classic chocolate-peanut butter flavor.
- Control Sweetness: Adjust the amount of maple syrup or honey based on your sweetness preference. Taste the mixture before it sets to ensure it meets your liking.
Tips & Tricks
Common Mistakes to Avoid
– Overmixing the fudge: Mixing too much can make the fudge tough. Stir just until combined.
– Not allowing enough chill time: The fudge needs time to set. Chill for at least two hours.
Best Practices for Texture
– Ensuring proper measurement of ingredients: Use measuring cups for accuracy. This helps create the right texture.
– Importance of using room temperature ingredients: Room temperature ingredients blend better. They help create a smooth mixture.
Enhancing Flavor
– Adding a pinch of sea salt: A little salt makes the flavors pop. It balances the sweetness.
– Using high-quality cocoa powder: Good cocoa powder brings rich flavor. Opt for unsweetened varieties for best results.
Variations
Add-Ins and Mix-Ins
You can make this fudge even better with fun add-ins. Try adding nuts like walnuts for crunch. Seeds like chia can also be great. They add texture and a healthy boost. You can also play with flavor extracts. A touch of mint gives it a fresh taste. Almond extract adds a nice twist too. Just a little goes a long way!
Healthier Alternatives
Looking for a healthier option? Use sugar-free chocolate chips instead of regular ones. This way, you cut down on sugar but keep the taste. You can also reduce the sweetener amount. This helps if you want a less sweet fudge. Just remember, it may change the texture slightly.
Seasonal Twists
Celebrate the seasons with special flavors! For fall, add pumpkin spice for a cozy vibe. In winter, try peppermint to make it festive. You can also dress up your fudge for special days. Use colorful toppings like sprinkles or nuts. These little extras make your fudge look as good as it tastes!
Storage Info
How to Store
To keep your fudge fresh, use an airtight container. Glass containers work well, but plastic ones are fine too. Make sure the lid seals tight to avoid air. Store your fudge in the fridge. This keeps it firm and tasty.
Freezing Fudge
If you want to save some for later, freezing is great. Cut the fudge into squares before freezing. Place pieces in a single layer on a baking sheet. Once frozen, transfer them to a freezer bag. Remove as much air as you can from the bag. For thawing, take out a square and leave it in the fridge overnight. This helps it keep its creamy texture.
Shelf Life
In the fridge, your fudge lasts about a week. After that, it may lose flavor and texture. Look for signs of spoilage: if it smells off or has a dry feel, it’s time to toss it. Keeping it stored well helps you enjoy it longer!
FAQs
Can I make No-Bake Chocolate Peanut Butter Fudge vegan?
Yes, you can make this fudge vegan! To do this, simply replace the honey with maple syrup. Maple syrup is a great plant-based sweetener. Use a vegan chocolate chip if you add those. This keeps the fudge tasty and friendly for plant-based diets.
How long does it take for the fudge to set?
The fudge takes about 2 hours to set in the fridge. Factors like the thickness of your fudge and the fridge’s temperature can change this time. If your fudge is thick, it might take longer. Check it after 2 hours. It should feel firm to the touch.
Can I use natural peanut butter instead of creamy?
You can use natural peanut butter, but it will change the fudge’s texture. Natural peanut butter is thicker and can make the fudge grainy. Creamy peanut butter gives a smooth and rich taste. If you prefer natural, mix it well to ensure a good blend.
This blog post covered all you need for making no-bake chocolate peanut butter fudge. We talked about main ingredients, simple steps for preparation and assembly, and helpful tips to avoid mistakes. Remember, you can mix in your favorite flavors and store the fudge safely.
Experiment with variations and have fun! With this knowledge, you can create tasty treats for any occasion. Happy fudging!


