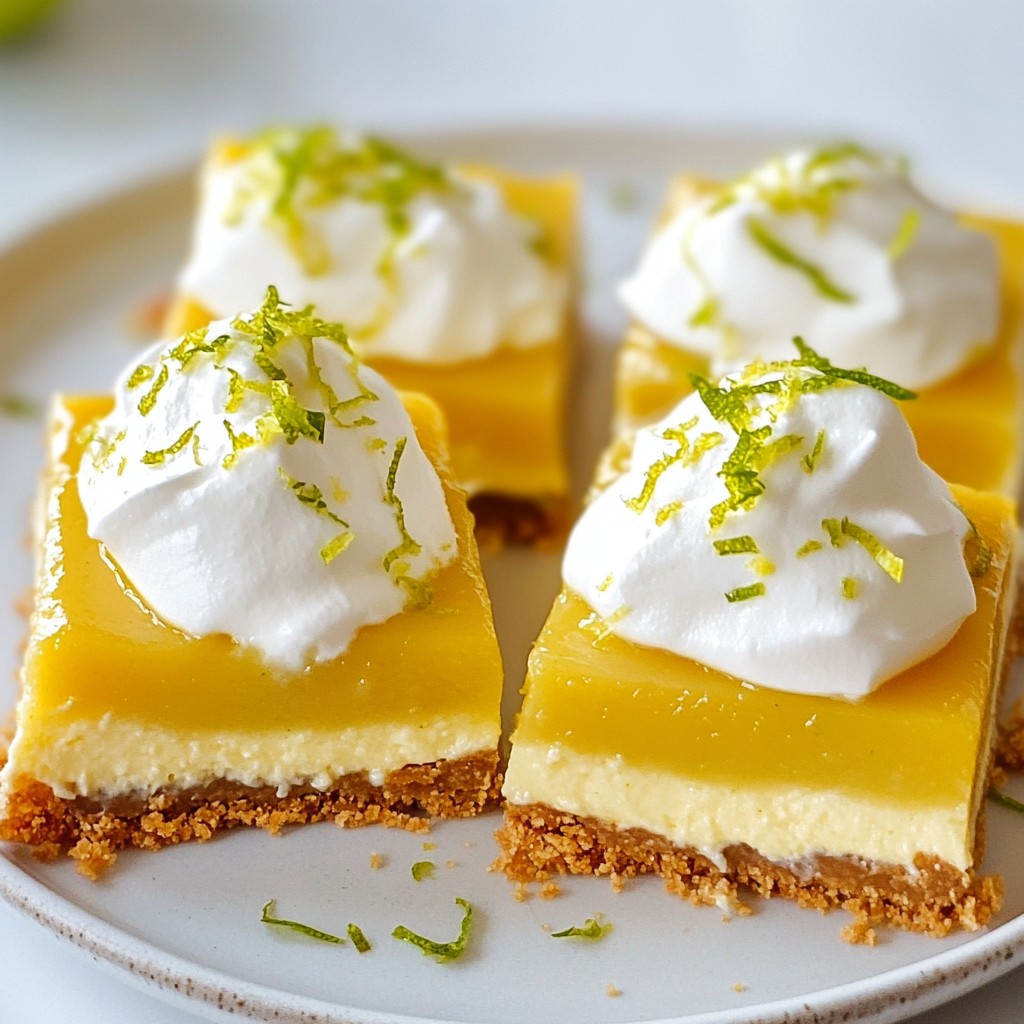
Craving a sweet and tangy treat? This No-Bake Key Lime Pie Bars recipe is your answer! You’ll love how easy it is to whip up this refreshing dessert with simple ingredients. Imagine a smooth key lime filling sitting atop a crunchy crust, perfect for any occasion. Get ready to impress your friends and satisfy your taste buds with this delightful recipe—no baking required! Let’s dive into the details.
Why I Love This Recipe
- Easy to Make: This no-bake recipe requires minimal effort, making it perfect for a quick dessert.
- Refreshing Flavor: The combination of key lime juice and zest creates a bright, zesty taste that is perfect for warm weather.
- Creamy Texture: The whipped cream adds a fluffy texture that complements the tartness of the lime filling.
- Perfect for Gatherings: These bars can easily be made ahead of time and are a crowd-pleaser at any event.
Ingredients
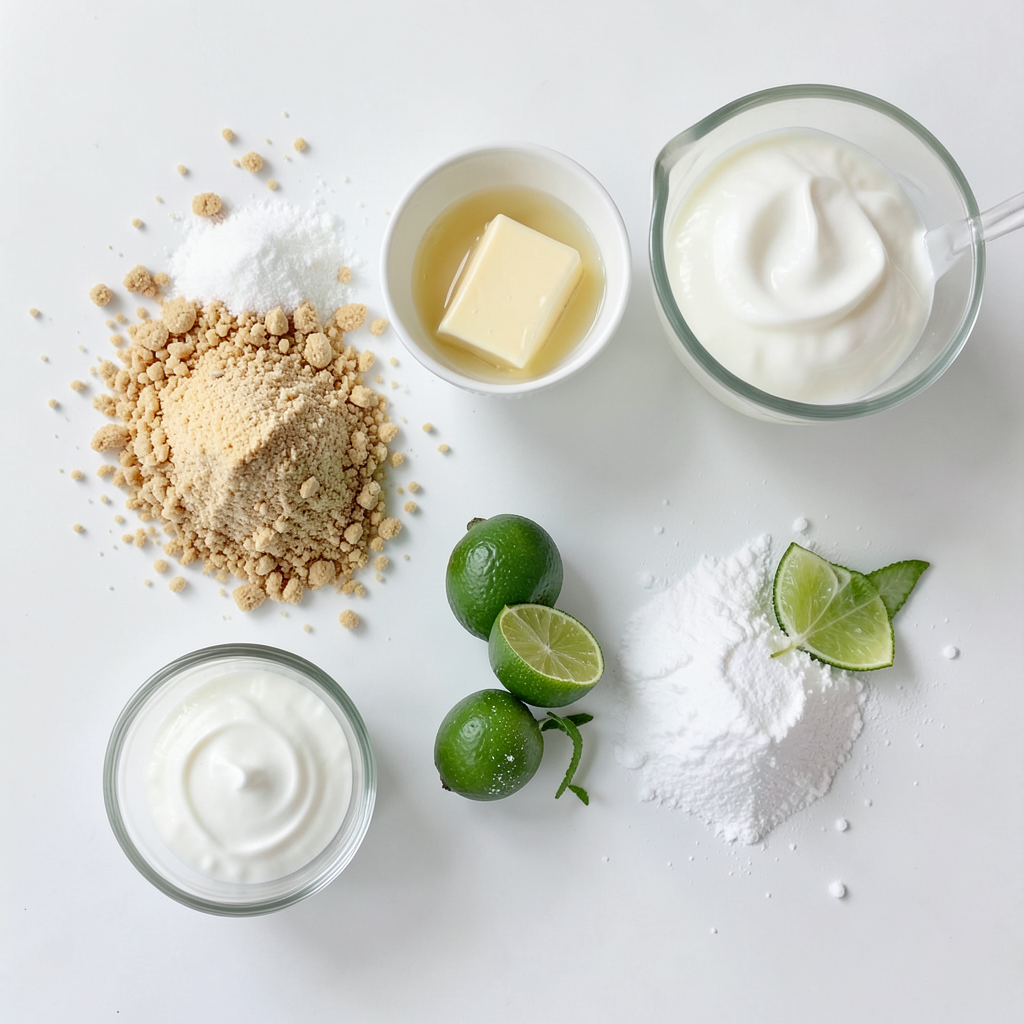
List of Main Ingredients
- 1 ½ cups graham cracker crumbs
- ⅓ cup granulated sugar
- ½ cup unsalted butter, melted
- 1 cup sweetened condensed milk
- ½ cup fresh key lime juice (or regular lime juice)
- 1 tablespoon lime zest (plus extra for garnish)
- 1 cup heavy whipping cream
- 2 tablespoons powdered sugar
- Pinch of salt
The first step to making No-Bake Key Lime Pie Bars is gathering all your ingredients. The crust needs graham cracker crumbs, sugar, and melted butter. These simple items create a perfect base.
Next, you’ll need sweetened condensed milk. This adds a creamy sweetness to the filling. Fresh key lime juice gives the pie its zesty flavor. You can use regular lime juice if you can't find key limes.
Lime zest adds extra zing. Whipping cream makes the filling light and fluffy. Powdered sugar sweetens the cream. A pinch of salt balances all the flavors.
Optional Garnishes
- Additional lime zest
- Whipped cream
For a finishing touch, consider adding extra lime zest on top. It looks nice and tastes great! A dollop of whipped cream is another option. It adds even more creaminess to each bite. Enjoy your delicious No-Bake Key Lime Pie Bars!
Step-by-Step Instructions
Preparation of the Crust
First, I mix the graham cracker crumbs, sugar, and melted butter in a bowl. I want the crumbs to be fully moistened. This step is key for a tasty crust. Then, I press the mixture into the bottom of my baking dish. I use the back of a measuring cup to create an even layer.
Preparing the Key Lime Filling
In another bowl, I combine sweetened condensed milk, fresh lime juice, lime zest, and a pinch of salt. I whisk until the mixture is smooth and creamy. This lime filling is bright and refreshing. It adds the perfect zing to the bars.
Whipping the Cream
Next, I whip the heavy cream in a separate bowl. I use a hand mixer to whip until it thickens. Once it starts to form, I add powdered sugar slowly. I keep whipping until I see stiff peaks. This step gives the bars a light texture. I then gently fold the whipped cream into the lime mixture. Careful folding ensures a light and airy filling.
Assembling the Bars
After that, I pour the lime and whipped cream mixture over the crust. I spread it evenly with a spatula. It’s important to cover the crust completely. Then, I cover the dish with plastic wrap and refrigerate it. I let it set for at least four hours. This chilling time makes the bars firm and ready to cut.
Tips & Tricks
Best Practices for a Smooth Filling
To get a smooth filling, start with room temperature ingredients. Cold ingredients can make lumps in your filling. Use a whisk to mix the sweetened condensed milk, lime juice, and zest until it is smooth. When you fold in the whipped cream, do it gently. This keeps the filling light and airy.
Cutting the Bars
For clean cuts, use a sharp knife. A dull knife can make a mess of your bars. To make cutting easier, run the knife under hot water. Dry it off before cutting. Cut the bars into even squares for a nice look.
Adjusting Sweetness and Tartness
If you want your bars sweeter, add more powdered sugar to the whipped cream. This makes it richer too. If you like it more tart, add extra lime juice. You can also use regular lime juice if you can't find fresh key limes. The taste will still be great!
Pro Tips
- Use Fresh Limes: For the best flavor, opt for fresh key limes or regular limes rather than bottled juice.
- Chill Thoroughly: Allow the bars to chill in the refrigerator for at least 4 hours for the perfect set and texture.
- Customize the Sweetness: Adjust the amount of powdered sugar in the whipped cream to suit your taste preference.
- Garnish Creatively: Consider adding fresh mint leaves or lime slices as a garnish for a pop of color and flavor.
Variations
Flavor Variations
You can make these No-Bake Key Lime Pie Bars even more fun. Adding coconut gives them a lovely tropical twist. Simply mix in about half a cup of shredded coconut into the filling. It adds a nice texture and flavor.
You can also try using different citrus flavors. For example, try lemon or orange juice instead of lime juice. This will change the taste but keep it refreshing. Experimenting with flavors can make this recipe your own!
Healthier Alternatives
If you want a lighter version, use low-fat cream or yogurt instead of heavy whipping cream. It can still taste creamy but with fewer calories. You can also use lighter sweeteners. Try honey or agave syrup in place of granulated sugar. This will help reduce sugar but keep it sweet.
Presentation Variations
Serving suggestions can make your bars look great! Add fresh fruits like berries or slices of lime on top. This adds color and flavor. You can also get creative with garnishes. A dollop of whipped cream next to each slice looks nice. Sprinkling extra lime zest adds a pop of color and brightness to your dish.
Storage Info
Best Practices for Storing
To keep your No-Bake Key Lime Pie Bars fresh, refrigerate them as soon as they set. Place the bars in an airtight container or cover them tightly with plastic wrap. This helps prevent them from drying out or absorbing other smells from the fridge. Make sure the bars are chilled for at least four hours before cutting. This allows the flavors to meld and the texture to firm up.
Freezing Instructions
If you want to enjoy these tasty bars later, freezing is a great option. First, cut the bars into squares. Wrap each piece in plastic wrap to keep them fresh. Then, place the wrapped bars in a freezer-safe container. They can last up to three months in the freezer.
When you’re ready to enjoy them, take the bars out of the freezer. Allow them to thaw in the fridge for about two hours. This way, they regain their creamy texture and taste just as good as fresh.
FAQs
How long do No-Bake Key Lime Pie Bars last?
No-Bake Key Lime Pie Bars last about a week in the fridge. Store them in an airtight container. If you need a longer shelf life, freeze them. They can last up to three months in the freezer. To thaw, move them to the fridge overnight. This keeps the bars nice and creamy.
Can I use bottled lime juice instead of fresh?
You can use bottled lime juice, but the taste differs. Fresh lime juice brings a vibrant flavor. Bottled juice might taste a bit flat. If you want the best taste, go for fresh juice. It makes a big difference in your bars' flavor.
What can I substitute for graham crackers?
If you can't find graham crackers, don't worry. You can use other options. Try crushed digestive biscuits or vanilla wafer cookies. For gluten-free options, look for gluten-free graham crackers or almond flour. Each will give a different flavor but will still be tasty in your bars.
You now know how to make tasty no-bake Key Lime Pie Bars. We covered the main ingredients, the steps to prepare, and how to get the best results. Remember the tips for cutting and adjusting flavors to meet your taste. Enjoy playing with different variations and garnishes. Store your bars well to keep them fresh. Share your delicious creation with others. This treat is sure to impress!