Are you ready to indulge in a dessert that is both creamy and fruity? Pineapple Upside-Down Cheesecake is the perfect blend of sweet and tangy flavors. This delightful treat combines rich cheesecake with a bright pineapple topping. It’s easy to make and is sure to impress your friends and family. Join me as I guide you through the simple steps to create this tasty dessert delight!
Ingredients
Essential Ingredients for Pineapple Upside-Down Cheesecake
To make a delicious Pineapple Upside-Down Cheesecake, you need the following items:
– 1 cup graham cracker crumbs
– 1/4 cup unsalted butter, melted
– 1/4 cup brown sugar
– 1 can (8 oz) sliced pineapple in juice, drained
– 1 cup cream cheese, softened
– 1 cup powdered sugar
– 1 teaspoon vanilla extract
– 1 cup sour cream
– 2 large eggs
– 1/4 teaspoon salt
– Maraschino cherries for garnish (optional)
These ingredients work together to create a creamy and flavorful cheesecake.
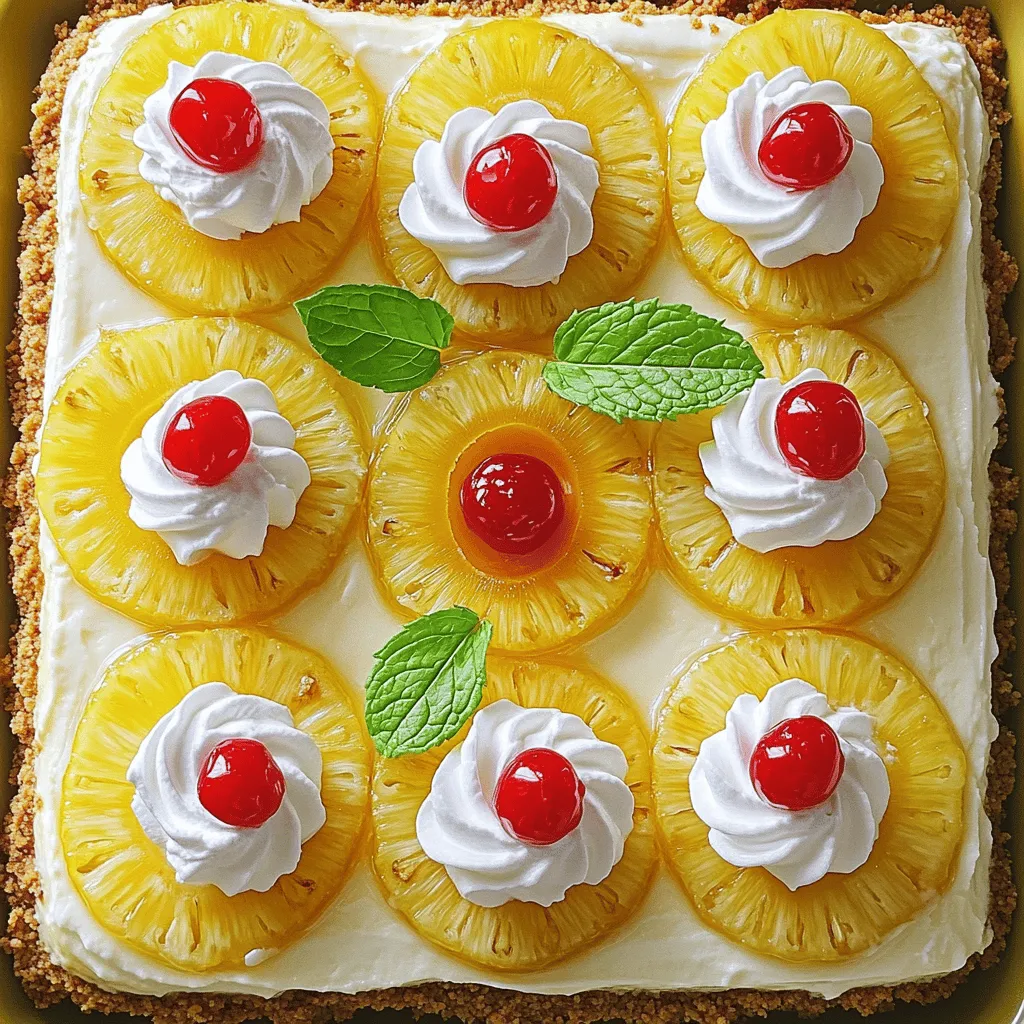
Optional Garnishes and Serving Suggestions
You can enhance your cheesecake with fun toppings. Consider adding:
– Whipped cream for extra creaminess
– Fresh mint leaves for a pop of color
– A scoop of vanilla ice cream on the side
These garnishes make each slice look beautiful and inviting. They also add extra flavor.
Tips for Selecting Quality Ingredients
Choosing the right ingredients is key for the best taste. Here are some tips:
– Use fresh pineapple when possible. It adds a bright flavor.
– Select a high-quality cream cheese. This improves the texture.
– Opt for pure vanilla extract over imitation for richness.
Pay attention to these details. They can elevate your dessert from good to great!
Step-by-Step Instructions
Preparing the Crust
To start, preheat your oven to 350°F (175°C). Grab a mixing bowl and add 1 cup of graham cracker crumbs, 1/4 cup of melted unsalted butter, and 1/4 cup of brown sugar. Mix until everything is well combined. Next, press this crumb mixture firmly into the bottom of a 9-inch springform pan. This will be your crust.
Layering the Pineapple
Now it’s time to layer the pineapple. Take one can of sliced pineapple, drain it well, and arrange the slices evenly on top of the crust. If you like, place a maraschino cherry in the center of each pineapple ring. This adds a nice touch and a pop of color.
Making the Cheesecake Filling
In another large bowl, beat 1 cup of softened cream cheese until it’s smooth. Gradually add in 1 cup of powdered sugar while mixing. Once combined, stir in 1 teaspoon of vanilla extract and 1 cup of sour cream. Mix again until you have a smooth filling. Now, add 2 large eggs one at a time, beating on low speed after each addition. Finally, sprinkle in 1/4 teaspoon of salt and mix just until combined. Be careful not to overmix.
Baking and Cooling Process
Pour the cheesecake batter over the pineapple layer in the springform pan. Spread it evenly. Bake in the preheated oven for 45-50 minutes. The edges should set, but the center will still jiggle slightly. After baking, turn off the oven and leave the cheesecake inside for an hour to cool gradually. Once cooled, refrigerate it for at least 4 hours or overnight for the best texture. When ready to serve, carefully remove the sides of the springform pan. Invert the cheesecake onto a serving platter, so the pineapple topping is on top. Enjoy your delicious treat!
Tips & Tricks
Baking Tips for Perfect Cheesecake Texture
To get a smooth and creamy cheesecake, you must mix the cream cheese well. Start with room temperature cream cheese. This helps it blend easily. Also, mix on low speed to avoid adding too much air. If you mix too fast, your cheesecake may crack while baking. Lastly, let the cheesecake cool slowly in the oven with the door ajar. This helps keep the texture smooth.
Common Mistakes to Avoid
One big mistake is overmixing the batter. This can create a cheesecake that is too fluffy, making it less dense. Another mistake is not lining your pan with parchment paper. This can make it hard to remove the cheesecake later. Also, avoid skipping the cooling time. If you serve it too soon, it may not set well.
Success Tips for Flavor and Presentation
To enhance the flavor, use fresh pineapples when possible. They taste better than canned ones. For a beautiful look, add whipped cream and mint leaves on top. You can also place maraschino cherries in the center of each pineapple slice for color. Serve it with a scoop of vanilla ice cream for a fun twist.

Variations
Tropical Fruit Additions
You can make this cheesecake even better with extra fruits. Try adding mango, kiwi, or strawberries. These fruits give a fresh taste and color. Mix them in with the pineapple or place them on top. You can also create a tropical fruit blend. Each fruit brings its own sweet twist.
Alternative Crust Options
If you want to switch up the crust, consider a cookie crust. Use crushed vanilla cookies or even chocolate cookies. These add a rich flavor to the cheesecake. You can also try an almond flour crust for a gluten-free option. Just blend the flour with melted butter and press it into the pan.
Different Cheesecake Flavors
The classic cheesecake flavor is great, but you can explore more. Add coconut extract for a tropical twist. You can also mix in some lime zest for a bright touch. If you love chocolate, swirl in melted chocolate for a rich flavor. Each option gives a new way to enjoy this dessert.
Storage Info
How to Properly Store Leftover Cheesecake
Storing leftover cheesecake is simple and smart. First, let the cheesecake cool completely. Cover it tightly with plastic wrap or foil. You can also place it in an airtight container. This keeps the cheesecake fresh and prevents it from drying out. Store it in the fridge for up to five days. Always check for any off smells before eating leftovers.
Freezing Pineapple Upside-Down Cheesecake
Freezing this cheesecake is a great way to save it for later. First, let the cheesecake cool completely in the fridge. Once it’s cool, slice it into pieces. Wrap each slice tightly in plastic wrap. Then, place the slices in a freezer-safe bag. Be sure to label the bag with the date. You can freeze the cheesecake for up to three months. When you’re ready to enjoy it, just thaw it in the fridge overnight.
Best Ways to Reheat or Serve After Storage
Reheating cheesecake can be tricky. It’s best to serve it cold or at room temperature. If you prefer it warm, preheat the oven to 350°F (175°C). Place the cheesecake on a baking sheet and warm it for about 10 minutes. For a special touch, top it with whipped cream or fresh fruit. This adds flavor and makes the dessert more inviting.
FAQs
How long does Pineapple Upside-Down Cheesecake last?
Pineapple Upside-Down Cheesecake can last about 5 days in the fridge. Make sure to cover it well. This keeps it fresh and tasty. After that, the flavor and texture may change.
Can I make this cheesecake ahead of time?
Yes, you can make this cheesecake ahead of time. It tastes even better after chilling overnight. Just bake it a day before your event. Let it cool, then refrigerate.
What can I substitute for sour cream?
You can use Greek yogurt as a substitute for sour cream. It gives a similar creaminess and tang. You can also try cream cheese mixed with a little milk. This will work too!
Is there a way to make a gluten-free version?
Yes, you can make a gluten-free version easily. Just use gluten-free graham crackers for the crust. Make sure to check the labels to ensure they are truly gluten-free. This way, everyone can enjoy the dessert!Enjoy making your delicious cheesecake!
This blog post shared how to make a delicious Pineapple Upside-Down Cheesecake. I covered key ingredients, step-by-step instructions, and helpful tips for baking. You learned about variations to spice things up and proper storage methods. Remember, using fresh ingredients makes a big difference in taste. With these tips, you can create a cheesecake that impresses anyone. Enjoy baking and sharing your sweet creation!


