
Craving a sweet treat that wows your taste buds? Red Velvet Cheesecake Bars are the answer! With their rich red hue and creamy cheesecake layer, they’re the perfect delight for any occasion. In this post, I’ll guide you step-by-step to make these irresistible bars from scratch. Whether you’re treating yourself or impressing guests, let’s dive into the ingredients and see how easy it is to whip up this gorgeous dessert!
Why I Love This Recipe
- Decadent Flavor: These Red Velvet Cheesecake Bars combine the rich, classic taste of red velvet with the creamy sweetness of cheesecake, creating a dessert that’s hard to resist.
- Perfect for Sharing: With 16 bars in one batch, they are ideal for parties, potlucks, or any gathering where you want to impress your friends and family.
- Easy to Make: The recipe is straightforward and doesn’t require any special skills, making it perfect for both beginner and experienced bakers alike.
- Visual Appeal: The striking red and white marbled layers make these bars not only delicious but also visually stunning, perfect for any festive occasion.
Ingredients
Essential Ingredients for Red Velvet Cheesecake Bars
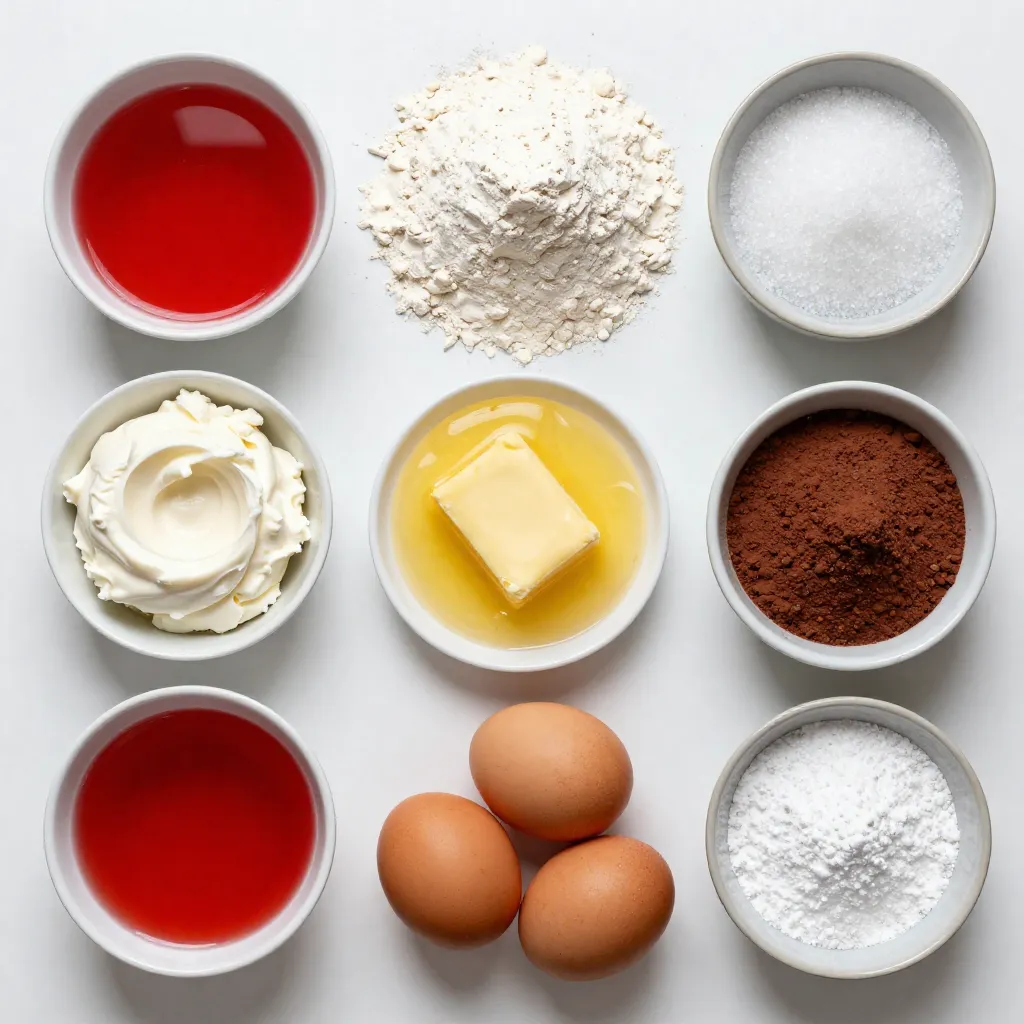
To make these tasty Red Velvet Cheesecake Bars, you will need the following ingredients:
– 1 ½ cups all-purpose flour
– 1 cup granulated sugar
– ½ cup unsalted butter, melted
– 1 large egg
– ½ teaspoon vanilla extract
– 1 tablespoon cocoa powder
– 1 teaspoon red food coloring
– 1 block (8 oz) cream cheese, softened
– ½ cup powdered sugar
– 1 egg
– 1 teaspoon vanilla extract
– Pinch of salt
Each ingredient plays a key role in creating the perfect balance of flavors and textures. The all-purpose flour gives structure, while the granulated sugar adds sweetness. Melted unsalted butter brings richness, and the egg binds everything together.
Vanilla extract enhances flavor, and cocoa powder gives that classic red velvet taste. Red food coloring is what makes these bars stand out with their vibrant hue.
For the cheesecake layer, softened cream cheese provides creaminess. Powdered sugar balances the cream cheese’s tanginess. The extra egg and vanilla in this layer ensure it stays smooth and rich. A pinch of salt rounds out the flavors beautifully.
Gather these ingredients before you start. It makes the process smooth and fun. Make sure to use fresh ingredients for the best results. This way, your bars will be as delicious as they are beautiful!
Step-by-Step Instructions
Preparing the Red Velvet Base
1. Preheat oven and prepare the baking pan
Heat your oven to 350°F (175°C). Line an 8×8-inch baking pan with parchment paper. Leave some paper hanging over the sides for easy removal later.
2. Mixing the red velvet ingredients
In a large mixing bowl, combine ½ cup of melted unsalted butter, 1 cup of granulated sugar, and 1 large egg. Stir until the mix is smooth and creamy. Add in ½ teaspoon of vanilla extract, 1 tablespoon of cocoa powder, and 1 teaspoon of red food coloring. Mix it until it’s all one color.
3. Adding flour and combining the mix
Gradually add 1 ½ cups of all-purpose flour to the bowl. Stir until just combined. Be careful not to overmix. A few lumps are okay. This keeps the bars light and fluffy.
Baking the Layers
1. Baking the first red velvet layer
Pour half of the red velvet batter into your prepared baking pan. Spread it out evenly. Bake in your preheated oven for 10-12 minutes, or until it is just set.
2. Preparing the cheesecake layer
While the first layer bakes, get a separate bowl. Beat 1 block of softened cream cheese until it is smooth. Add ½ cup of powdered sugar, 1 egg, 1 teaspoon of vanilla extract, and a pinch of salt. Mix until the cheesecake is creamy and well combined.
3. Combining layers and swirling for effect
After the first layer is done, take it out of the oven. Pour the cheesecake mixture over the red velvet base. Spread it evenly. Next, dollop the rest of the red velvet batter on top. Use a knife or toothpick to swirl the red velvet into the cheesecake layer. This creates a beautiful marbled look.
Final Baking and Cooling
1. Completing the baking process
Return the pan to the oven. Bake for another 25-30 minutes. The cheesecake should be set and the edges will turn a light golden color.
2. Cooling and slicing the bars
Once baked, let the bars cool completely in the pan. Use the parchment paper to lift the bars out. Cut them into squares. Now they are ready to enjoy!
Tips & Tricks
Achieving the Perfect Texture
To get the best texture in your Red Velvet Cheesecake Bars, avoid overmixing. When you mix your batter, stop as soon as you see no dry flour. Overmixing can make your bars dense and tough.
Testing for doneness is also key. Look for a slight jiggle in the center. The edges should be set and a light golden. You can also check with a toothpick. Insert it in the center; if it comes out clean or with just a few crumbs, your bars are ready.
Serving Suggestions
How you serve these bars can change the whole experience. Chilled bars taste rich and creamy. Room temperature bars feel soft and buttery. Both ways are delicious!
Garnishing is fun! You can drizzle chocolate sauce on top. A sprinkle of cocoa powder adds a nice touch. Fresh berries on the side brighten the plate. Feel free to get creative with your presentation!
Pro Tips
- Use Room Temperature Ingredients: Allow your cream cheese and egg to come to room temperature before mixing. This helps achieve a smoother cheesecake layer without lumps.
- Don’t Overmix: When combining your batter, mix until just combined to keep the texture light and fluffy. Overmixing can lead to dense bars.
- Swirling Technique: For a beautiful marbled effect, use a knife or toothpick to gently swirl the red velvet batter into the cheesecake layer without mixing it completely.
- Cool Completely: Allow the bars to cool completely in the pan before cutting. This helps them firm up and makes slicing easier.
Variations
Flavor Variations
You can make red velvet cheesecake bars even more fun with extra flavors. Here are some ideas:
– Adding chocolate chips: Mix in semi-sweet or dark chocolate chips. This adds a rich taste and a delightful texture. Just fold in a cup of chips into your red velvet batter before baking.
– Infusing with different extracts: Try using almond extract instead of vanilla. Almond gives a sweet, nutty flavor that pairs well with the cream cheese. Just replace the vanilla with the same amount of almond extract.
Dietary Alternatives
You can still enjoy these cheesecake bars with some dietary changes. Here’s how to adapt:
– Gluten-free options: Swap all-purpose flour for a gluten-free blend. Many brands offer great alternatives that work well in baking. Just ensure it has a similar texture to regular flour.
– Vegan substitutions: For a vegan version, use plant-based butter and a flax egg. To make a flax egg, mix one tablespoon of ground flaxseed with three tablespoons of water. Let it sit for five minutes until it thickens. For cream cheese, use a store-bought vegan cream cheese.
Storage Info
Best Storage Practices
To keep your Red Velvet Cheesecake Bars fresh, store them in an airtight container. This method helps maintain their moisture and flavor. Place parchment paper between layers to prevent sticking. You can keep them at room temperature for a short time. If it’s warm, the fridge is best.
For longer storage, the fridge is great. Keep the bars in the container to protect them. Make sure the container is sealed well. This way, they stay tasty and fresh for you.
How Long Do They Last?
At room temperature, these bars last about two days. If you move them to the fridge, they can stay good for up to a week. Just remember to check for any signs of spoilage.
If you want to keep them longer, freezing is a good choice. Wrap each bar in plastic wrap, then place them in a freezer-safe bag or container. They can last up to three months in the freezer. When you want to enjoy them, just thaw them in the fridge overnight.
FAQs
Common Questions About Red Velvet Cheesecake Bars
Can I make these bars ahead of time?
Yes, you can make these bars a day or two ahead. Just store them in the fridge. This helps the flavors blend well.
What can I substitute for cream cheese?
If you need a substitute, you could use Greek yogurt or mascarpone cheese. Both create a creamy texture.
How do I know when the bars are done baking?
To check, look for a slight jiggle in the center. The edges should be set and a bit golden. A toothpick inserted should come out clean.
Can I use a different color instead of red food coloring?
Sure! You can use blue, yellow, or green food coloring. Just remember, the color will change the look but not the taste.
These Red Velvet Cheesecake Bars are easy to make and packed with flavor. We covered essential ingredients, step-by-step instructions, and helpful tips to ensure success. You can try different flavors or adapt them to fit your diet. Proper storage helps them last longer, keeping them fresh and tasty. Enjoy these bars warm or chilled, and feel free to experiment! I hope this guide inspires you to bake and share these delicious treats with family and friend


