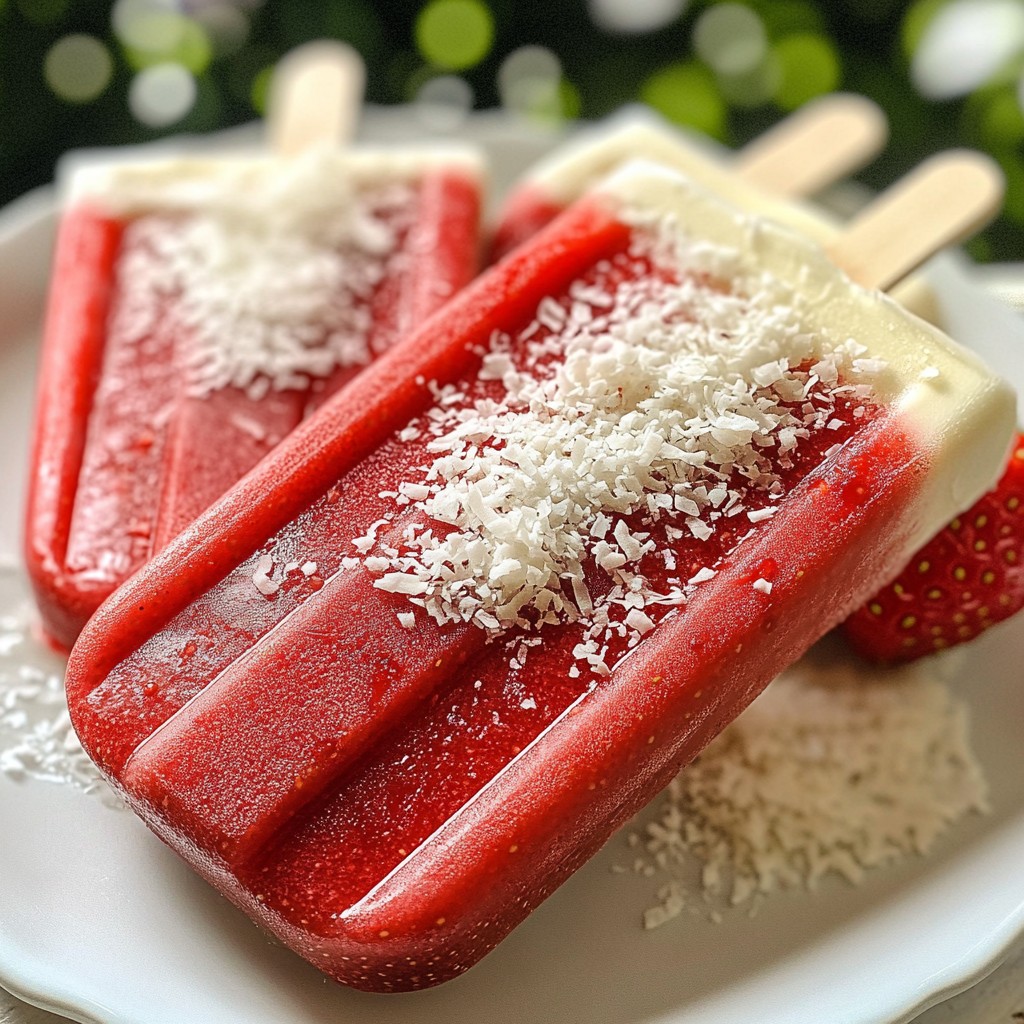
Craving a cool treat that’s both delicious and healthy? Strawberry Coconut Popsicles are your answer! These frozen delights mix fresh strawberries with creamy coconut milk for a refreshing twist. In this guide, I'll share my simple recipe, health benefits, and fun variations. You'll find tips to craft the perfect popsicle every time, making it easy to satisfy your sweet tooth or impress guests. Let's dive in and make something delightful!
Why I Love This Recipe
- Refreshing Flavor: The combination of strawberries and coconut creates a deliciously refreshing treat that is perfect for warm days.
- Easy to Make: This recipe requires minimal ingredients and only takes 15 minutes of prep time, making it a quick and simple dessert option.
- Customizable: You can easily adjust the sweetness and add layers of fruit or coconut for a fun twist, catering to your taste preferences.
- Healthy Treat: Made with fresh fruit and coconut milk, these popsicles are a healthier alternative to store-bought frozen treats.
Ingredients
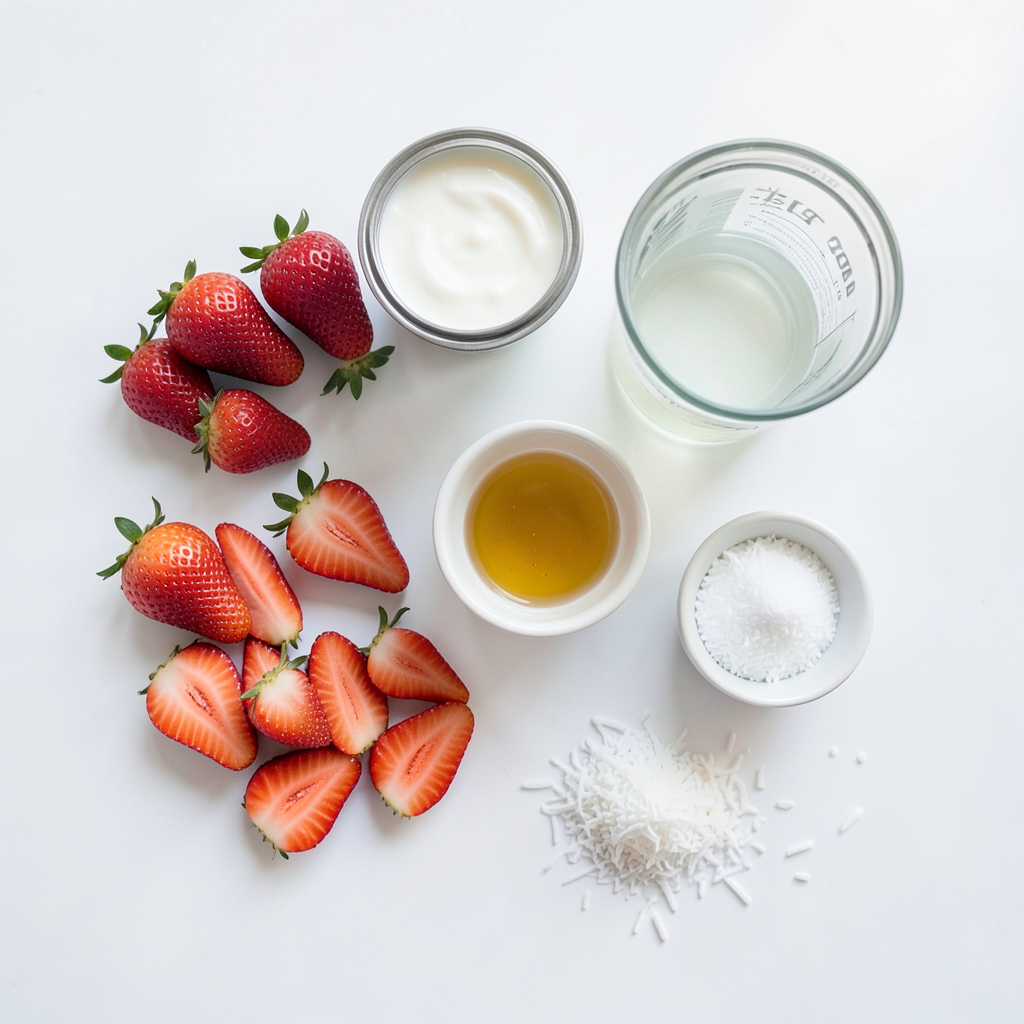
List of Ingredients
- 2 cups fresh strawberries, hulled and sliced
- 1 cup coconut milk (canned for creaminess)
- 1/2 cup coconut water
- 2 tablespoons honey or maple syrup
- 1 teaspoon vanilla extract
- Pinch of salt
- Optional: Shredded coconut for garnish
Ingredient Substitutions
You can swap coconut milk with almond milk or oat milk. These options work well. If you want a nut-free choice, use soy milk. For sweeteners, you can use agave syrup or stevia. Each option gives a unique flavor.
Health Benefits
These popsicles are not just tasty; they are good for you too. Strawberries are rich in vitamins and antioxidants. They help boost your immune system and improve heart health. Coconut milk provides healthy fats, which can support brain health. Coconut water is great for hydration, especially in hot weather. Enjoying these popsicles means you get a mix of fun and nutrition!
Step-by-Step Instructions
Preparation Steps
To make smooth popsicles, start with the blender. Add the sliced strawberries, coconut milk, coconut water, honey, vanilla extract, and a pinch of salt. Blend everything until it looks creamy. Stop blending when you see no big chunks of strawberries. If you want it sweeter, taste the mix. Add more honey or maple syrup if needed.
Next, fill your molds. Pour the blended mix into each mold until it is about 3/4 full. If you like, add sliced strawberries or shredded coconut between the layers. This adds fun texture and looks great.
Freezing Instructions
Now, it’s time to freeze the popsicles. Place the molds in the freezer for at least 4 to 6 hours. Make sure they freeze until solid. If you want the best results, leave them overnight. This ensures they set well.
Release Tips
When you’re ready to eat the popsicles, it's time to release them from the molds. To do this easily, run some warm water over the outside of the molds for a few seconds. Then, gently pull the popsicles out. This method works well without breaking your treats. Enjoy your cool strawberry coconut popsicles!
Tips & Tricks
Achieving the Best Texture
To make the best strawberry coconut popsicles, blend your ingredients well. A smooth mix ensures a creamy texture. Large chunks can make your popsicles icy and hard. After blending, taste the mixture. If it feels too thick, add a little more coconut water.
Layering is also a fun way to add texture. You can add sliced strawberries or shredded coconut between layers. This gives a nice surprise when you take a bite. It makes your popsicles look pretty too!
Enhancing Flavor
Sweetness is key to a great popsicle. Use honey or maple syrup, but taste your mix first. Add more if you want it sweeter. A bit of vanilla extract also boosts the flavor. It adds a lovely depth that makes your popsicles sing!
For a fun touch, consider garnishing. Shredded coconut on top adds a nice crunch. You could also use fresh strawberries on the side. This helps make your popsicles look even more inviting.
Serving Suggestions
When serving, think about how to make it pop! A wooden board is a great base. Arrange your popsicles neatly and sprinkle with shredded coconut. This gives a tropical vibe that looks great on sunny days. You can also place some fresh strawberries nearby for color.
Pair your popsicles with fresh fruit or yogurt. This makes for a fun dessert. You could even serve them at a party for a cool treat everyone will love! Enjoy the refreshing taste with friends or family.
Pro Tips
- Choose Ripe Strawberries: Select strawberries that are bright red and fragrant for the best flavor.
- Experiment with Sweeteners: Try different sweeteners like agave or coconut sugar to customize the taste to your preference.
- Layer for Texture: Adding layers of sliced strawberries or shredded coconut creates a beautiful presentation and enhances the texture.
- Quick Release Method: If the popsicles are stuck, run warm water over the molds for a few seconds to help them release easily.
Variations
Flavor Variations
You can get creative with flavors in your strawberry coconut popsicles. Here are some ideas:
- Adding other fruits: You can mix in blueberries or mangoes for a fun twist. These fruits add color and flavor. Just blend them with the strawberries for a fruity burst.
- Chocolate or nut butter options: For a richer taste, try adding cocoa powder or almond butter. These ingredients can make your popsicles feel more indulgent.
Vegan Options
If you want to make these popsicles vegan, here are some easy swaps:
- Substituting with plant-based sweeteners: Use agave syrup or date syrup instead of honey. These options keep the pops sweet without any animal products.
- Dairy-free alternatives to coconut milk: You can also use almond milk or oat milk. These choices still give you a creamy texture while keeping it vegan.
Seasonal Variations
Using fresh, seasonal fruits can add a delightful touch to your popsicles:
- Using seasonal fruits for freshness: In summer, add peach slices or raspberries. In fall, try apples or pears for a unique flavor.
- Holiday-themed popsicle ideas: For festive occasions, mix in peppermint extract or cinnamon. You can even layer red and green fruits for a fun holiday look.
Storage Info
How to Store
To keep your strawberry coconut popsicles fresh, store them in an airtight container. You can also wrap each popsicle in plastic wrap for extra protection. This helps to prevent ice crystals from forming. You should freeze them for at least 4-6 hours until they are solid. If you want popsicles for later, consider placing them in a freezer bag. Remove as much air as possible before sealing.
Shelf Life
Strawberry coconut popsicles can last up to two months in the freezer. After this time, they may lose their flavor and texture. Watch for signs of freezer burn, which looks like white patches on the popsicles. If you see this, it's best to toss them out. Spoiled popsicles will taste off and may have an unpleasant texture.
Reviving Frozen Popsicles
If your popsicles feel too hard or icy, you can revive them. Let them sit at room temperature for a few minutes before serving. This helps soften them up. If they have lost their texture, try blending them into a smoothie. You can slowly defrost them in the fridge for a few hours, but never use a microwave. This keeps them safe and tasty.
FAQs
Common Questions
How to make strawberry coconut popsicles without molds? You can use small cups or ice cube trays. Pour the mixture into them. Insert sticks when the mixture is a bit firm.
Can I use frozen strawberries? Yes, frozen strawberries work well. They may make the popsicles creamier. Just blend them straight from the freezer.
How do I adjust the sweetness to my preference? Start with the suggested amount of honey or maple syrup. Taste the mixture. Add more if you like it sweeter.
Special Dietary Needs
Are these popsicles gluten-free? Yes, these popsicles are naturally gluten-free. They use fresh fruits and coconut milk.
Tips for making them nut-free. This recipe is already nut-free. Ensure no nut-based sweeteners are used. Stick with honey or maple syrup.
Kids and Popsicles
Age recommendations for homemade popsicles These popsicles are safe for kids over 2 years old. Always supervise younger kids while enjoying them.
Ideas for engaging kids in the making process Let kids help wash and slice strawberries. They can also pour the mixture into the molds. This makes it fun and interactive!
You now have a quick and easy recipe for delicious strawberry coconut popsicles. We've covered the key ingredients, healthy benefits, and simple preparation steps. You can swap out ingredients to suit your taste. Don't forget the fun variations and tips for perfect storage. Enjoy these fresh treats with family and friends. Making popsicles is not just tasty; it’s a fun activity too. Try adding your favorite fruits or flavors. Enjoy creating your own unique versions!