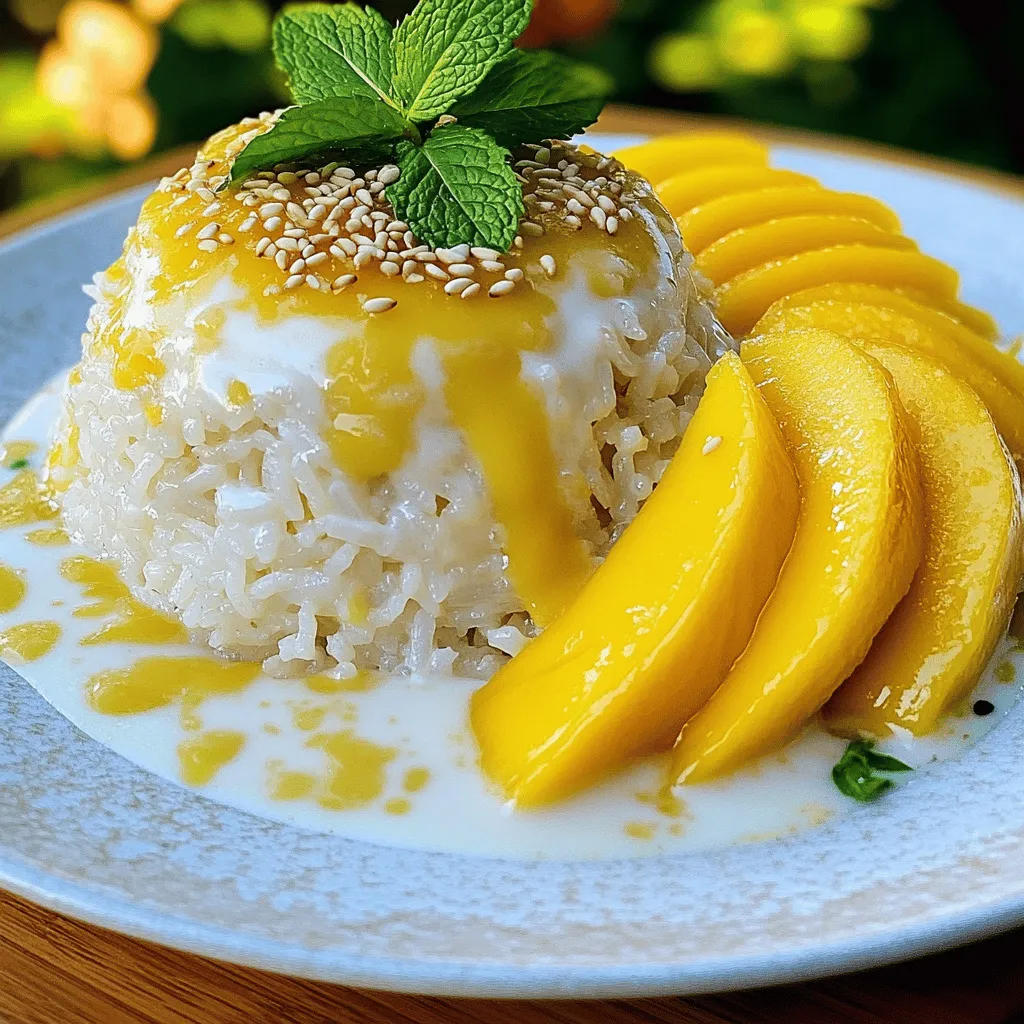
Thai Mango Sticky Rice is a sweet dream come true! This treat combines soft, glutinous rice with fresh, juicy mango and rich coconut sauce. In this post, I’ll share my simple recipe and guide you through each step. Whether you’re a pro cook or just starting, this dessert will impress your friends and family. Let’s make this delightful dish together—your taste buds will thank you!
Why I Love This Recipe
- Deliciously Sweet and Creamy: The combination of ripe mangoes and rich coconut sauce creates a heavenly flavor that is irresistible.
- Perfectly Textured Rice: The glutinous rice is steamed to perfection, making it delightfully sticky and satisfying to eat.
- Beautiful Presentation: With the vibrant colors of mango and garnishes of sesame seeds and mint, this dish is as pleasing to the eye as it is to the palate.
- Easy to Make: Despite its exotic flavor, this recipe is simple to prepare and perfect for both special occasions and everyday enjoyment.
Ingredients
Main Ingredients for Thai Mango Sticky Rice
To make this dish, you need a few key items:
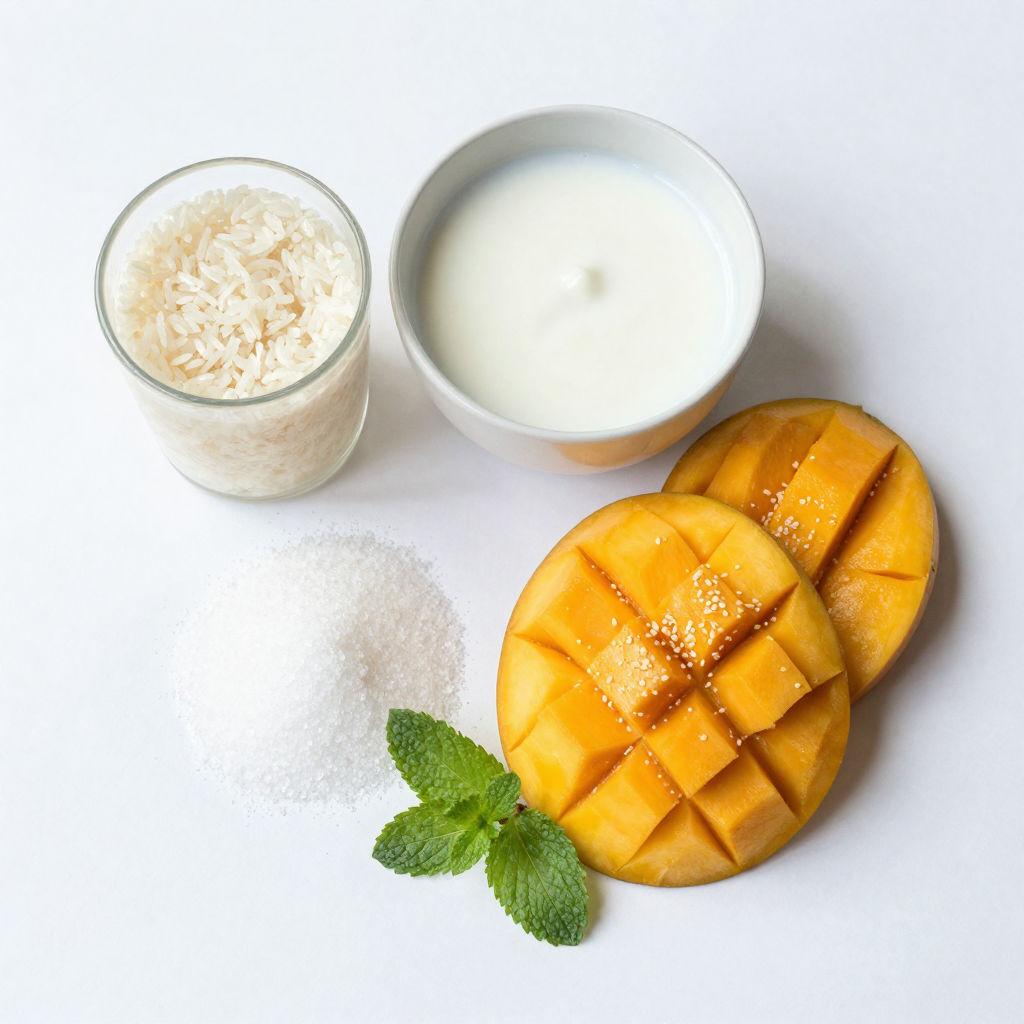
– 1 cup glutinous rice (also called sticky rice)
– 1 1/2 cups coconut milk
– 1/2 cup sugar
– 1/4 teaspoon salt
– 2 ripe mangoes, peeled and sliced
These ingredients come together to create a tasty treat that is both sweet and rich.
Optional Garnishes
You can enhance your dish with these fun extras:
– 1 tablespoon sesame seeds (for garnish)
– Fresh mint leaves (for garnish)
These garnishes add a nice touch and make the dish look pretty.
Equipment Needed
To prepare Thai mango sticky rice, gather these tools:
– A bowl for soaking the rice
– A steamer lined with cheesecloth or a clean kitchen towel
– A saucepan for the coconut sauce
– A serving plate
Having the right tools makes cooking easier and more fun!
Step-by-Step Instructions
Preparing the Glutinous Rice
To begin, rinse the glutinous rice under cold water. Keep rinsing until the water runs clear. This step removes excess starch. After rinsing, soak the rice in water for at least four hours. If you can, soak it overnight for the best results.
Next, drain the soaked rice. Place it in a steamer lined with cheesecloth or a clean kitchen towel. Steam the rice for 30 to 40 minutes. You want it to be translucent and tender.
Making the Coconut Sauce
While the rice cooks, let’s make the coconut sauce. In a saucepan, mix the coconut milk, sugar, and salt. Heat this mixture over medium heat. Stir it until the sugar dissolves completely.
Once mixed, set aside about 1/4 cup of this sauce. You will use it to drizzle later.
Combining and Serving
When the rice is ready, transfer it to a bowl. Pour the remaining coconut sauce over the rice. Mix it well to coat every grain. Let it sit for 15 to 20 minutes. This allows the rice to absorb all the flavors.
To serve, take a mound of sticky rice and place it on a plate. Arrange sliced mangoes beside it. Drizzle the reserved coconut sauce on top. Finish by sprinkling sesame seeds for added texture. You can also add fresh mint leaves for a burst of color and aroma. Enjoy this delightful dish!
Pro Tips
- Soaking the Rice: For best results, soak the glutinous rice overnight. This helps achieve the perfect texture and stickiness.
- Coconut Milk Quality: Use high-quality coconut milk for a richer flavor. Avoid brands with additives for a more authentic taste.
- Mango Selection: Choose ripe, sweet mangoes for the best contrast with the creamy sticky rice. Look for mangoes that yield slightly to pressure.
- Presentation Tips: For a beautiful presentation, use a ring mold to shape the sticky rice on the plate before adding mango slices and sauce.
Tips & Tricks
Perfecting the Sticky Rice Texture
To get the right texture for your sticky rice, choose glutinous rice. Rinse it well until the water is clear. Soaking is key. Aim for at least four hours, or even overnight. This helps the grains absorb water. When you steam the rice, it should become soft and sticky. If it seems dry, it may need more soaking time.
Serving Suggestions and Pairings
This dish shines as a dessert, but you can serve it in many ways. Pair it with fresh fruits like bananas or dragon fruit for a colorful twist. You can also add a sprinkle of toasted coconut or nuts for crunch. A scoop of vanilla ice cream makes a great addition too. The mix of warm rice and cold ice cream is delightful.
How to Choose the Best Mangoes
Selecting ripe mangoes is important for your dish. Look for mangoes that feel slightly soft when you press them. The skin should have a bit of a sheen. Mangoes should smell sweet at the stem end. Common varieties are Ataulfo or Haden, both great for this recipe. Avoid mangoes with blemishes or wrinkles, as they may be overripe.
Variations
Vegan Version of Thai Mango Sticky Rice
You can easily make a vegan version of Thai mango sticky rice. Just stick to the basic recipe. The main ingredients—sticky rice, coconut milk, sugar, and mango—are already vegan. Use pure cane sugar, which is vegan-friendly. This way, everyone can enjoy the sweet, creamy delight!
Alternative Toppings and Add-ins
Feel free to get creative with toppings! Instead of sesame seeds, try shredded coconut for added texture. You can also use crushed peanuts for a nice crunch. Some people like to drizzle a bit of honey or maple syrup on top for extra sweetness. Fresh lime juice can add a zesty kick that brightens the dish.
Regional Variations of Mango Sticky Rice
Mango sticky rice varies by region in Thailand. In some areas, they use black sticky rice, giving it a unique flavor and color. In other regions, you might find toppings like mung beans or even taro. Each variation brings its own twist while keeping the main ingredients intact. This dish is adaptable, so you can explore these regional flavors in your kitchen!
Storage Info
How to Store Leftovers
To keep your Thai mango sticky rice fresh, store it in an airtight container. Make sure it cools down to room temperature first. Your rice can last for about 2-3 days in the fridge. If you notice any moisture, wipe it out with a paper towel before sealing. This helps keep it from becoming mushy.
Reheating Tips
When you’re ready to enjoy your leftovers, reheating is simple. You can use the microwave or stovetop. For the microwave, place the rice in a bowl and cover it with a damp paper towel. Heat in short bursts, stirring in between. This will help keep the rice moist. On the stovetop, add a splash of coconut milk and heat over low heat, stirring gently.
Freezing Mango Sticky Rice
If you want to keep it longer, freezing is a great option. First, let the rice cool completely. Then, portion it out into freezer-safe bags or containers. Squeeze out any air before sealing. Thai mango sticky rice can be frozen for up to a month. To enjoy later, thaw it in the fridge overnight before reheating.
FAQs
What is the best type of rice for Mango Sticky Rice?
The best rice for mango sticky rice is glutinous rice. Glutinous rice is often called sticky rice. It has a high starch content, which gives it a unique texture. This rice becomes soft and chewy when cooked. You can find it in Asian grocery stores or online. Make sure to soak it for at least four hours for the best results.
Can I use canned coconut milk?
Yes, you can use canned coconut milk. Canned coconut milk gives a rich and creamy flavor. Choose a brand that has no additives for the best taste. Look for full-fat coconut milk for a thicker sauce. Just heat it gently with sugar and salt as per the recipe. This will help create a smooth and tasty sauce for your mango sticky rice.
How long does Thai Mango Sticky Rice last?
Thai mango sticky rice lasts for about two days in the fridge. Store it in an airtight container to keep it fresh. If you have leftover coconut sauce, keep it separate. You can reheat the rice in the microwave to enjoy it later. The flavors will still be delicious, but the texture may change slightly.
Is Mango Sticky Rice gluten-free?
Yes, mango sticky rice is gluten-free. It contains no wheat or gluten ingredients. The main ingredients are glutinous rice, coconut milk, sugar, and mango. This makes it a great dessert for those with gluten sensitivities. Enjoy this sweet treat without worry!
Thai mango sticky rice is a delightful treat. We explored its main ingredients, optional garnishes, and necessary equipment. I shared easy steps for preparing the rice and making coconut sauce. You learned tips for perfect texture and serving ideas. Variations include vegan options and regional twists. Proper storage ensures you enjoy leftovers.
In closing, this dish is fun and simple to make. It brings joy to any meal. Try it today!


