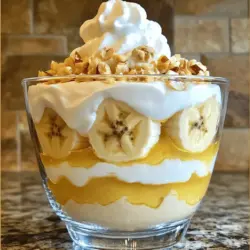
Go Back
To create this creamy delight, gather these simple ingredients: - 4 ripe bananas, sliced - 1 cup granulated sugar - 1/3 cup all-purpose flour - 1/4 teaspoon salt - 2 3/4 cups whole milk - 3 large egg yolks - 1 teaspoon vanilla extract - 1 tablespoon butter - 1 box (11 oz) vanilla wafer cookies - Whipped cream (for topping) - Crushed walnuts or pecans (for garnish, optional) Start by whisking the sugar, flour, and salt in a medium saucepan. Mix until combined. Slowly add the whole milk to avoid lumps. Cook this mixture over medium heat. Stir constantly until it thickens and bubbles, which takes about 8-10 minutes. While this cooks, whisk the egg yolks in a separate bowl. Once the milk mixture thickens, add a little of it to the egg yolks. This step is called tempering. Then, pour the egg yolk mix back into the saucepan. Cook for 2-3 more minutes while stirring. Remove from heat and add the vanilla extract and butter. Stir until smooth. The entire prep time takes about 25 minutes. After that, you need to chill the banana pudding for at least 4 hours. For the best taste, let it chill overnight. This allows the flavors to blend. You’ll want to serve this dessert cold. Enjoy each creamy bite! Don't forget to check out the Full Recipe for more details. To make the best banana pudding, start with the custard. Here’s how: 1. In a medium saucepan, mix the sugar, flour, and salt well. 2. Slowly add the whole milk while whisking to avoid lumps. 3. Place the saucepan over medium heat. Stir constantly for about 8-10 minutes. 4. Once it thickens and bubbles, remove it from the heat. 5. In a bowl, whisk the egg yolks until smooth. 6. Take a small amount of the hot milk mixture and add it to the yolks. This warms them up. 7. Now, pour the yolk mixture back into the saucepan. Cook for another 2-3 minutes. 8. Stir in the vanilla extract and butter until smooth. Now, it’s time to layer the pudding. This is where it gets fun! 1. Grab a large serving dish or small cups for individual servings. 2. Start with a layer of vanilla wafer cookies at the bottom. 3. Next, add a layer of sliced bananas on top. 4. Pour a layer of the custard mixture over the bananas. 5. Repeat these layers: wafers, bananas, custard. 6. Finish with a final layer of custard on top. Let’s get ready to dig in! 1. Cover the dish with plastic wrap. Chill it in the refrigerator for at least 4 hours. Overnight is even better! 2. Before serving, add a generous layer of whipped cream on top. 3. If you like, sprinkle crushed walnuts or pecans for a nice crunch. Follow this method, and you’ll have a creamy delight that everyone will love! For the full recipe, check the earlier section. Enjoy your cooking! To make the best banana pudding, avoid these common mistakes: - Using overripe bananas: They may be too mushy. Aim for ripe but firm bananas. - Not chilling long enough: Letting it chill for at least four hours helps the flavors meld. - Skipping the vanilla extract: This adds depth. Don't leave it out! - Not layering properly: Start with wafers, then bananas, then custard. Repeat to keep layers even. To elevate your banana pudding, try these tips: - Use fresh ingredients: Fresh milk and eggs improve taste and texture. - Mix in spices: A pinch of cinnamon or nutmeg can add warmth. - Add a splash of lemon juice: It brightens the flavor and helps keep bananas from browning. - Consider different cookies: Try ginger snaps or chocolate wafers for a twist. Want to switch up your toppings? Here are some ideas: - Coconut whipped cream: It adds a tropical flair. - Toasted coconut flakes: Sprinkle them on top for added crunch. - Chocolate shavings: They give a rich touch. - Fresh fruit: Add strawberries or blueberries for color and flavor. These tips help create a creamy delight. For the Full Recipe, refer back to the earlier section. Enjoy making your banana pudding! {{image_2}} Banana pudding is a classic treat, but there are ways to change it up. Here are some fun twists you can try. If you need a gluten-free option, swap the vanilla wafers. Use gluten-free cookies instead. Look for brands that mimic the taste of vanilla wafers. You can also make your own gluten-free cookies at home. This way, you keep the same creamy texture and flavor without gluten. To make a vegan version, replace milk with almond or coconut milk. Use cornstarch in place of eggs to thicken the pudding. You can also add maple syrup for sweetness. Instead of butter, use a plant-based spread. For a topping, choose coconut whipped cream. It gives a nice flavor and keeps it vegan. Want to spice up your pudding? Add flavors like chocolate or coconut. For chocolate, mix cocoa powder into the custard. You can also use chocolate wafers instead of vanilla ones. For a coconut twist, add shredded coconut to the layers. You can even use coconut milk instead of regular milk. These flavors create a fun new dessert that keeps the same creamy base. These variations let you enjoy banana pudding in new ways. Each one stays true to the creamy delight of the original recipe. For the full recipe, check out the Heavenly Banana Pudding section. To keep your banana pudding fresh, store it in the fridge. Use a covered container to keep it safe from other odors. Make sure it stays chilled at all times. The dessert tastes best within 2-3 days after making it. However, the bananas may brown. To slow this, place plastic wrap directly on the surface of the pudding. This will help keep air out. If your banana pudding has sat for a day or two, it may need a little love. The layers might not look as fresh. You can fix this by gently stirring the top layer. Add a dollop of whipped cream to add freshness. If it seems dry, drizzle a bit of milk over the top. This will help bring back some creaminess. You can freeze banana pudding, but with caution. The texture changes when thawed. For freezing, prepare the pudding but skip adding bananas. Layer the pudding in a freezer-safe container and cover tightly. When you’re ready to enjoy it, thaw it in the fridge overnight. Add fresh bananas just before serving for the best taste. For the full recipe, check out the Heavenly Banana Pudding. The best bananas for pudding are ripe ones. Look for bananas that are yellow with some brown spots. These bananas provide the best flavor and creaminess. Avoid green or overly brown bananas. They can taste starchy or mushy. Ripe bananas blend well into the smooth custard. Their sweetness enhances the overall taste of your banana pudding. Banana pudding can last about three to four days in the fridge. Make sure to keep it covered to avoid drying out. The bananas may start to brown after a day or two. Still, the pudding will stay good to eat. If you see browning, it's a sign to enjoy it soon. Always trust your senses; if it smells or looks off, it’s best to discard it. Yes, you can make banana pudding ahead of time. It actually tastes better after chilling for a few hours or overnight. This allows the flavors to mix well and the pudding to set up nicely. Just layer the ingredients as directed and refrigerate. Before serving, add the whipped cream on top for freshness. This makes it a great dessert for gatherings or busy days. For the full recipe, check out the Heavenly Banana Pudding section! This blog post shared a simple and tasty banana pudding recipe. You learned how to prepare, layer, and serve it perfectly. I also gave tips to avoid common mistakes and enhance flavor. Plus, I covered gluten-free, vegan options, and creative variations. In the end, homemade banana pudding is fun and easy. You can enjoy it yourself or share with friends. Make it your own and savor every bite!

- Best Banana Pudding

Indulge in the ultimate sweet treat with this best banana pudding recipe that's as easy to make as it is delicious! This creamy delight features layers of fresh bananas, rich custard, and vanilla wafer cookies, creating a dessert that's perfect for any occasion. Follow the simple steps and tips for the best flavor, and be ready for compliments. Click through to discover the full recipe and elevate your dessert game today!

Ingredients
  

4 ripe bananas, sliced

1 cup granulated sugar

1/3 cup all-purpose flour

1/4 teaspoon salt

2 3/4 cups whole milk

3 large egg yolks

1 teaspoon vanilla extract

1 tablespoon butter

1 box (11 oz) vanilla wafer cookies

Whipped cream (for topping)

Crushed walnuts or pecans (for garnish, optional)

Instructions
 

In a medium saucepan, whisk together the sugar, flour, and salt until well combined.

    Gradually whisk in the whole milk, ensuring there are no lumps.

      Cook the mixture over medium heat, stirring constantly until it begins to thicken and bubble, about 8-10 minutes.

        In a separate bowl, whisk the egg yolks. Once the milk mixture is thick, gradually whisk a small amount of it into the egg yolks to temper them.

          Pour the tempered egg yolk mixture back into the saucepan and cook for an additional 2-3 minutes, stirring constantly.

            Remove the saucepan from the heat and stir in the vanilla extract and butter until melted and smooth.

              In a large serving dish or individual cups, layer the vanilla wafers, sliced bananas, and the custard mixture, starting with waivers at the bottom and finishing with custard on top.

                Repeat the layers until all ingredients are used, making sure to end with a layer of custard.

                  Cover with plastic wrap and refrigerate for at least 4 hours, or overnight for best results.

                    Before serving, top with whipped cream and sprinkle with crushed walnuts or pecans for an added crunch (if desired).

                      Prep Time, Total Time, Servings: 25 minutes | 4 hours (chilling) | Serves 8-10