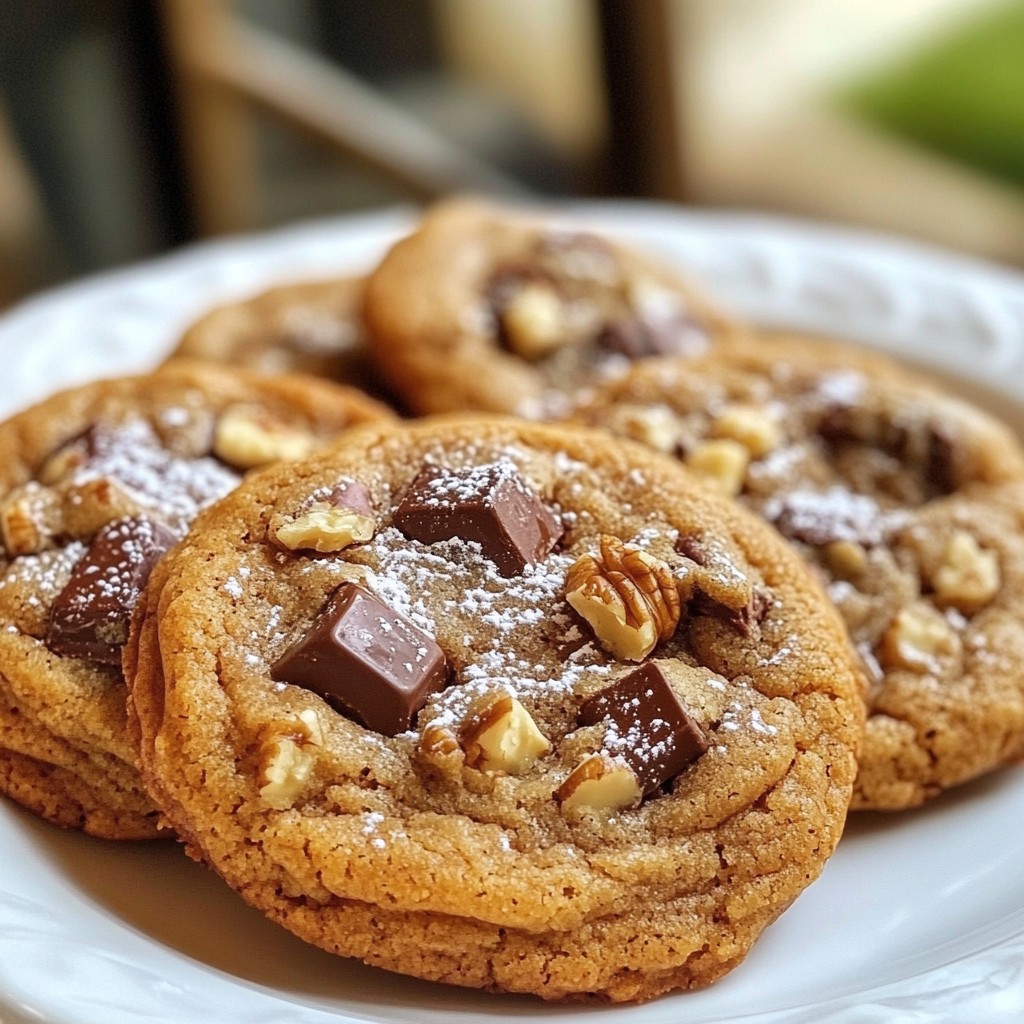
Imagine biting into a warm, gooey chocolate chunk cookie that melts in your mouth. Now add the rich, nutty flavor of brown butter, and you have a treat that’s hard to resist. In this guide, I’ll walk you through each step of creating these delightful cookies, from the perfect ingredients to baking tips. Let’s make your kitchen the go-to spot for delicious brown butter chocolate chunk cookies!
Why I Love This Recipe
- Rich Flavor: The brown butter adds a depth of flavor that elevates these cookies from ordinary to extraordinary.
- Textural Delight: With gooey chocolate chunks and optional crunchy nuts, each bite offers a delightful contrast in textures.
- Quick and Easy: This recipe comes together in just 30 minutes, making it perfect for last-minute cravings or gatherings.
- Versatile Treat: Customize with different types of chocolate or nuts to suit your personal taste preferences!
Ingredients
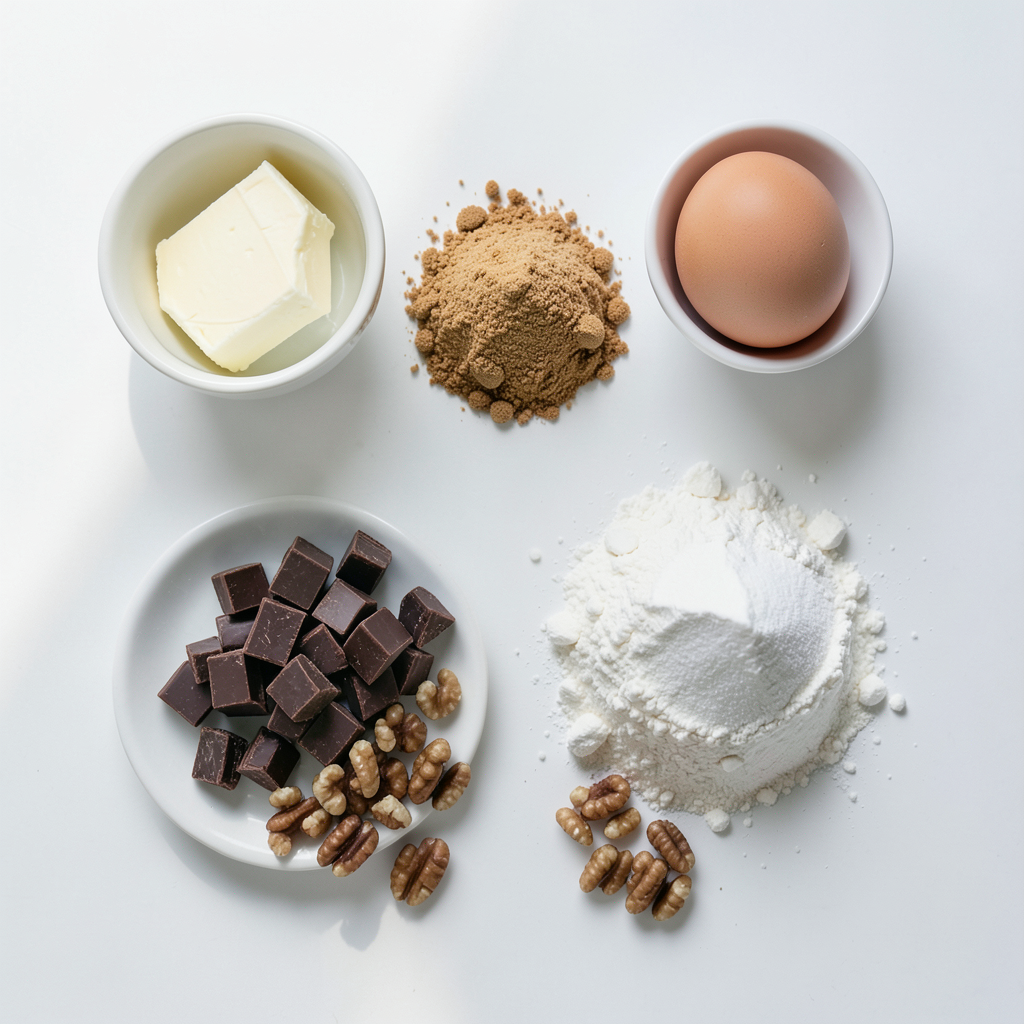
To make Brown Butter Chocolate Chunk Cookies, you need a few basic ingredients. Each one plays a key role in creating that rich and delicious flavor. Here’s what you’ll need:
- 1 cup unsalted butter
- 1 cup brown sugar, packed
- 1/2 cup granulated sugar
- 2 large eggs
- 1 teaspoon pure vanilla extract
- 2 1/4 cups all-purpose flour
- 1 teaspoon baking soda
- 1/2 teaspoon salt
- 1 cup dark chocolate chunks (or semi-sweet if preferred)
- 1/2 cup chopped walnuts or pecans (optional)
Each ingredient adds something special. The unsalted butter gives creaminess. The brown sugar adds deep flavor. Eggs help bind everything and make it fluffy. The flour, baking soda, and salt create the perfect dough base. Finally, chocolate chunks bring in bursts of sweetness. If you like, toss in some nuts for extra crunch. It's all about balancing flavors and textures to craft these delightful treats!
Step-by-Step Instructions
Browning the Butter
To make brown butter, start with unsalted butter in a medium saucepan. Heat it on medium. Swirl the pan gently as it melts. Watch the butter change from yellow to golden brown. This process takes about 5 to 7 minutes. The nutty aroma tells you it’s ready. Remember, don’t walk away! Burning can happen fast. Once browned, remove it from heat and let it cool slightly. This will help your cookies taste rich and nutty.
Mixing the Ingredients
In a large bowl, mix the browned butter with brown sugar and granulated sugar. Use a whisk to blend them until smooth. Add the eggs one at a time, mixing well each time. Then stir in the vanilla extract for extra flavor. In another bowl, whisk together the flour, baking soda, and salt. Gradually add these dry ingredients to the wet mix. Stir just until combined; don’t overmix! Finally, fold in the dark chocolate chunks and nuts if you like. This gives a tasty surprise in every bite.
Baking the Cookies
Preheat your oven to 350°F (175°C). Line a baking sheet with parchment paper for easy cleanup. Scoop tablespoons of dough onto the sheet, spacing them 2 inches apart. Bake for 10 to 12 minutes. The edges should be lightly golden, while the centers stay soft. To check, gently press the cookie center. It should spring back slightly. Once done, let the cookies cool on the baking sheet for 5 minutes. Then transfer them to a wire rack to cool completely. Enjoy the delightful smell as they cool!
Tips & Tricks
Achieving the Perfect Cookie Texture
To make the best brown butter chocolate chunk cookies, you need to think about texture. Do you like chewy or crunchy cookies? Each type needs a different approach. For chewy cookies, use more brown sugar and bake them a little less. If you want crunch, add more granulated sugar and bake them a bit longer.
The temperature of your ingredients matters a lot. Use room-temperature eggs and butter for a smooth mix. Cold ingredients may cause your dough to become too stiff, leading to uneven baking.
Flavor Enhancements
You can make these cookies even more special with extra flavors. Try adding a pinch of cinnamon or a dash of sea salt on top. Both can boost the taste.
Choosing high-quality chocolate also makes a big difference. Dark chocolate chunks give a rich flavor. If you prefer sweeter cookies, semi-sweet chocolate works well too. Look for chocolate with at least 60% cocoa for the best results.
Feel free to get creative! Try adding nuts or dried fruit for added texture and flavor. Your cookies will be a delight with these simple tips.
Pro Tips
- Browning Butter: Ensure you watch the butter closely as it can go from browned to burnt quickly. The nutty aroma is key to perfect flavor.
- Chilling the Dough: For thicker cookies, consider chilling the dough for at least 30 minutes. This helps prevent spreading while baking.
- Chocolate Quality: Using high-quality chocolate chunks will significantly enhance the flavor of your cookies. Opt for a brand you love!
- Storing Cookies: Store your cookies in an airtight container at room temperature to maintain their softness and freshness for up to a week.
Variations
Dietary Modifications
You can easily make these cookies fit your diet. If you need a gluten-free option, swap out all-purpose flour for a gluten-free blend. Many brands work well, so pick one you like.
For a vegan version, use 1/4 cup of unsweetened applesauce for each egg. Replace the unsalted butter with vegan butter. This keeps the cookies soft and tasty.
Flavor Variations
Want to switch things up? Try adding mix-ins. You can toss in dried fruits like cranberries or apricots for a sweet twist. If you love nuts, walnuts or pecans add a nice crunch.
You can also experiment with different types of chocolate. Try using milk chocolate chunks for a sweeter taste or white chocolate for a creamy surprise. Mixing dark and milk chocolate creates a rich flavor blend. Enjoy these tasty options!
Storage Info
Best Storage Practices
To keep your brown butter chocolate chunk cookies fresh, store them in an airtight container. This helps maintain their soft texture and rich flavor. I recommend using a glass or plastic container. You can also use a resealable bag if you remove as much air as possible.
Keep your cookies at room temperature. Avoid placing them in the fridge, as this can make them dry and hard. If you want to keep them longer, you can freeze them.
Freezing Cookies
You can freeze both unbaked and baked cookies. For unbaked cookies, scoop the dough onto a baking sheet. Freeze until firm, then transfer the dough balls into a freezer bag. They will stay fresh for up to three months.
For baked cookies, let them cool completely. Then, place them in a single layer in a freezer-safe container. You can stack them with parchment paper in between layers.
When you’re ready to enjoy them, thaw the cookies at room temperature for about 30 minutes. For a warm treat, pop baked cookies in the oven at 350°F (175°C) for a few minutes. Enjoy your delightful cookies fresh and warm!
FAQs
Common Questions About Brown Butter Chocolate Chunk Cookies
How long do brown butter chocolate chunk cookies last? Brown butter chocolate chunk cookies stay fresh for about one week. Store them in an airtight container at room temperature. For longer storage, you can freeze them. They will taste great even after a month in the freezer.
Can I make the dough ahead of time? Yes, you can make the dough ahead of time. Chill the dough in the fridge for up to 72 hours. This helps the flavors to meld. When you're ready, just scoop and bake the cookies. If you want to freeze it, shape the dough into balls and freeze them. Bake directly from the freezer, adding a few extra minutes to the time.
What should I do if my cookies are too flat? If your cookies are too flat, it can be due to a few reasons. Make sure your butter is not too warm. Cold butter helps cookies hold their shape. Check that you used the right amount of flour. If the dough is too soft, add a bit more flour. Lastly, try chilling the dough before baking. This will help the cookies rise nicely.
This blog post covered how to make delicious brown butter chocolate chunk cookies. We discussed ingredients, step-by-step instructions, and helpful tips. You learned to brown butter, mix ingredients, and bake cookies perfectly. We also explored dietary options and flavor variations to suit your needs. Store your cookies properly to keep them fresh, and refer to the FAQs for common questions. Enjoy your baking journey! Perfect cookies are just a few steps away.


